#wig styling
Here’s the first part of my “How I Made That” series on my dwarf wig (For my upcoming Dis costume)
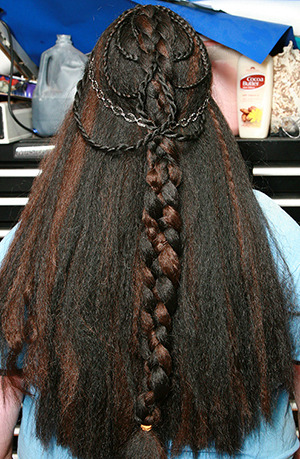
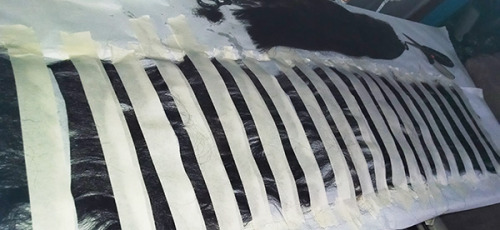
This discusses how I made a ton of wefts quickly and easily, using silicone caulking and braid hair.
http://www.celebrationgeneration.com/blog/2015/01/26/how-i-made-that-dwarf-wig-part-1-making-wefts/
Post link
Noct! I used an Inigo in Blue Grey from Arda Wigs to style into this Noctis wig. It would be easier to trim a Jaguar or a Magnum Long for this. But at the time I purchased the base wig, the other wigs were on backorder. This is seriously the perfect color for our prince though. I had the chance to see the Arda team who went above and beyond to develop this special color blend, through many trials and errors, now this is here. ❤
Post link
Throwback Thursday styling tips! Since I wasn’t feeling well and missed the chance to upload this week’s Wednesday Wig Hack, a friend of mine suggested that it would be a cool idea to talk about some wigs I have styled in the past.
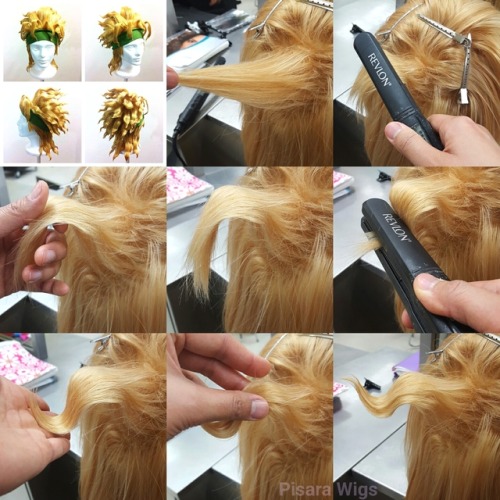
I have gotten questions about how to style “wavy spikes” like I did for my Dio (Jojo’s Bizarre Adventure) wig so here is a little demo. You can also use this technique for characters like Nagito Komaeda (Dangan Ronpa), or Lancer / Diarmuid (Fate/Zero). :)
- First, you want to make your spike. Follow countless of spiking tutorials online for this step. :P Don’t apply too much hair product though because we will use heat on it so it still needs to be sort of soft and flexible
- Use a flat iron, with the medium heat setting (I used 380 F for this), grab the spike where you want the wave to start. Bend you wrist so that the spike point downwards. Keep in mind, for this kind of wavy spikes, the pattern of wave will be down>up>down
- Let go of the flat iron after a few seconds and immediately use your fingers to catch the spike to hold its shape until it cools down. (Use gloves if you’re sensitive to heat. My hands can’t feel a thing because I’m used to heat tools)
- Go at it with the flat iron again! Grab the spike a good distance from the first wave, around 1 inch and a half for me. Then flip your wrist so that the spike points upwards
- After a few seconds, let go of the flat iron and catch the spike with your hand again. If you want extreme curve near the tip, you can push the spike in towards the wig. Once it cools down, it should hold the shape
- Now you can go in and “puff” up the spike by squeezing the sides. I use Got2B spiking glue on my fingers to lightly coat the spike throughout
- Touch up the tip by adding another wave with the same steps as before. Use Got2B spray to seal the style. And you’re done! (Just kidding you have to do like 30 other spikes. Good luck )
Base wig used for tutorial: Malinda in pale blonde from Arda Wigs
Base wig used for Dio: Magnum Long in light blonde from Arda Wigs
Post link
Wig Hack Wednesday #4 !
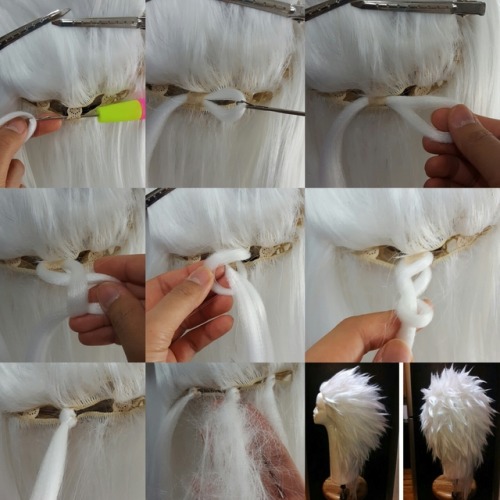
Today I wanna introduce a no-sew-no-glue method to add volume to your wig with a jumbo braid (or braiding hair). Using this method will save you time and money because you’ll be getting more bang for your buck! Jumbo braids are pretty cheap and can range from around $2-$8 depend on quality of the hair fiber. Usually, they are used to add thickness to braid hairstyles, but you can use it for any “big-hair” hairstyle, really. Be careful when using hair dryer or heat tools with jumbo braids because they cannot stand as much heat-styling as other wig fibers. For this tutorial, I’m using a jumbo braid in marshmallow from Arda Wigs.
- Untie the end of the jumbo braid. Separate and cut a small piece of weft from it. Keep in mind that you’ll need the piece to be double of the length you would want for the final product because you will be folding the piece in half.
- Use a latch crochet hook to go under the elastic band of the wig and grab the folded hair
- Bring the hook back through the same hole, making sure the latch closes before you pull it through the hole
- Grab the hair with your fingers, twist it once and hold
- Bring the hair from the hanging side and pull it through the twisted loop without tightening the loop
- Bring the loop to the opposite side and twist it again
- Pull the hair from the hanging side through the loop again
- Pull and tighten the knot so it’s as small as possible
- Keep adding more hair to the other elastics and different sections of the wig. You can tease it for more volume!
I used this method to make a Sage Madara (Naruto) wig and it produced great result with high volume but still very light-weight. I hope this helps you create cool wigs with super volume at low cost (looking at Steven Universe people…lol )
Post link
Wig Hacks Wednesday #3 !
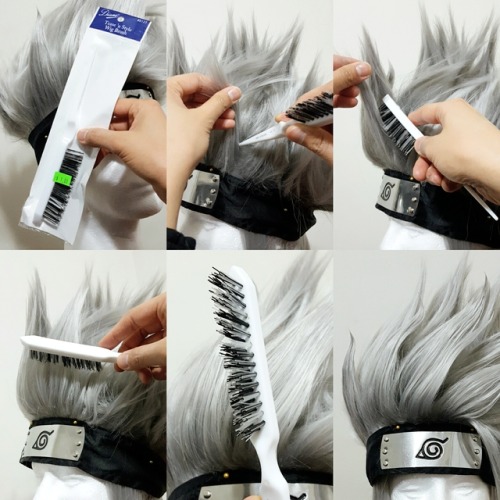
Today I wanna highlight on one of my favorite tools for spiking. This teasing brush cost me only $1 from a local beauty store. It has made my life much easier when it comes to teasing and getting that extra volume in wigs. You could buy it online for a bit more, look up “Diane Teasing Brush”.
This brush is very versatile. Use the tail to pick out hair and section off the spikes. Use the brush part to tease the hair starting from the roots and up (I like to go in at an angle). Then use the brush part again to lightly smooth the outter layer of the spike.
There are many different teasing combs/brushes in the market. But from my experience, this brush works SO WELL and is affordable. I like that its bristles are synthethic, flexible, but sturdy enough. Give it a try and you’ll be able to spike wigs much easier. :)
Wig in pic is Jareth in light grey from Arda Wigs.
Post link
EDIT: Alternatively, you can use velcro or snap buttons for this method, if you are not comfortable with using magnets on a headwear. The main idea of this tutorial is to introduce making 2 parts of the wig be detachable and exchangable. I used magnets because it was what I had at home at the time.
Wig Hacks Wednesday #2 !
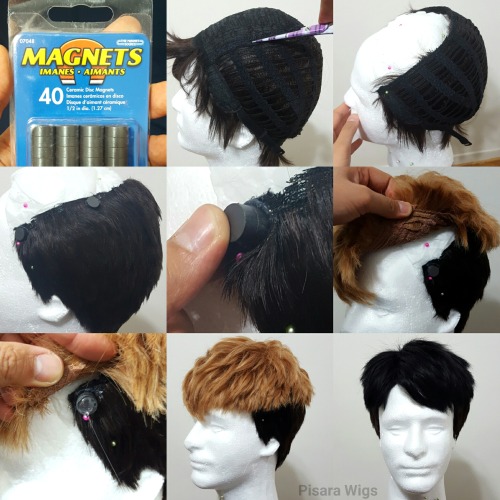
Have 10 upcoming cosplays and all of them have undercut hairstyle? Fear not! You can make the most out of your undercut wig, and re-use them for all your undercut husbando’s with this simple method. (Info about wigs in pic listed below)
- Get heavy-duty small magnets. I got mine from Home Depot for about $6 for this 40-piece pack. You only need 10 magnets to complete one wig project at first, but getting a bigger pack will save you money in the long run
- Using a short base wig, flip it inside out and put it on a foam head. You should pad the foam head prior with papers so that the size is closest to your head size since foam head tends to run small. This is very important to get the right fit for the undercut
- Snip the wig lace around the head curve, leaving the undercut high enough to keep its shape on its own
- Trim the short base wig as short as you can without wefts showing through, spray and blow dry the hair down. At this point, use hot glue to attach the magnets around the wig near the top (2 magnets on the sides by the ears, 1 at the center back, and 2 inbetween)
- Grab 5 more magnets and stick each one to your magnets on the wig from previous step (no glue for this step)
- Place your half top wig on top of the foam head. Position it on all sides to make sure it can reach and cover all the magnets. If needed, use a small piece of fabric to fill in spaces so you have a flat surface for gluing rather than just wefts
- Put hot glue on the second set of magnets, and press the top wig down onto it. Do this one by one, start from the magnets on the sides by the ears, and work your way to the back
- Adjust the top wig hair and blend it with the undercut wig, using your fingers and hair spray
Now you’re ready to join a Korean boy band, ice skate to your own song, and hunt down some titans with this hairdo!
Tips:
- make sure to press and hold until hot glue completely dry or magnets might fall off, low-temp works better if you have dual setting on your hot glue gun
- you can’t shampoo the undercut wig with the magnets so make sure to wear wig caps ALWAYS to pretect your wig from excess oil and sweat from your natural hair/head (nylon or stocking style of wig caps are great for this, plus it keeps your hair flat)
Wigs used in this tutorial: Rufio in Natural Black (CL-077), Jaguar in Sandy Brown (CL-071), and Caine in Black (CL-078) from Arda Wigs
Post link
Wig Hacks Wednesday #1 !
Need to quickly add length to your base wig without spending time sewing rolls and rolls of wefts? Want to use the same wig for that certain character who grew out their hair after timeskip arc? (I’m looking at you, Shonen Jump characters)
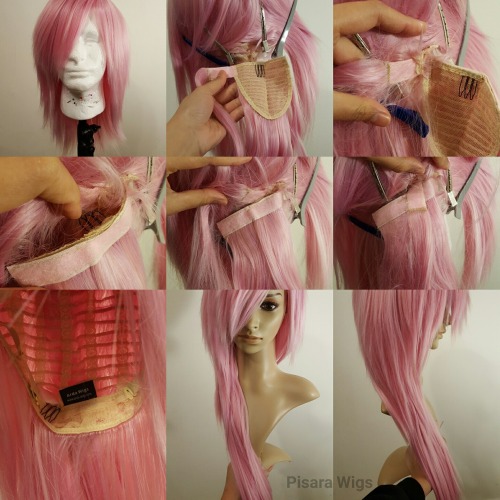
Here’s a quick way to add some sturdy length to your base wig, but still easy to remove if needed, using the ponytail wrap from Arda Wigs (Base wig in pic is a Jareth in Baby Pink)
- Using the duckbill clips, section off the hair where you want to add length. Unwrap the ponytail wrap’s velcro top. (You can see many rows of wefts on it which makes it volumous)
- Pull the small tail side through the spaces between the elastic band on the wig
- Fold in the ponytail wrap’s main side and use the little comb to secure it to the base wig
- Bring the small tail side over the main side of the ponytail wrap and press down the velcro parts to secure them to one another
- Comb and straighten the wig hair as needed to blend the textures
- She’s ready to rock hair-over-shoulder looks!
I hope this was useful for you guys. Every Wednesday, I will be sharing wig hacks for styling, tools, products, and just whatever I find interesting to add to your wig work experience! If you don’t wanna miss these posts, go to the top of my page and change your notification settings to “see first”. I will also be putting up more video tutorials with voice-over once I get a good video camera. Any tutorial suggestions, let me know please!
Post link
Katsuki Bakugou (My Hero Academia) wig commission
Base wig used: Jareth in Champagne from @ardawigs
Our favorite explosive boy! I’ll post the styling progress for this wig later this week. I have been working on multiple projects in the past weeks so I’ll be uploading a lot more.
Wig commissions are OPEN! Please email your inquiry to: [email protected]
Post link
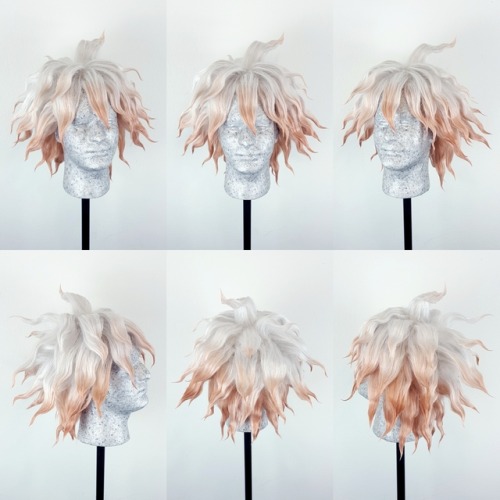
Nagito Komaeda (Danganronpa 2) wig commission
Base wig used: Jareth in Silver from @ardawigs , dyed with Rit Dyemore dyes in Chocolate brown mixed with Apricot orange.
Surprisingly, I didn’t have to do a tons of trimming on this wig since the base wig has layers that are pretty good length for the style. Did a ton of teasing and hair shaping with a flat iron though. I used the same technique to get “wavy spikes” like in my wig tutorial for Dio (Jojo) wig.
Wig commissions are open! Please email to [email protected] for a price quote
Post link
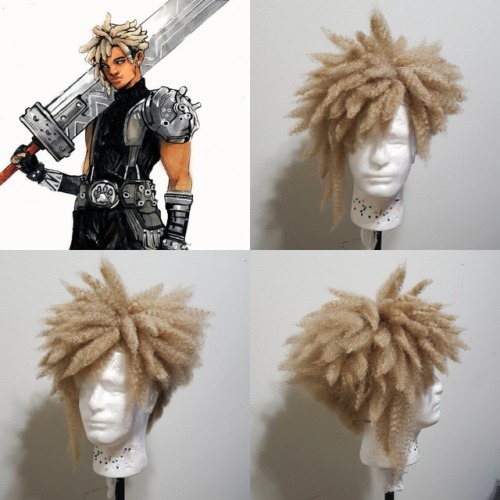
Got to work on this Cloud wig for @kaduout ! The design is based on a FFVII fanart series by the super talented @nikolasdraperivey
Base wig used: Dreadlock Rasta Wig Blonde from Largemouth (Amazon seller)
Wig commissions are open! Please email to [email protected] for a price quote.
And if you’re going to Anime Expo 2017, I will have a wig panel on Tuesday July 4th at the con. :D
Post link
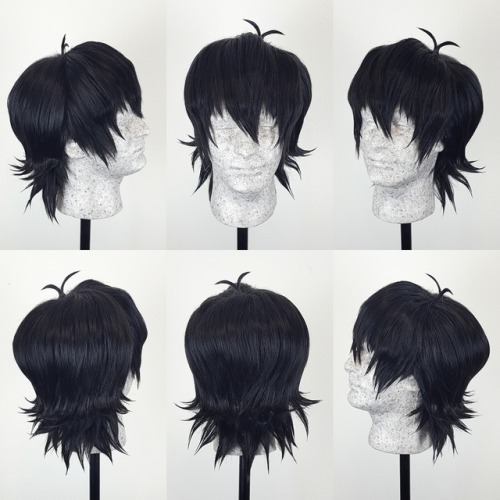
Keith (Voltron) wig commission
Base wig used: Inigo in Black with extra wefts from @ardawigs
The mullet game is strong on this guy. If you want to know how I made the “seamless” antenna for this wig, I have an antenna/ahoge tutorial in my tutorial album on Facebook page. (Link in profile) You only need small rubberband and glue!
Wig commissions are open. Please email to [email protected] for a price quote.
Post link
Mai (Avatar: The Last Airbender) wig commission
Base wig used: Silky Venus base wig in Onyx, and a leftover backparting piece from one of the Chibi base wigs from Arda Wigs.
The hairbuns were made purely from hair that are attached to the main base wig. A lot of wrapping the gluing the hair on itself to create the shape. It’s more natural-looking and secure since it is part of the main wig and not made separately. I’ll be making a tutorial for the hairbun soon!
Wig commissions are always open! Please email for a quote: [email protected]
Post link
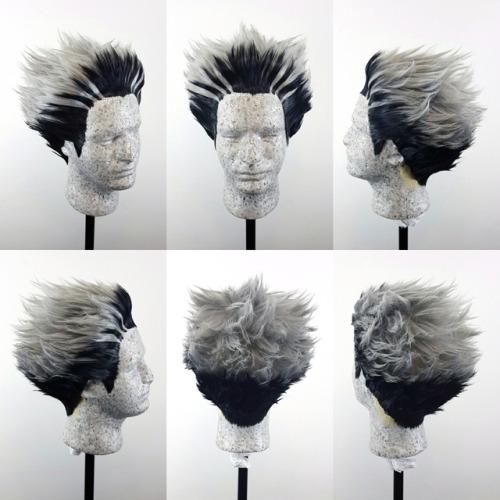
Bokuto (Haikyuu!!) wig commission
Base wig used: Jaguar in Light Grey, and extra wefts in Black from Arda Wigs
This wig was a challenge mainly because the reference for the character changes alot, even from the official source. So I had to use my artistic judgement on where to place the black “highlights”. Custom glued hairline was added for the front as well as the back by the nape area. I’ll be putting up a short tutorial for this wig soon if you’re curious how I made it. :)
Wig commissions are open! Please email me for a quote at: [email protected]
Post link
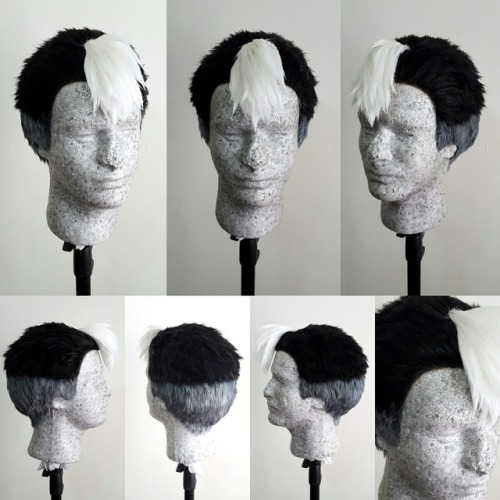
Shiro (Voltron) wig commission
Base wig used: Marty in Black, Marty in Silver (custom dyed), and weft in Pure White from Arda Wigs
I spliced two Marty base wigs together to make this wig. If you are able to dye a wig black then you could just use one Marty. I used RitDyemore in Graphite but could not get a solid black color on the silver Marty. The grey turned out quite nice though.
Wig commissions are OPEN! For a quote, email to: [email protected]
Post link
Takumi (Fire Emblem Fates) wig commission
Base wig used: Jeannie in Victory Blonde from Arda Wigs
For the long ponytail volume, I teased the hair on the inner layer and then comb the outer layer to smooth. The long ponytail is removable.
Wig Commissions are open! Please email: [email protected]
Post link
Drag Tip! The easy as pie wig oven! And it’s cheap to boot!
My Mikari from Mahou Shoujo Site ^^

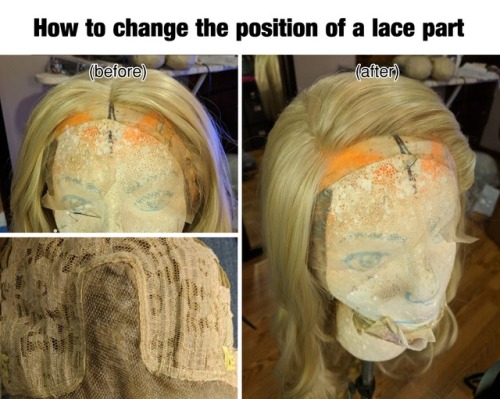
Three months ago I bought this wig for Katsucon, and just now I realized that I failed basic reading comprehension and this wig has a center lace part. Due to the shape of the part, it can only be moved around about an inch before you start running into the wefted area, but I really needed this wig to have a deep side part. For the look that I was going for, I ended up having to do some surgery to move the lace part several inches away from its original position. I took a few pictures during the process, which are under the cut!
(also please don’t judge me for how ugly my wig head is, she’s very old and well loved)
Post link
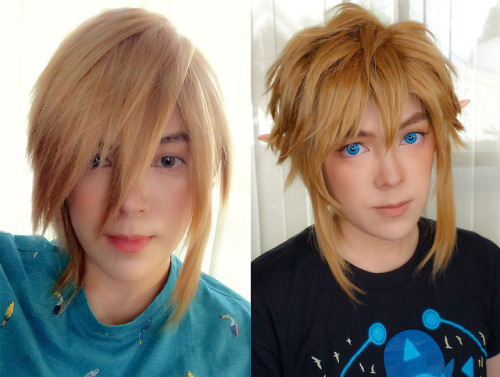
BotW Link progress!
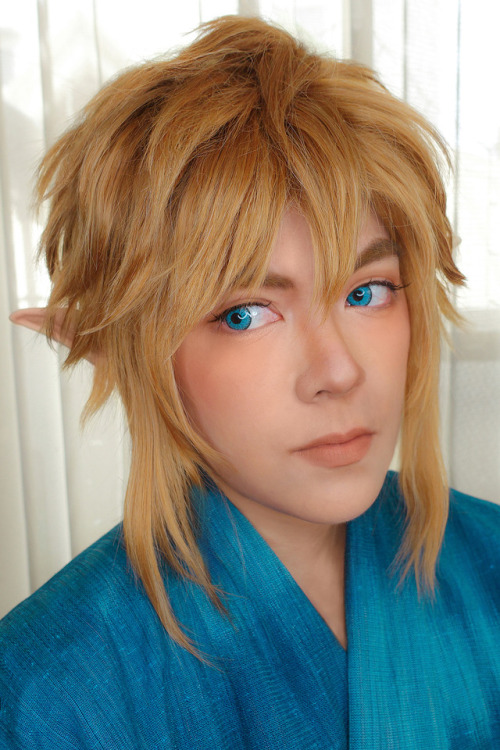
The wig before and after I styled it, and a closer look at the makeup!
I’m excited to be finally putting this cosplay together!
Post link
The Lab’s FIRST Wig Spray released for year-round purchase! We’re terribly honored to have Jaymes Mansfieldas a partner and muse. These alcohol-based fragrance sprays are safe to use on synthetic and human hairpieces alike – you may also use them to freshen up your room, your linens, or anything else that reeks.
Everything you just did was totally normal, and your family’s not going to find out. Cover up a thousand nighttime sins with the veneer of perfect innocence: virginal cream soda, with extra cream.
Watch Jaymes’s wig spray unboxing video below!

