#charlottezxz


Hey Folks!
Here with another shorter update, this time on menus and things!
We’ve been making some headway on our own menus for the game and have recently finished the Main Menu and party selection. We’ve also made some good lee way on the Status Screen, Save scene and more.
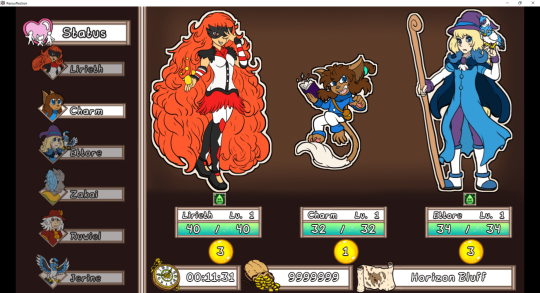
Here’s the selection for other people in the party both active and reserve.

And here’s some current progress on the Status Menu!
That’s all i’ll be showing for now!
Until next time!
Post link
Hey folks here’s an update on progress on animations and skills in the battle scene for Ressurflection!
It’s slowly getting there with a lot of them in place just needing timing and action sequence tweaks. Sounds are gonna be done last, as some of those sounds are repeated.
We are aiming for a Summer release of the demo, so stay tuned!
Time to go back to my hole and draw away!
Until next time!
Hi Folks,
April-ling your way here to give ya another update!
We’re making a lot of steady progress on all the assets we need for both future things and present (demo), mainly concerning the battle system mechanics and its animated little fellas.
Over the past few days I’ve been animating and finally replacing a lot of placeholder assets, such as in the opening games tutorial and finally fully finishing it and getting to all those ‘edumacational’ bits.
I’ve attached a snippet of the tutorial in action to give you a little peak into what its like and what to expect.
For now i’ll let this short little update and its visual video aid do all the talking!
Thanks for your continued patience and support, until next time!

Hi folks, here with another accumulative update!
Now where to begin..?
As of recently or the past month and before kinda, I’ve had a good friend of mine 8bit or Bart as I otherwise call him join us on the project for Ressurflection! He’s a smort little bean and who excels in a lot of the logical groundwork such as the math, formulas and coding tweaks of things that need doing as well as a pretty good writer! Plus he makes for a very soft cushion to land on and beat up ;)
Most of the work or works that have been going on behind the scenes can be summed up as a lot of animations, animations and more animations plus a lot of battle, battle and more battle work! There’s been countless edits and improvements to the game as a whole that I believe screenshots will do it better to showcase.

Progress is really coming along, with most of the groundwork there, there are just some very important battle bugs that need squashing such as targeting allies/enemies and the menu commands/list not populating/refreshing properly as two of the more notable.
Skills are also being worked on for the characters both visual, action sequencing and the sound part of it, it’s really all coming together as one neat little package!
Give it a month or two and we’ll have the demo ready hopefully!
Hehehehehe!
Until next time!
Post link


Sippy sippy!
I made a little tea sipping animation for Jerine, one of the circus members in our game!This was coot to do! I kinda goofed on the cards on the hat but i spent long enough on it as is!
It’s an emoji on the server now, delightful!
Post link

Hi folks, just a quick update on the project so far to keep you all in the loop!
Just before Christmas i released a small, work in progress build of the demo for a few people to play on the Ressurflection Discord. It went over really well, with the testers finding bugs, grammar mistakes and some diabolical overlooked errors (such as a missing asset or wrong picture call) and improving the game experience overall.
I’d firstly like to really thank everyone who played and tested that build and who relayed their feedback to me whether directly in DM or the discord in public, it has all been taken into consideration and on board this gammak train.
As a result of it, i have been spending my time improving the overall game and replacing all the missing assets there were either placeholdered or absent in that current build. I aim to have it complete in the coming months, although i can’t place an exact ETA on it, as some of the assets in the build will apply to the game overall and not just specific scenario for the demo.
The demo as a whole, is the Prologue/Start of the game which can be completed in around 20-30minutes of time, however quite a few people spent longer than that looking into all the various little tid bits of dialogue and things to interact with.
In the meanwhile i also set up an Itchio page for the project which can be found here with an update to date synopsis, screenshots and images.
https://charlottezxz.itch.io/ressurflection
Thank you very much for your patience, i hope to have something fun and enjoyable for you all to play in the coming months.
Many thanks,
Charlotte
Post link


Here are also the rest i’ve done so far!
Lantern, Knight, Fish and Horn!
https://twitter.com/charlottezxz
Post link


Here are some of the daily draws I’ve been doing collectively bunched, i post them to twitter daily!
Themes include; Well, Tea, Turtle, Teeth, Aztec, Banana, Basket, Owl, Forest and Chicken!
https://twitter.com/charlottezxz
Post link


Today’s spoopy draw under the theme of ‘potion’ have a potion mimic!
Be careful what potion you pick up!
I’ve also been posting them to twitter which can be found here;
https://twitter.com/charlottezxz/status/1215193073883455488
Post link


Monster theme for this daily drawing!
And because i want to make up for the missing January days i haven’t sketched (i am about 4 drawings behind) it is a double whammy today.
The blue one was based of a shark and somehow became that colorful boi and the bird like one is a mount design of a hybrid of a bird/horse/dog! I might end up using them in the game as they are pretty swell.
Post link

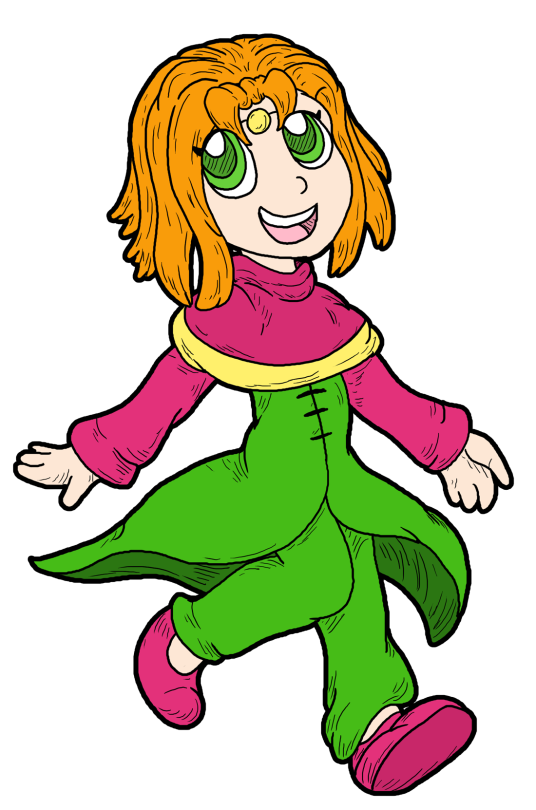
Here’s a sketch from this morning themed on ‘honey’ featuring Maxwell from the game along with some bee characters.
Post link

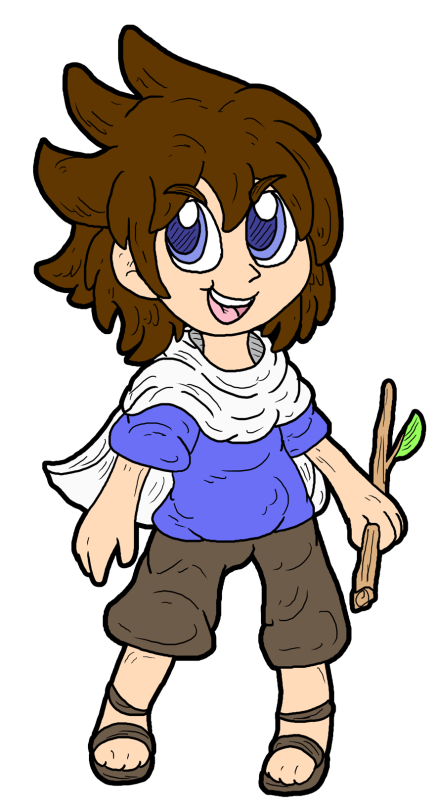
Hi guys, here’s my belated Happy new years!
To start it off here is a piece of concept art/character art i have done of all the circus bois from the ‘Roulette Runner’s circus in Ressurflection!
They are all quite the merry, bright, colourful cast of bunchful characters!
I intend to go back and add some missing details such as feathers for Blackjack’s wings and a few more things, but here it is for now!
Post link

Fluttering in to say Happy holidays everyone, hope you have a swell day!
Here’s to another good year!
Thanks again!
Post link
Hi Folks,
Sorry for the quiet, I’ve been hard at work in various things for the game!
Here’s a revamped title screen!
I overhauled a chunk of the assets, made some better, it is much visually less cluttered and there’s a better colour contrast. The font is far more readable and the sfx has been changed to a kalimba sound.
Also from a structural stand point, i had some testers have lag during it - that no longer happens now.
I will make a deeper more explained post on other goings on a little later down the line.
For now, take care!

Hi Folks, time for another update!
As it has been Spooktober i have been chipping at my little side project again “Stitched Up” i’ve put above a little gif of a map i’ve been working on for it. I’ll be working on this for a while longer, as i started late in October (though i have still been working at Ressurflection stuff!) probably through to November and see where that takes me.

As for Ressurflection, I’ve been chipping at a myriad of things such as going over some of my rough sketches for the MM, i even recorded a few things of me rough sketching those things! And all those sprites you can see on the left and below, lotsa bee sprites and rox bois and more!
Here’s also some rough animations and things I’ve started doing for the other side project!

That’s all for now folks, take care!
Post link
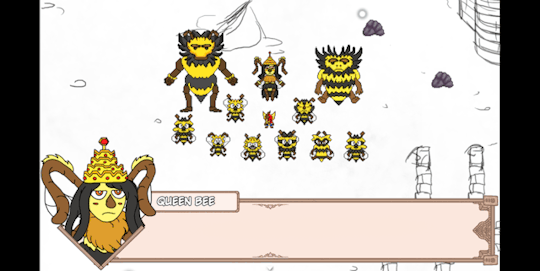
Hi Folks,
Time for a little update!
I’ve started animating some battlers again, here is a WIP one of a very unimpressed Queen Bee enemy along with some placeholder guards (until animated).
There’s also a WIP woodland battle tune composed by Geoff!
You can check out the rest of his tunes at his soundcloud here; https://soundcloud.com/geoff-moore-music

Overall testing and trying new things, they are all coming through very nicely!

I post all my updates and new things into the discord too, drop down and say hi by joining the link here if you’re interested; https://discord.gg/DKGUpYX
I’m thinking of starting to stream making the battlers for the game, i’ll be sure to post when i do!
Until next time!
Hi Folks, back with a little update!
We’ve been fixing a bunch of things and working on mocking in maps and other bits and starting to chip at the main menu.
I’ve had a discord mocked up for a little while that i wanted to pop live when the demo goes up, but i am happily opening up now for anyone interested to join. I should hopefully post things to there and here.
That’s all for now!
Hi Folks, it’s time for another update!
Alternative youtube link for the video also;
https://www.youtube.com/watch?v=96VhIWTLRFM
Bringing you a look at a wip deep forest map i have been working on and an associated battle back!

There’s lots to do and plenty to bug fix, placeholder and resources to muster such as the skipping menu above.
I also wanted to start challenging myself with one of our more bigger enemy battler’s so i have made a start on this big dragon boi!
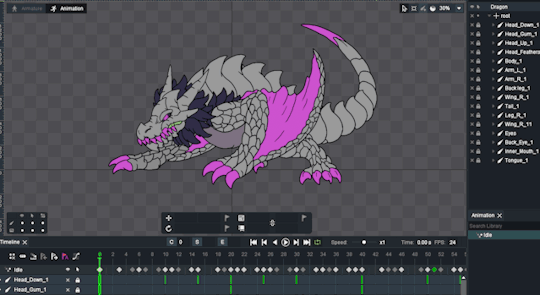
Here’s a little look at his rawrsomeness.

He’s a pretty big guy in contrast to these midget folk.
Short on the ye old words today, but i think these moving motion pictures must enough words on their own!
Until next time!
Hi Folks,
Today I have a different kind of post for you!
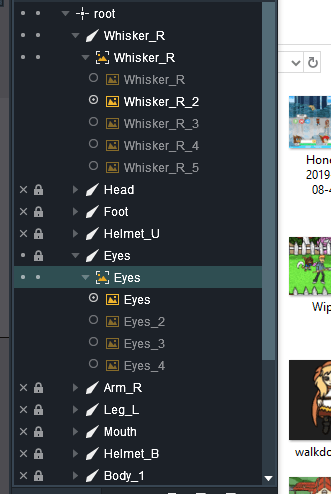
I’ve been frequently asked how I do the animation style combination in the way I animate my battlers and how to specifically animate frame by frame in dragon bones itself, well, in this post I’ll hopefully address both of those for you!
To break it down, most battlers are a combination of frame by frame animation and dragon bones mesh and armature. I will supplement this with a most recent animated edition!

This is the Catalier, a small cute forest bug with a shell helmet like a knight (hence the name Catalier, being a combination of Caterpillar and Cavalier). It uses a combination of frame by frame in the eye blink and the whiskers. The rest of him are separate body parts given an armature bone and animated individually.

When it comes to deciding just what, I am going to animate frame by frame or by mesh, I look at the concept of the battler itself. For the most part, any fluid elements to a battler I will frame it. By this I mean things such as a battler’s hair, accessories such as a bag or a cape and things such as tails. Basically anything that can have a fluid movement or a sense of 3D space. When ears flicker they change angle, a tail can swish, a cape can flow…those aren’t as easy or as effective in mesh format.
So with Catalier I decided his whiskers and eyes would be frame by frame to be more characterized and have more motion to them!
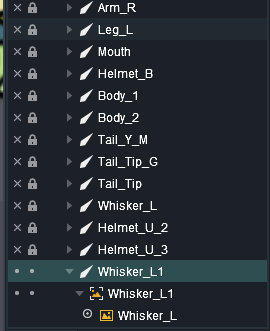
So first, I go over my concept of the Battler, drawing each body part into separate ‘segments’!

Imagine if you were making a doll, you would assemble each part separately right? Such as the head, the note, the eyes, the feet, the tail etc. In Catalier’s case each segment of his caterpillar body is separate, as are his whiskers and pieces of his helmet. The end result is a total of these parts.
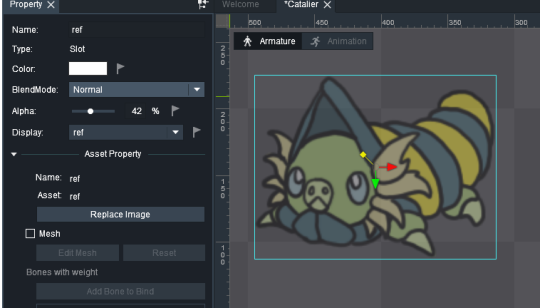
So first, open up your dragon bones and create an armature document for your battler. Import all the pieces to assemble as normal into the library. Normally I also import an assembled ‘reference’ pose and set that behind and with an Alpha layer of about 50%. Make sure to lock it down! I do this so I can assemble everything correctly on top. Delete the reference after you are finished with it (or just hide it if you so want).
The way I do things is a rule of thumb, if it’s going to be frame by frame it doesn’t need a mesh. Just a bone. Giving the part a bone gives it an anchor point to grab and move and animate.
Adding a bone is pretty simple, make sure that the body part you want to add it to is the only thing you can click on (lock everything else down). Hit the bone tool, drag and pull over your body part and it should automatically link the bone to it. The bone normally names itself after the name of the object/body part.

To add your frames is also pretty simple. On the first body part you attached the bone to, you are going to drag and drop your frames for that body part onto the actual image. I have crudely drawn a red arrow to show this. Do it for every part.
You’ll notice you can toggle between frames with the dot by the name!
I highly recommend the base body part you are going to frame by frame is the first FIRST frame of the animation. Toggling this in the armature mode will change the first frame for everything using that body part.
Once that is set up, toggling each of your frames is actually pretty easy!
Go into the animation mode and select your body part, remember the bone we attached earlier? We are gonna click to to select it. If you move the part on the animation screen, it counts as a point of your animation (by moving with the bone).

In Dragon bones different kinds of animation are color coded. By default green is movement, purple is alpha, grey is frame by frame and blue is rotating. You can actually change these to a preference of your choice if you so wish. In the above screenshot, green is the whiskers moving with the bobbing head and the grey dots are when the image changes into another frame of a whisker part to animate them.
All you do to frame by frame your part is toggle each frame of the body part images we selected earlier. Select the 0 frame on the timeline and toggle the first frame. Then, for example, two seconds down the timeline, toggle the second frame. This is all there is to it! Remember you do this by the circle symbol in your library where we put the pictures earlier.

You can press space bar to play your animation!
In the library you can see as your animation plays how it flicks between the frames when it gets to them!

Don’t forget to toggle the loop icon if you want your animation to keep looping!
And that’s all there is to it really!
You can achieve a lot of different results combining them and i personally find it easier for anything that is more than a simple moving limb. Such as a bird wing or a flowing cape.
Or you can animate entirely frame by frame! Some of my animations are that way. The combination or possibilities are very vast!
I hope this was of some help for you who are struggling to transition to Dragon bones and want to combine frame and mesh!
Happy Game Deving!

Hi Folks!
As I draw closer to finally adding my demo to the mix I thought I would give a shout out to a few projects that are made by super awesome people and you should check out!
I also drew cute chibi versions of characters from them!
(●´ω`●)
Toby’s island –
A wonderful RPG in development with a great visual style and sense of exploration. Toby’s island is a 2D RPG adventure game centred on monster raising, puzzles, turn based combat and town building. As the name of the title might suggest, you wind up on an island where you must learn to survive, such as cultivating your own food, developing tools to traverse the landscape and raise creatures from eggs to defend yourself. In beta testing the game it has come a long way from what it once was!
For more info on the project look no further than here!
Black crystals RPG –
A cute hand drawn styled RPG with a big emphasis on character interaction and handcrafted elements. It has a customised battle system with plenty of interaction and intuition. It is a visually pleasing and loving game to look at that you can tell has had a lot of heart put into it as it really shows. The skills, move sets and animations of the character bring across plenty of personality.
The dev log of black crystals can be found here!
https://blackcrystalsrpg.tumblr.com/

Roji’s room –
Roji;s room is another RPG with a pleasing and interesting aesthetic to it! You play as Roji and travel through the collective dreams of the earth, making choices and effecting the out come of things. Made by a friendly and lovely developer, this is another game I look forward to for the hand drawn and a bit comic-like aesthetic and characterful combat.
You can found out more here!
https://rojisroomrpg.tumblr.com/

Cursed marionette is an rpg horror game based around dark fairy tales and more. Centred around a mysterious maiden and featuring a cast of other characters, the mystery and writing of it seems intriguing. The developer is another wonderful person who has given plenty of feedback on my own project also! A demo is planned for release of this project but if you’d like to see more check out the link below!
https://projectcursedmarionette.tumblr.com/

Folkloria is another pleasing RPG which is reminiscent of paper Mario in combatbual style with a cartoony and vibrant cast of cute and fiendish characters. Influenced by folklore as evidenced in the title, many of its characters and enemies are drawn from mythology such as a griffin main character Weaver, a cactus cat, a kitsune and more.
More info and nice sprites can be found here!
https://folkloriarpg.tumblr.com/
That’s all for now folks, take care!
Post link

Hi Folks!
I’ve put together a fairly lengthy list of both minor and major things that we need to finish up before we’re ready to put out a demo! As of writing this post things on the list include incomplete CG images, missing sprites and animations, missing animations, sound design for some scenes and battle animations.
The list is also split into Need vs Want, with Needs being necessary scripting, animations and images and want being bits of polish and additions like extra dialogue or sprites.
It is certainly playable form start to end but it just needs that touch of polish and finishing of some assets before we’d be happy to put it out for people to try.
It has been a long time coming but it makes me happy to say that we’re at this point so close in time!
As for an ETA it is hard to say but it shouldn’t be that much further.
Thanks for reading!
Until next time!
Thought i would update you folks on the progress of the battle back and other bits! It’s a lot more colorful and vibrant and clear now!
It’ll be time to work more at the battler animations and do more enemies, ui and more fixes here and there.
That’s all for now!
Until next time!
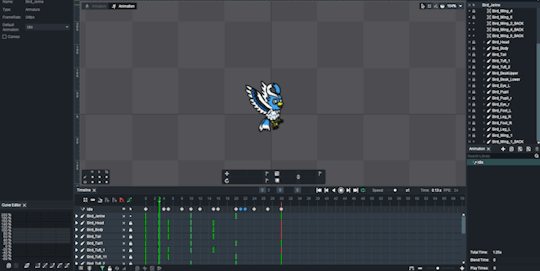
Hi Folks time for another update!
There’s been a lot of work on the battle system, getting all the functionality gradually into place and chipping away at the visual elements on it. I’ve attached a little video show casing some of these elements coming together rather nicely! There’s a lot to work at but it is gradually getting there!

A lot of frames need drawing for battler animations, usually starting as a placeholder black and white sketch per frame.

Everything is of course not finished yet but has certainly come along way!
Until next time!


Hi Folks, an update with some visual things!
Another WIP mappo or two! Banners and bricks and mortar upon a cobble bridge! Loving how it is coming along so far especially once all the props started populating it.

Here’s a couple of process/roughs of that map too!

We also got some font change working, so we can change them on the fly mid dialogue - with another custom font.

Here’s the initial rough for that map too!
That’s all for now, until next time!
Post link
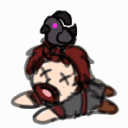
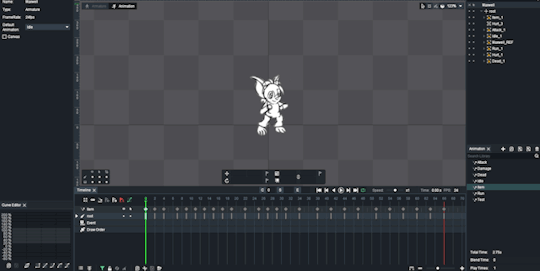
Hi folks, another update on the battlers! (And a question!)
Excited to show some progress on implementing them, such as the crows (who still need some more animations and shaded cells) and the animation progression for actors. The party member ‘Charm’ is starting to have her idle done, it still needs some tweaks and things but it is getting there!
There’s also plenty of placeholders abound, but i thought showing it in action would be much better than a still image.
Also, an out of the loop question, what is going on with Tumblr at the moment? Something of a policy change?
That’s all for now folks!
Until next time!


Hi guys, a lil battler filled update today!
I’ve attached some of the WIP Idle frames of some enemies and a nice wip screenshot of how battle is currently looking!
I also just noticed the blog has reached a little over 100 followers and just want to thank any of you who have kept up with the project as it mills along!

Many kind thanks to you all!
That’s all for now, until next time!
Post link
Small belated update today folks, a couple of things been working on but have taken a small hiatus whilst I’ve not been well.
As it is close to Halloween i thought i would post this WIP map involving a spook house! This recording is from a little while ago on my behalf and less spoilery to post this.
Sorry for the short post, until next time!
Hi folks, another update for all of ya!
Much milling has been going around giving characters some nice facials!
The idea being to mock in a fair few ranges of emotions to tide them over!
Most of these pertain to side characters but Melody, one of our main Protagonists (The lass with the pinkish hair) has gotten a whole huge library of them!
Below is Charlie the coot little pupper!

Here is Vanish! Her namesake is more than just a title!

Here’s a bearish huggable guy called Nicholas!

Melody here below with a huge array of faces! You can see some of the older ones i drew before i better established a drawing style. They’ll soon be updated with a ‘modern’ equivalent. (Numbers 3, 4 and 5).

Along with doing expressions, I’ve been going through the cut scenes and sketching in any CG’s where they have been needed!

I also want to give a shout out to @projectcursedmarionette for giving me their feedback on several things such as UI readability and the font. Working on the project for as long as i have means i have gotten so used to it as it was.
Improvements for that include the text box now being tinted brown, font size increase with a thicker outline for readability.
That’s all for now folks, untill next time!


Hi folks, time for another update!
More of a visual one than anything, most of the work behind the scenes has been in still continuously rough sketching every map, making sure it all matches up size wise and roughing events and cut scenes upon them until i will eventually do them proper, lines, colors and all! This enables everything to be done roughly, and essentially the game be done as a whole rough sketch :)
I’ll attach a few sketches and (Wip) ones above, so you folks can have a gander!
I’m more than happy to share them! (Who knows i might tweak them still)
Until next time!
Post link
Hi folks, another update for you all!
All the updates happening behind the scenes are mostly non-visual such as fixes after 1.6 update and some codings and the like. There are some visual things happening, mostly animationings and sheets for enemies and characters in battle and out (along with animated cutsceney stuff, woo!).
It’s going to be some time yet untill we’re ready to really show stuff proper, but hang tight!
I’ve attached a WIP animated sheet of an Enemy Crow onto this update, please change the youtube speed to either 1.5 or 2.0 as that is how fast it should really go and also right click the video for loop.
Anyway, that’s all folks!
Until next time!