#worbla tutorial

Nothing is worse than putting the last details on your prop, messing up, and not having enough time or supplies to fix it. These tips will help save you a lot of grief in the long run.
1. Research the piece you’re making. Whatever you do, research the fudge out of every prop you make. If you’re making armor for a specific character, find several different pictures and videos of that character from all angles. If it’s wings for a steampunk prop, look up a few species of birds and see how their feathers come together. This is intrinsic to getting your pattern right. After all, you don’t want to get to the event only to realize that your prop is totally wrong.
2. Do mock-ups. Whenever I’m getting ready to make a prop, I sketch it out and construct it in paper first. It might seem excessive, but it will make the entire project run more smoothly. Mock-ups help you:
a. See where there will be strain in the prop.
b. Determine the best way to connect each piece.
c. Rework the design if something isn’t meshing.
d. Create a template for your patterns.
3. Make sure your pattern is perfect. Never rush making the pattern that you’ll use to cut out the pieces for your project. If you start with ill-fitting pieces, the best you’ll get out of all your work is a bad-looking prop. At the worst you’ll get to the event and have it fall apart around you.
4. Beware of hot tools. I once burned my heel with a heat gun so bad that I couldn’t walk right for a month, and now I have a permanent scar. If you’re using a heat gun, make sure you have somewhere safe to put it when you’re molding your prop. If you’re working in boiling water, look out for drips of hot water.
5. Beware of hot plastic. The plastic will get deceptively hot as well, and a lot of times you won’t notice it until it burns you. If you don’t want lobster red, hyper-sensitive fingertips for weeks, use thin leather gloves and proxy tools (rollers, spoons, etc.) to work on your prop.
6. Don’t leave your props in the heat. They won’t totally melt, but they will get bent out of shape…and then you will too.
a. When you’re driving to your event, make sure any Wonderflex or Worbla props are packed in a cooled compartment out of the sunlight.
b. When you come home, keep them safely stored in room temperature or below and don’t put them in front of a window. It’s pretty easy to fix the droopy parts if your prop does melt, but you won’t want to do it.
And finally…
1. Save your scraps.
2. Fit together your pattern pieces like a jigsaw on your sheet.
3. Use primer!
4. Glue beforeyou paint.
5. Don’t try to bend or stretch the material too far.
6. Hold the corners of each unrolled sheet down with weights.
7. Prevent bending by using several layers of material.
8. Mix and match Wonderflex and Worbla so you’re always using the best material for the job.
9. Update old patterns for new projects.
Stupid mistakes end up costing you a lot of time and money, not to mention bodily harm. Try to keep these in mind when you’re working on your next prop and you’ll be amazed at how well it turns out.
You can’t wait to start making your home-brewed suit of armor, but you’re not sure what you’ll need before you sit down. Here are some basic tools that you’ll use whenever you’re working with Wonderflex and Worbla:

Pencil
So you can mark where you will cut.

Paper
If you’re prone to making mistakes, it’s good to make stencils on paper and cut out each piece according to them.

Tape
For keeping stencils down.

Scissors
For long, straight cuts and trimming frayed edges.

Exacto knife
For cutting intricate designs. You’ll want to get a lotof these.

Heat gun
A hairdryer on PCP. A heat gun is, hands-down, the single most useful tool you will have at your disposal. It heats up quickly, will let you target specific areas, and gets the plastic nice and malleable faster than anything else will. You can get one for a little over $20 on Amazon. A microwave or heater will do if you don’t have a heat gun, but trust me, this is so much better.
And that’s it. Six tools and a whole world of prop-making has opened up before you.
This guide was made under the wing of Costume Discounters (www.costumediscounters.com). Please go check out their site!! They sell wigs, shoes, shirts, essentials…all sorts of goodies.
What is Wonderflex and Worbla?
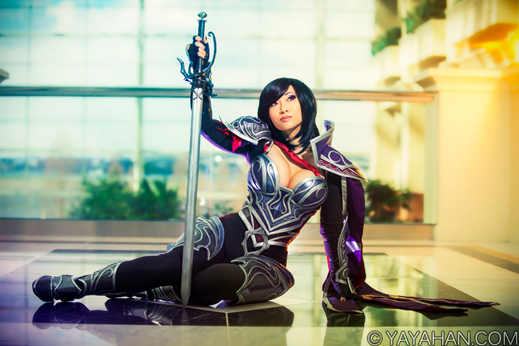
Worbla armor by Yaya Han

Wonderflex Wings via Kelly Chehardy
Wonderflex and Worbla are a costumer’s best friends. They can be used to make armor, jewelry, weapons, wings, shoes–pretty much anything you can imagine.
Okay, but…what is it?
Both Wonderflex and Worbla are plastics that are pliable when heated and that hold their shape once cooled. You can get it to that point by using an oven, microwave, boiling water, or (my favorite) a heat gun. They’re treated with a skin-safe adhesive that will make any two surfaces of the plastic stick together once it’s been warmed up. You can use almost any kind of paint to color it. They are sold in thin, rolled sheets that can be cut with scissors or knives and layered to make rock-hard props. Despite their durability, they’re very light and easy to carry.
In other words, they’re like magic.
The best thing is that you don’t need much experience to work with them. If you’ve ever cut something out of paper and tried to fit it together into a bigger shape, than you’ve got it down.
Is there any difference between them?
This is a common question because the two are so similar. The simplest answer is…
Wonderflex has a light netting on one side of the plastic and is adhesive on both sides of the sheet. Worbla does not have any netting and is adhesive on one side of the sheet.
That means that Wonderflex is a little stronger than Worbla but won’t bend as well, while Worbla will stretch to fit organic forms but will break more easily. You can see the example of each on this armor (the Wonderflex is blue, the Worbla brown). Some people swear by one or the other, but both plastics are pretty much the same in the long run.
If Wonderflex and Worbla are so great, why doesn’t everyone use them?
It’s probably because they don’t know how easy it is to use and how long it will last. When you first start looking to get some, it will seem expensive because you might think that you’ll go through it really fast. I’ve made two masks, two hand claws, two cuff links, and seven bangles out of a large sheet of Wonderflex that I bought four years ago. I still have half of the sheet left and those props have outlasted all the other ones I’ve made. The minor splurge is definitely worth it in the long run.
Wonderflex and Worbla really are amazing materials. Get them and they’ll become the bread and butter of your props.
Wonderflex armor via Volpin.
This guide was made under the wing of Costume Discounters (www.costumediscounters.com). Please go check out their site!! They sell wigs, shoes, shirts, essentials…all sorts of goodies.


Worbla Smoothing
Continuing the series of short worbla tutorials, now that you have your piece together and the air bubbles all removed, its time to smooth out your piece, which likely has its share of little needle holes, pits, and uneven parts.
- Get yourself a set of clay sculpting tools and a tub of wood filler putty
- Use the tools to fill all your little holes in, drag the filler across the worbla using the clay tools, all the bits that it is filling in should stand out easily.
- If you require more filler on larger areas, use your fingers.
- Its totally ok to go overboard you will be sanding this down
- Once you’re satisfied sand down the excess with some medium sandpaper, it should come off fairly easily
- Apply multiple coats of gesso and sand with a light/fine sandpaper.
- Start prepping for painting!
- Optional - You can also use shellac after the gesso to fill in very tiny imperfections
Probably the biggest hangups you will run into are getting the wood filler right, especially if you use large amounts it can tend to have bubbles inside of it, if things aren’t even you can always lay more on and re-sand.
Other Quick Worbla Tutorials:
Post link


Worbla Air Bubble Tutorial
Second worbla tutorial from a new user, this one is much shorter, but its very important to getting a good look on your finished pieces.
Air bubbles are unavoidable, no matter how careful you are there will be some, and depending on the shape of the piece they could be rather large. In order to remove them you’ll need a pin and your heat gun
Steps:
- After identifying what you need to smooth out, reheat your piece until the worbla is flexible again
- Using a pin, puncture the air bubblefrom the side, I was dumb when I first did it and went from the top, this will create little craters and while you can fix it later you’re just adding more work
- Gently force the air out and smooth the spot over with your fingers
- Continue and re-heat as necessary until all air bubbles are removed
The blue gauntlet from my Latios costume I did with the wrap around method and I did nothing to remove air bubbles. The red one for RoseSpirit’s Latias costume I did using the sandwich method and I took the time to fix as many air bubbles as I could.
At first glance in a photo they don’t look too different, but if you look at the full resolution or see them up close you can see the imperfections in the Latios gauntlet.
Overall this is a simple, but very important step in making armor and more often than not I see it as a foot note in tutorials or not even mentioned at all.
Other Quick Worbla Tutorials:
Post link