Hello, I didn’t make it in time but I still wanted to share this short guide on applying varying line weight onto a drawing.
In my first year of art college, drawing class was like a treasure trove of new tips and knowledge which I looked forward to every week. I used to only draw either very lightly overall or with the same intensity and no variation in my lines.
But one of the first things introduced to us in drawing class was how to vary our lines and mark making to capture light and shadow through just our line drawings. I never noticed the big difference it made to drawing only in a line with the same weight or which was uniform in pressure. I saw how it added more depth and fluidity to the character or subject making them less flat and stiff overall.
So ever since then I have tried to observe more and make thoughtful decisions of where I can play with the pressure of my lines while drawing.
can I ask how you did the patterns in the background? they look very cool
Sure! It’s pretty simple but kinda hard to explain in writing. I basically created three large colour blobs in the back that I felt complemented the characters nicely in varying colours and sizes. I then took those colours and created a barrier between them with a lighter, differing colour so it stood out more. Next, I created a clipping mask over each blob and took misc texture brushes and went to town- before using a colour picker to make them cohesive with the background of each section. I repeated that process for each area, and tadaaa.
Sorry if my explanation was needlessly complex. I use basic procreate brushes for pretty much all my illustrations. As for picking brushes to texture with, try choosing something subtle but still visible. You don’t want it to become overbearing or stand out more then your character/drawings focal point- though there are a few instances in which that could work. Anyways, hope this helped!
important things for new or young digital artists to remember:
don’t shade colors with black
don’t overuse the airbrush tool, especially when it comes to shading
layers have different settings, explore them!
if your lines are wiggly when you draw, check your brush stability settings
if you find your lineart is looking too stiff/not like your sketch, try cleaning up the sketch instead of lining it. it helps keep fluidity and the feel of your original drawing
crop your pictures, don’t leave a ton of empty space unless you add some kind of background
make sure your canvas is set to at least 300dpi
draw on a large canvas ( i draw on a 3000x3000px canvas) it will be easier to line your work and everything will look much smoother even if you shrink it down
.jpeg files save space, but this file type may compress your art and sacrifice quality. when I post art I always use .png
Good advice! I’d also add (under a cut because I can ramble):
ALWAYS SIGN YOUR WORK! Also consider putting your username/website url in a corner somewhere. Seriously it’s so simple, and can help so much if your art is removed from your website and gallery and posted elsewhere. At least if your name/website’s on it people have a chance of finding you again. It also makes it a little bit harder for someone to steal it and claim it as their own work.
Always keep around high-res versions of your work if you can; you never know when you might need them or want to make prints. It saves so much heartache in the long run.
Try not to post high-resolution versions of your work publicly online. If people have access to high-res versions of your art, there’s nothing stopping them from using those images and making prints or products of their own using it. If you only post lower-res images, especially with your name/watermark/website address on them, it makes it more difficult for people to steal it and make money from it on merchandise.
.jpg files are great to use for sharing illustrations online, but don’t use them to archive your high-res images if possible; like the OP says, it compresses the image and sacrifices quality. If you want more information about different file types and when to use them, this is a great explanation. Short form:
.jpg is great for small web-ready versions of photos and illustrations with lots of detail and complex colours (you don’t notice the compression as badly with photographs or complex, detailed, and/or fully painted images).
.png is great for small web-ready versions of illustrations and other graphics which feature flat colours, smooth gradients or hard edges. This format also supports anti-aliased transparency.
.tif is great for high-res archival purposes, and to ready a file for print. Many professional print services will ask for .tif files.
.gif is a rather crappy format for anything other than small-sized web graphics. It supports simple animation and aliased transparency.
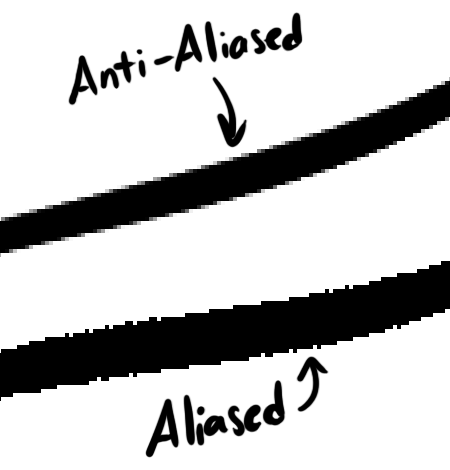
Get to know these terms: AliasedandAnti-Aliased. An aliased edge refers to one with a hard pixel edge. Anti-aliased refers to a softened, blended edge. These terms are very useful to know when dealing with digital art programs, as different settings will refer to these two terms often. (Click here to see an example)
When shading, try using a complimentary colour for the shadows that is opposite on the colour wheel to the colour of your light source. For example, if your light source is yellow, like the sun, try using purple tones in your shadows. It’s amazing how much this can punch up your images!
If you work with layers and are terrified of accidentally saving a flattened version of your image and losing the original, try this:
Before you even think of flattening your layers, save your file under a new name by clicking File>Save As. Maybe call it [myart]_flat.psd or whatever.
THEN flatten your file. This way, if you accidentally save it, you’ll be saving over your new file and still have your original file with all your layers intact.
This also works well for resizing images, too, if you’re afraid of saving over your high-res files!
Try to get used to saving your work constantly. Build up a twitchy ctrl+s finger. Trust me, there is nothing worse than spending five hours or more on a piece of art only to have the program freeze or your computer crash and lose all your progress. Save often! If it’s a particularly important piece of art I also recommending keeping two of it around until you’re finished, just incase one file becomes corrupted (like if your program crashes in the middle of saving). It happens, and it sucks!
I’ll leave it there for now, I think I’ve gone a bit beyond what a “new or young digital artist” would find immediately useful… still, it’s never to early to get into good habits! :D
OH SWEET JESUS I WAS SO DUMB AND BLIND THIS CHANGES EVERYTHING—
This is like the most obvious shit I feel like I’ve just ascended or something. How the fuck did nobody realise any of this?… HOW DID I NOT SEE THIS I AM DONE
Here’s a video for beginner artists looking to get a better understanding of the digital art medium: 5 digital art tips that work but also alleviate any stress and make your life easier. This art advice does not need to be completed in any specific order. Use it as you go :)
Please like/comment/sub, I’m trying to create videos for beginner artists and really grow this channel. Thank you!
Digital art tutorial/ Art Process/ Tips and other advice!!!
If you like my art pls support my channel. I did a speedpaint for this video where I talk about finding your art style. Pls give it a watch, I want to share some advice with others :)


