uh idk what that title it. basically, we’re discussing making kandi masks usable. also a note on why i DONT suggest hot glue.
I don’t really suggest hot glue to seal fabric to your mask because it has a chance of melting your string, I think. That isn’t really preferable, obviously, because then it’ll likely destroy your entiremask. I don’t know specifically if it WAS the hot glue when I did it that wrecked my shit, or if it was the string coming undone, but I wanna exercise caution and avoid hot glue from now on, you know?
So, I’ve been getting into sewing lately, making plushes and my halloween cosplay thing. So, this time around, I’m gonna try and sew fabric into my mask. I think I can do this by passing my needle through my beads.
Is this gonna take a while? Absolutely. If you’d like to try this with me, though, here’s what you’re gonna need.
- Fabric, anything will do as long as you can layer it comfortably. Remember to test your fabric against the flame test to see if it’s layered enough.
- Sewing needle
- Thread (preferably in the same color as your fabric, but I don’t think anybody will see it anyway so it doesn’t matter)
- Kandi mask! If you don’t know how to do that, I wrote up a thing right here
- Candle and something to light it with, or just a lighter
- Sewing pins
Got all that? Great! Let’s begin.
First, you’re gonna wanna fold your fabric a bunch. Light your lighter, or light a candle, and form your fabric around your face, covering your nose. Try to blow out the candle– try your best. If you can’t do it, then pin that and cut it out. If you can blow it out, then layer it some more until you can’t. I think what I have is cheap cotton? Or polyester? It took about 4 layers.
Cut that rough roughly the size of your mask. You’ll have time later to go back and trim it, don’t worry.
Got a square? Cool. Now, we’re gonna sew this to the inside of our mask, an endeavor which might be hard. Who knows? I don’t right now.
Okay, it wasn’t really that hard. My suggestion is to work your needle through the side of the fabric that’ll touch your face (the back) then work it through a bead, then go through the front of the fabric relatively close to a bead. Then you can put your needle through empty spaces between beads near the edges of the mask, and continue putting it through beads and putting it through the fabric. This is how I did mine, and I think it’ll suit my purposes great.
I sewed across the entire edge of the mask, tied that off by putting my needle through a thing of thread that’s already sewn in, repeating that a few times, and pulling hard.
After you sew that all together, you can trim your fabric. I suggest still leaving some slack, so you don’t accidentally cut your sewing.
Now. What’s the use of this? We’re in the age of July 2021, where vaccines are in full swing and masks are slowly fading out of necessity… For the fortunate, from my position. Because of my conditions at the moment, I can’t get the vaccine. I’ll have to wait over a year to get it. I’ve also heard that many places around the world don’t have access to it yet. In addition, it’s common in Japan for others to wear masks whenever they get sick, as a common courtesy to others. Also in addition, I feel like many of us have gotten used to them, they’re apart of fashion for some of us now. Even if I was able to get the vaccine, I don’t know if I’d be able to give up my masks quite yet. Some of them, like the usage of kandi masks, can be quite stylish. Having them be functional is just a nice plus. Also… I kinda find that putting fabric in them makes them a little more comfortable to wear, it lessens the effects of the hard beads pushing against your nose bridge lol.
That’s all I’ve really got to say. I think I find this method safer than using hot glue, and maybe even more secure? Ultimately, though, hot glue could have it’s advantages. It’s been passed around for a while now for a reason. It’s way faster, and it takes less materials. It’s your call on if you’d like to risk it or not. Like I said, I’m not sure if my own mask fell apart due to that, or due to shitty string and bad tying.
It’ll be an entertaining coin flip if you choose to do it! If you do it without many averse effects, please send me an ask detailing your beads and your string type! If you do that, I can update this post to be less anti hot glue lol
Soooo let’s talk about that briefly. Why wouldyou remake kandi?
Maybe the string is wearing thin. Maybe you don’t like a color you used, or the type of beads or string you used. Regardless of, the general consensus is that remaking kandi you were traded for a reason beyond changing the string to renew it isn’t a good idea. Obviously kandi is ever-changing, and this idea might change. Who knows?
Once you’ve decided you wanna go through with the remaking process, you’ve gotta disassemble it. I’d suggest starting from the bottom or top and just cutting the string, taking off the affected beads, and cut again. I’d advise going slow so you don’t lose any beads. If you’re alsolike me and have really bad vision– hello y'all– I’d suggest sorting apart colors you get confused. Otherwise you’re gonna be shining a flashlight in your bag of beads for an hour wondering ‘is this black? or dark blue?’ Plot twist: it’s neither and it’s dark purple.
Today I’m gonna be using a modified version of this pattern by T3TR1S, with the old mask pictured below. Never too late to start on Halloween preperations, right?
[Image ID: An uncropped photo of a kandi mask. It’s 21 wide by 14 tall. The straps are a dark blue. The mask is black with a red and light blue alternating border, and the mask has a libra sign on it in a more cerulean color. End ID]
look i felt too lazy to crop that last night.
Regardless of the pattern you decide to use, it’s gonna look something like this when you enlargen it/click on it.
[Image ID: A picture, once again 21 high by 14 wide, of the patten for the mask above. This is the unmodified version. It lacks the red and light blue border, and the sign on it is more of a darker teal color. End ID]
There’s no numbers though, right? If you recall from one of my multi-stitch tutorials, this is because masks can be started from a few different places and can be finished in a couple of ways that’re all similar. Having numbers would likely get confusing.
First, you’re gonna be chosing a place to start your mask. I personally like to pick somewhere around the middle of the pattern. You needto start your mask from one of the straight sides, and there has to be at least two beads to start off with. For instance, starting from the two beads at the bottom of the left side would work, but using the very last bead– only one of them– wouldn’t. This is because of how brick stitch– or more commonly called peyote stitch– works, which will be explained shortly. AKA, right now.
First, you’re gonna wanna grab some string. I suggest about two arm’s length is good for now. Take that, and fold the two ends together like so–
[Image ID: a picture of me holding a piece of pink string. It’s folded together, and the two ends of the string are pressed together. End ID]
This is why we need where we’re starting to have two beads, because that’s how we start peyote stitch! I’m not going to go toomuch into detail on that here, because I plan on writing something on peyote stitch anyway.
Follow your pattern across whatever row you chose. It should be a straight-shot across– there shouldn’t be any weird curving or anything yet. You’re gonna put on those two beads, then the one bead depicted in the middle of those two. Like this–
[Image ID: A picture of the same mask pattern from before– but with red marks depicting the two starting beads, and the one after. End ID.]
This picture shows where I’m starting my mask– the two beads on the end then the one bead. You’re gonna put the two beads on the string– one per end of string you’re holding together– then you’re gonna put your strings together and put the one bead through BOTH of the strings.
For this, I’m gonna end my row with two beads– great! You… might not though. I think that’s possible? Regardless, it makes everything a bitharder. At the end of your row, I highly suggest taping an end of your string down after pulling it tight, and taking the other end of your string and beginning building. You’d start building by putting on an end bead (a bead above/below where you ended, respectively) and going through the next bead that’s sticking up (or the last two beads you put on). I’d build that for a row or two, and then build with the OTHER string for a row or two. From there, you can just keep going til the points, which I’ll show how to handle shortly.
If you’re gonna end with two beads– great! Finish up that row, putting on the next two beads, then the one bead, then the two beads. Follow the pattern you have on hand for color changes, and make sure to keep track of which string is the TOP part of your row, or the BOTTOM part. Otherwise, you might end up with colors in the wrong place.
When you’re done with that row, if you have two beads, congrats! You can tie that off using some square knots. Welcome to the building of the actual mask! The entire way this works is through putting a bead on, and going through the next one sticking up… for now. There’s weird ways to starting new rows that I’ll unfortunately have to cover. Look at your pattern.
[Image ID: A picture of the mask pattern, with red marks all along the first row. The next row is marked in blue. End ID]
In this picture, I’ve shown my first row. The blue marks will be representing my next row, building upwards. Building downwards would be the same thing, just toward the bottom of the pattern. In other words, the next row is depicted as the next raised beads near your last row.
[Image ID: A picture of the mask pattern from before. The third row of the pattern is highlighted in lime green. End ID]
Here, I’ve taken the liberty of highlighting the third row for you! But once you get to the end of that third row, you’re probably wondering how to put that end bead on. This is the unfortunate part…
There’s a couple of different methods to this. This is Vicky’s old tutorial on masks, which could be useful and worth it to follow instead of this if this doesn’t make sense.
I learned using iHeartRaves’ video. You know, the one with people complaining in the comments about this part in particular? I spent about an hour figuring out how to do this, but I think I have the hang of it by now. So, here we go.
You’re gonna put a bead on your string, the bead should be in the color of the last bead on that third row. For me, in the original pattern, it’d be black. For my modified version, it’ll be red.
[Image ID: A photo of my mask progress. There’s a red bead hanging on the pink string I’m working with to build upwards. There’s a blue bead and a red bead below where the red bead will go. End ID]
You see that red bead to the side there? Below the light blue one? Stick your string through the top of that, like so.
[Image ID: A picture of my mask work in progress. The pink string from before is going through the top of the rightmost– or the bottom if the mask is looked at horizontally– red bead. The string is coming from the bottom of the bead, and the new red bead we put on the string is posistioned next to the light blue bead in it’s rightful place. End ID]
If you pull tight (and you should!) the bead will move to the top of those side beads. You can use your fingers to move it and hold it in it’s proper place.
Now, take your string and go through the bottom of that light blue bead, like so…
[Image ID: A picture of my mask WIP. The pink string was pulled through the bottom of the light blue bead, and is coming out of the top of it. End ID]
That part might be a bit hard. Don’t be afraid to move stuff around to get it in there, you can tighten it up and put the new red bead back in place after you get it through. From there, you put your string through the top of the new red bead, like so!
[Image ID: Another mask WIP picture. The pink bead is going through the top of the new red bead, and is coming out from the bottom of it. End ID]
From there, start row 4! Your new red bead should be secure now. Everytime you come back to this side, you’ll need to do that. It’ll always be the same process. Put new bead on string, put string through top of bead two beads down, put string through underside of bead one bead down, put string through top of new bead.
On the other side of your mask, you can just continue building by putting the end bead on, and going through the last bead you put on. Though I suggest pulling the string for the last bead really tight, this’ll keep everything together better.
Keep following your pattern until you get to the spikes part around here–
–okay only 10 images allowed per post. fuck you tumblr. at ANY rate…
There’s a part of your pattern where it doesn’t go straight up anymore. It drops off and starts to make a spike. Vicky explains what to do about this pretty well here. But, even then, here’s some text instructions. When you finish that row, and there’s no bead to put above it to start another row, just shove your string through the last bead you put on. This’ll start the spike shape. You’ll just keep doing that as you go through to carry the spike higher and higher.
As you go, the spike will break off into two smaller spikes. This is fine– just focus on one spike, building on that until it’s finished. After you put that last bead on, take your string and weave it towards the middle of your mask so you can start the other spike, tie it off tight a few times, and start on the other spike. I hope that makes sense– I swear I’d have pictures if it wasn’t for tumblr’s image limit. (actually you might be better off watching Vicky’s video from here, I’m not gonna lie. If you wanna learn to tie off the mask and tie together the spikes from her, here’s a timestamp for that.)
If you’re still here, I’m sorry lol. But let’s keep going! Build until the spikes and complete those on the top, then build on the bottom and make those. When you’re done, you should have a shape resembling the pattern you’re following.
okay ive been here for, about 4 hours. ill be back tomorrow (but in one second for you :) )
it’s the next day, let’s talk about lacing up masks! You’re gonna want a small piece of string, doesn’t have to be that long at all. You’re gonna thread that through the bead in the middle of the spikes. For me, on the top, it’s the black bead above the top of the libra sign. Even it out so the two ends of string are together and they’re mostlyequal. Then, you’re gonna take the string on the left and put it through the right bead that’s one up. The left string goes through the right bead one up. Then you take the left one, go one up to the right. Left one goes one up to the right. Right string goes through the left point, left string goes through the right point.
Pull that together! It should lace up into something a lot like this (photo by sarasunshine on KandiPatterns). See how her mask comes together at the top in a kinda point? That’s what we’re aiming for. Pull that tight and tie it off. Do the same to your bottom spikes.
We’re at the final stretch! Specifically it’s time for mask straps. This one is also hard to explain, so I’m gonna link you to the point in Vicky’s video where she adds straps. In addition, she only laces her masks twice, while I do mine thrice. There isn’t much different between the two, it depends on how you feel.
Straps. I’d highly suggest more stretchy fabric cord for this rather than clear elastic or something not so stretchy. I used all my fabric cord on this, so I’m gonna use this weird jelly glitter string I found? I genuinely have no idea where it came from. I do my straps in the same way Vicky does, and I think she can explain it better than I because she isn’t limited to 10 images per post. Though, I will suggest you be careful, it’s really easy to use too many beads, or to make the straps too tight or too loose. imo, i like to have a LOT of room on my string (seriously, i only used about 22 beads) because I move the beads around so they aren’t on the back of my ears. by the time i’m done tying on my string, the straps are usually half string and half beads.
Just follow how Vicky does it, fiddle with it a bit, it’s ultimately up to personal preference about how you’d like to do it.
okay that’s all i’ve gotta say uhhh i should have something up on putting fabric in them for actual use soonish. go forth and make stuff.
I’ve been making a lot of Perler stuff lately, which is why I’m posting stuff relating to beadsprites a lot. I think I’m gonna go make a mask tutorial next, though, so look forward to that if you’d like.
You ever want to make a gigantic (usually) hunk of plastic and shove it on a string? I do.
The beadsprites/Perler creations/whatever-you-call-them you use for necklaces aren’t usually that small, probably two pegboards at the minimum. Though, if you’re limited or simply like something a bit more low-key, using smaller Perler creations with necklaces is absolutely possible.
Necklaces are a bit more limited than cuffs, given why this is a seperate post from ‘How do I use Perlers in my kandi?’ First, especially if your creation is a little smaller, you might want to consider using your perler on a cuff or as a mask charm instead. With cuffs, you can have it rotate, you can make it look a bit more 'framed’. Does that make sense? I mean, when you make a Perler necklace, the background it’s on is your clothing/kandi-style clothing. If you put it on a cuff, you can custom-create a more intricate background, especially if you’re more inexperienced.
[ID for the links: The first link, marked with the word 'rotate’, contains 4 different pictures of a DR2-themed rotating cuff. The first picture shows the cuff on the person who created it. The second has it on a table, with the middle rotating part a bit rotated from before to show off more Perlers on it. The third is the same thing as the second, but with different Perlers being shown due to the rotation. The fourth is a top-down picture of the cuff. The top of the cuff is black and white. The rotating part is neon pink and a less-saturated pink. The bottom is black and white. In addition, in the black and white sections, there are some mildly transparent pink glittery beads. The Perlers featured on the cuff are partial-melted, and they’re the pixelated heads of the DR2 characters, I think stylized like the anime. The second link, marked with the word “framed”, features a picture of an alien-themed rotating cuff. The cuff makes use of an alien perler that’s various shades of green, black, and white. The cuff itself makes use of various shades of green, black, and clear beads. End ID]
Though, Perler necklaces are a good way to attract more attention to your Perler creations, especially if you’re only wearing one or two. They aren’t competing with everything else on your wrists.
If you’d like to go that route, here’s a couple ways to attach stuff to your string. Once you get a bunch of string, enough where it’s as long as you’d like and you’ve shoved some beads on it and you know where you want your Perler to go, you have a couple of options. One is that you get a jump ring and you put that on your Perler (stab a hole in your Perler, shove the jump ring through it). Then you can loop the string through the loop. This avoids the– in my opinion, at least– ugly happening of the beads coming from the back or front of the Perler. On the other hand, this requires a jump ring. If you’re interested in it looking neat, and you already dabble in other crafts, chances are you already have jump rings.
The other option is to poke two holes in your Perler creations, level with each other and usually a fair distance away from each other. Depending on how you put the string through the holes, the beads will come from the back and create a weird lump, or they’ll come from the front and kinda look weird? But this doesn’t require anything other than something to poke holes, and the other method requires that too!
There’s likely more options but those are the two I’ve utilized throughout my… career? I’ve only made, like, two of these though so maybe do your own research if you’re iffy on the ideas I suggest.
Good luck not dumping your Perler beads all over the floor :)
Due to the unfortunate, but probably necessary, death of Flash at the beginning of the year, KandiPatterns had to adopt a new pattern maker! With this came some changes, probably for the better.
So, first thing’s first, you’re going to need an account to make and post your patterns. You don’t need to post your patterns, they can be private, but more on that later. If you don’t have one, you can create one by going up ‘Register’ and doing what follows.
Once you’ve got your account, enter the pattern maker! By that, I mean hit the small green 'make a pattern’ button under the pink 'VOTE NOW’ button. Once you do that, it’ll open a new tab and you’ll be met with a (mostly) grey screen. At the top, it’ll tell you to use the new alpha pattern maker. Click on the link (the underlined words) in that header, and you’ll be on the home page of the new pattern maker. From here, there’s a variety of things you can do.
Firstly, if you find a pattern on the site and you want to modify it (be it for a bigger wrist, or you just don’t like the colors/have the colors needed) you can go to that pattern and hit 'copy to pattern maker’ for editing here. If you’d like to edit a pattern you’ve previously copied to the pattern maker, you can just click on the pattern under the 'generate template’ and 'choose pattern template’ buttons. It’ll open it in the editor, which we’ll get to shortly.
From here, you have a couple of options. You can choose from a variety of pre-made templates, or you can custom generate your own. I always choose to custom generate mine, but you might find that you don’t need to do that. If you hit 'choose pattern template’, you’ll get some multi (or peyote/brick stitch) options, and you’ll get a bunch of Perler options. The text here is super tiny, which is also a part of why I prefer to custom generate. Here’s what the pattern templates say.
30 x 6 multi stitch
32 x 10 multi stitch
34 x 13 multi stitch
36 x 15 multi stitch
42 x 20 multi stitch
50 x 30 multi stitch
Small square
Big square
Small hexagon
Big hexagon
Small circle
Big circle
Small square (it looks different? idk)
Big square (also looks different than the other big square)
Small square (but in a diamond shape)
Big square (also in a diamond shape)
Small star (6 pointed)
Small heart
Big heart
You can experiment with that, but if you’d prefer to be absolutely sure your pattern will fit in the pattern maker, you can custom generate a template and overshoot how big you think it’ll be. Once you open the 'generate template’ button, you’ll be presented with a few options. The first is to name your pattern, the second is what pattern type you’ll be making, the third is for how big your template is in width (or how long it is), and the fourth is how big it is in height (or how tall it is). The last checkbox is to fill your template with a color– usually you won’t check this box.
It’s better to have a template being too big than too small, we probably want your entire design to fit on the template lmao. So I usually wayyyy overshoot in my dimensions.
As for pattern types, you got three options. Perler, multi, and peyote. This peyote differers from the pre-generated ones by essentially flipping it on it’s side. You’d use the multi type if you wanted to make a peyote charm or panel that has the flats of the beads on the left and right, while the peyote template places the flats of the beads on the top/bottom. That is good for peyote cuffs and more horizontal charms/panels. Perler is exactly what it sounds like– it’s just a square that you can custom-change the size of for your own purposes.
For now, I’m gonna use a Perler pattern for simplicity’s sake. Once you figure out what you want and generate your template, you’re presented with a buncha tools and options! On the top, here’s what those drop-downs have (and what they do) from left to right.
Home takes you back to the main pattern maker page from before
File allows you to make a new pattern instantly, make a new one from a template, download your pattern, save your pattern (privately or publicly) to your account, and print out your pattern
Label allows you to have no labels, label by horizontal row, label by vertical column, or to label different colors with symbols.
Image allows you to upload a reference image or to remove said image. Apparently there’s future plans to integrate a pattern generator, but until then, the beadifier works for Perler patterns just fine imo.
On the left, you have your color picker, your pen for drawing, your eraser, your bucket tool, your eyedropper (color picker), undo, redo, trash (which deletes everything on your canvas), and crop transparant area (which helps make your pattern smaller by cutting out unused area, helpful for when you overshot before)
On the bottom you have a count of what colors you’ve used, and on the bottom right you have a zoom in button, a pan button (click and drag to move pattern around), and a zoom out button. You can also scroll to zoom in/out around where your mouse is.
On the top right you have about, keyboard shortcuts, and the ability to report bugs with the pattern maker. There’s also the option for you to log out of your account.
So, you’ve finished with your creation! From here, you can go to file -> save. A window will pop up, asking for a pattern title and for it to be public or private. Public means it’s on the site and is subject to user votes and mod approval (or disapproval), private means it’s only viewable in the pattern maker.
That’s about all there is to it. If your pattern is public, people can vote on your pattern and it can be approved or rejected (but tbh i’ve never had anything get outright rejected… so). There will be more on that in the general post about the website.
akaBEE TIME. i’ve kinda been in burnout after i tried a HUGE project and it didn’t really meet expectations, it exhausted me badly. I saw this video in my recs, though, and I thought it’d make for a nice project!
QD doesn’t have a tumblr, so I can’t tag her, but if someone wants to @ her on twitter that’d be appriciated! This post is gonna be really universal, and it won’t focus on the actual bee itself, to hopefully make it fine that I can’t @ her. If she sees this, and wants me to modify this to not use her pattern, I’d like to be informed! It’d be an easy fix lol.
If you’d like to make The Bee, you can do that by following the video, but the standard steps of this (put the beads down, iron them) will be universal across any Perler creation of yours. So, you can make the bee components by following this where applicable. I’m hoping here I can give insight on the tape method, ironing, and putting down beads.
Firstly! You’ll want to count out your beads. Like with making regular kandi, there’s a lot less disappointment if you know you have enough in the first place. In particular, this bee is a 3D creation, but most perlers won’t be. I think this is the first time I’ve done something 3D in my more-than-a-year of doing kandi.
Next, you have to put your beads on your pegboard(s). You’ll want to make sure you have enough room to make the full design. Typically, a board measures 29x29 spaces. You’ll need to see how tall and how wide your design is to see if it’ll fit in those parameters. If it won’t, it’s better to connect extra boards now before you start. If you don’t, you might make a hugemess later on trying to connect them.
Then you just kinda… place down your beads, following your pattern. It’s entirely do-able to make a Perler piece without a pattern, but I’d probably suggest you follow a pattern for your first piece.
Once you do that, I highly suggest that you tape your beads, and you take them off the board before ironing. This is commonly regarded as the tape method, and it prevents your boards from warping– or bending. You can really use any tape– I just don’t suggest dollar store Jot tape– I know people mostly use masking tape, or painter’s tape. I just use Scotch tape lol. You simply just lay your tape on your beads until you’ve covered them all, smooth it out a bit so every bead is probablystuck to the tape, then you either flip the tape, or you put one hand on the tape– another on bottom of the pegboard– then you flip it that way. If you find that your beads keep getting screwed up, I have some advice! Once you start putting down tape, don’t lift your tape. You can cover holes later.
If beads were left behind on the pegboard, you can use tweezers to stick them back in place. Speaking of, invest in a nice pair of tweezers. I use really basic ones, and they help me lay down beads faster too. From here you can poke holes in your tape… or not. I don’t do it a lot, simply because I’m lazy. I hear it helps prevent blow outs– or your beads not closing at ALL– which can cut down on your ironing time a bit and leaves less room for overironing. If you have the patience and time, poke holes. If you don’t, you’ll just have to deal with a slightly flawed project, or you’ll have to hope everything goes over well.
Once your creations are off the pegboard(s)– or they’re still on, i can’t control you– it’s time to iron! For the bee, you won’t wanna iron it all the way. Iron it so the beads connect, but the hole in the middle of the beads aren’t too small. Otherwise, assembly later will be hard.
Iron heat is gonna vary from iron-to-iron. Everybody tells you to have your iron on low-medium, but I personally need to have mine on the low highs, otherwise I’ll be here for hours.You’ll probably need to experiment with different heats to find what works best. Ideally, your perler’s holes should ALL be closed up on the side you’re ironing, with minimal spilling or bleeding of the beads.
When you’re done ironing, you have a choice. You can either iron the other side, which will make your creations more durable, or you can leave the other side unironed, which saves you time. Regardless of, when you’re done ironing, you’ll want to put something heavy on top of your creation while it cools, so it doesn’t curl and it lays flat. Unless you wantit to curl, in which case go for it, I can’t control you.
also the bee came out great, assembly was just a bit hard cause i over-ironed a bit :) in addition, you might notice there’s not many pictures in my posts as of late? and i’ve been slacking big time? my phone broke lol. i have a replacement, but im still adapting to it. we’re also on summer break so im taking the time to hang out… and make 3d bees, apparently? there’s also some life changing stuff kinda going on, nothing really major, but i feel kinda busy all the time yk? yk
A spur-of-the-moment post (this ain’t even listed on the index yet) because I want to plan out a cuff!
First, you probably want to decide what kind of kandi you want it to be. Don’t be afraid to get ambitious, it’s good to test your limits! Weigh the pros and cons of any idea that you have. How heavy is it? How many beads will it take? Do you go to raves? If not, do you have room to store it? If you do, will it be too heavy to carry around for an extended period of time? It’s good to consider these, amongst other things, while planning out a project.
I don’t really go to raves, but I think I have room for another rotating cuff of standard size in my drawer. I say this because I want to include perlers on this project. That might be a bit harder with smaller cuff types.
Next, we need to think about colors! If you have a theme, which you probably do, this part shouldn’t be too hard. Pick some major parts of your theme. If you’re going with, say, strawberries, you probably want a lot of pinks and reds and greens and maybe whites. If you’re going with scenecore, you probably want brighter colors and black. If you’re involving an original character (OC) in your project, think about their colors.
Maybe go with half of one theme, and half of another. On my Night In The Woods rotating cuff, the top X is orange and yellow and black, while the bottom X is purple and blue and pink. The middle part is just random other colors.
Next, probably sketch it out, or think it out. What colors will be going where? Because I’m planning a rotating cuff, I gotta plan for the X-base, the top X, the bottom X, and the rotating part. This could be super simplistic for you, though. Maybe it’s just a X-base, or maybe it’s just a set of singles.
Then, go buy supplies if you don’t have them already! You can probably get a rough estimate for how many beads you need. If you did that, or already have the beads, nothing’s stopping you now! Make all the parts you need, if applicable, and make your project a reality.
An easy post, because I’ve come down with a bad cold and I feel terrible lmao.
The100 Singles Challenge popped up on Kandi Patterns in 2012. I found it when digging through old threads. The idea of it is to, as you have probably surmised, make 100 singles in one sitting.
‘That’s easy’ I thought, starting this late at night. I ended up making 8 before going to bed due to leg pain that occurs due to staying up too late. I did pay for it the next day lol. I also ran out of ideas fast.
I feel like this would be cool for ravers trying to make singles to trade for events. It’s also fun to just push yourself (in a healthyway) to see what you can do, much like NaNoWriMo or drawing challenges in October.
For more of a challenge– or maybe just for variety– I’m going to propose that you’d be able to modify the rules to include allforms of kandi. Imagine 50 masks in a week or two, that’d be pretty cool… and tiring, but I don’t make a lot of masks. It may be fun to others.
Now go! Go forth and make an unholy amount of kandi. This is the excuse you’ve been looking for.
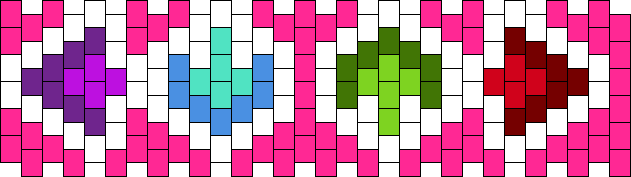
[ID: A picture of a multi-stitch kandi pattern depicting arrows from the game Friday Night Funkin’ on top of a pink background. The arrows have a white border around them. From left to right, the arrows are as follows: purple and pointing left, light blue and pointing down, green and pointing up, red and pointing right. The arrows are colored with a darker version of their main color on the arrow points. This picture of the pattern comes with the numbers labeling each row. End ID.]
This is gonna be a long one. Here’s some music for you to play, if you don’t have any out already.
Before we get to counting out beads– we should look at sizing. Most people say the average wrist should fit about 30 beads, but I personally prefer my cuffs to have 34-36 beads. I’d probably make a single that fits you, and increase how many beads that has by 2 or so. I think it has to be a multiple of 2 to work– or you’ll have to use an even number. If you need to make a cuff bigger, you can remake it in the pattern editor and size it as you wish. This is time consuming, but is certainly worth it to assure that it fits you.
If this applies to you: You know all those weird bowls you threw in 3D Art class? This is a good time to use them to store the beads you’ll use.
Generally, unless you’re reallyconfident you have enough, it’s a good idea to count out your beads beforehand. Yes, even if you need 500 black perler beads. Count that out. I like to use my phone to keep track of where I am, I’ll usually count out 10 beads or so and mark that down on my phone.
This pattern calls for 66 pink beads, 68 white ones, 7 dark purple ones, 5 cyan ones, 7 dark green ones, 7 dark red ones, 4 bright purple ones, 7 vibrant blue ones, 5 bright green ones, and 4 bright red ones. That is, if you’re gonna be going with the original sizing. It’s a good idea to open the pattern so you know exactly what I mean, the information you’ll need is under ‘Bead Counts’.
…But what if you don’t have 66 pink beads? It happens all the time. You can absolutely replace it with another color. So, go count out your thing, and I’ll be seeing you back here shortly.
…Also, it’s usually a good idea to have extras in case you counted wrong. And if you’re bad at color recognition like me, sort your darker colors and lighter colors in different containers so we don’t get confused.
…Are we good? Good! So, going back to the pattern (you have it open in another window, right?), I like to take a picture of it using my phone– or send it to myself on Discord or something– and I like to mark down where I’ve put beads and all that so I don’t lose track. Basically, get the picture of the pattern, and do something with it so you can draw on it.
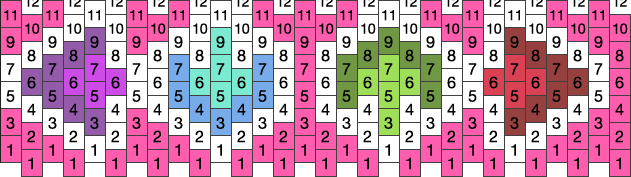
First, we’re going to start with row 1– or the beads in the pattern marked with a 1. If your pattern doesn’t have the numbers, click on the image and it should enlarge with the numbers. If you made pattern adjustments, you can go to Label in the pattern maker and hit 'Label by row’.
Now, you’re going to want to put every bead labeled one on your string, in that order. Following the original pattern, this would mean you put on 4 pink beads, then 1 white one, then 5 pink ones, etc. I’m not following the original exactly– I’m adding 4 pink beads at the end to fit my wrist– so mine’s gonna look a littledifferent if you’re following the original pattern. Once you get all those 1 beads on, tie off that single.
[ID: A picture of a kandi single. From where the string is hanging off at the bottom right, there’s 4 pink beads, 1 white one, 5 pink beads, 1 white one, 7 pink beads, 1 white one, 5 pink beads, 1 white one, and 9 pink ones. End ID.]
Now, we’re gonna disregard the short end of our string. You can cut it off now, or leave it on. I’m going to leave it on for now. Meanwhile, take the long end of your string and feed it through the pink bead next to it that’s closest to a white bead.
[ID: A picture of the same single. The string is now fed through one of the pink beads. The original bead the string was coming from has a green dot on it, the new bead the string is coming from has a blue dot on it. End ID.]
The original bead the string came from has a green dot on it, the new one has a blue one. You can make sure you did this right by looking at the pattern. As you can see, row 2 starts with a pink bead in between 2 pink beads, and on top of 1 pink bead. The second bead of row 2 is between 1 pink bead, and 1 white one. As you’re doing your next row, make sure everything looks right.
So now we’re going to start on row 2. Row 2 starts with that first pink bead marked with a 2. So, we’re going to put a pink bead on our string, we’re gonna put our string through the next pink bead, and we’re going to pull. We’ll create a result that looks like this.
[ID: A picture of the same single, but with a new pink bead stacked on top of an original pink bead. End ID.]
We’re gonna keep doing this around the entire row. Put a bead on your string, thread your string through the next bead, mark it down on the pattern. Also, remember to pull your string tightly, otherwise you might not get expected results… But that’s an easy way to hurt your hand, isn’t it? So, here’s how you can tie off your cuff so you can let go of your string.
[ID: A picture of the same single, with some beads from row 2 added. The string was put underneath the bead it was coming from, creating a loop on the right and the rest of the string to the left. End ID.]
Put your string under the bead you’re coming out from. Pull that upwards a bit so it gets lodged in-between the bead you’re coming from and the next bead. This creates a loop of string on one end, and the single piece of string from before. You can put the single piece through the loop and pull, and it’ll create a knot on the inside of your cuff. This explanation’s probably bad, here’s a clip on it.
[ID: A picture of row 2 almost being completed. Two beads are marked in the colors green and blue. End ID.]
So…
What now?
If you’re panicking because there isn’t a bead we can go through– don’t worry. There is. After a put a bead on our string, we wanna go through the green and blue bead. We want to come out of the blue bead. Thisis why, when making multi-stitch patterns, we have the diagonal row starts. So, we’re coming out that bead… and we’re ready to start row 3! But we aren’t starting at the far left of the pattern. If you recall, row 2 started at the bead diagonal to the start of row 1. Row 3 is starting at the bead marked 3 that’s diagonal to where row 2 started. So, the first bead of row 3 will be white, and the next will be dark purple.
So, you went to the far right of the pattern… what now? Go to the left and cover the bases we missed from going diagonal. I’m assuming you aren’t doing this mentally like I am. Follow the pattern, or your makeshift pattern. Once we get to the end of the row, we’re gonna go through the two beads again and do the next row. Row 4 starts diagonal to where row 3 started. So, row 4 starts with a dark purple bead.
And… that’s it. You keep doing this until you finish the pattern. Here’s a video on this type of cuff if you’re confused, and here’s Kandi Pattern’s text tutorial.
I’m gonna cut you loose now. If you need help, DM me and I can try my best to help you! If you wanna show me your kandi too, please do. I have an index for a reason, if you wanna submit your beginner’s creations, please do!
If I can be honest, I didn’t learn to read multi-stitch patterns until WAY late in my kandi-making hobby. I’d probably been making kandi for ¾ of a year before I learned, because it looked reallycomplicated. If you’re looking for how to make these patterns, how to resize them, etc., go here!
Good news? It isn’t complicated! Also good news, this good news isn’t accompanied by bad news like it usually is. Unless a longer post counts as bad news. So, how does it work?
Today, we’ll be looking at this Friday Night Funkin’ Arrows pattern by bugbinary. Ender has a bunch of other cool patterns, so go give enders patterns a look if you think it’d interest you!
[ID: A picture of a multi-stitch kandi pattern depicting arrows from the game Friday Night Funkin’ on top of a pink background. The arrows have a white border around them. From left to right, the arrows are as follows: purple and pointing left, light blue and pointing down, green and pointing up, red and pointing right. The arrows are colored with a darker version of their main color on the arrow points. This picture of the pattern lacks numbers. End ID.]
If you listened to or read through the image ID (which, I hope I’m doing well with those. It’s my first time trying to use them), you’d think that there’s numbered versions of multi patterns. There are! Here’s an example of the same cuff, but with the numbers.
[ID: The same picture of the cuff from above, but numbered. The numbers increase for every row of the cuff. The numbers on this cuff go from 1 to 12. End ID.]
These numbers are extremely helpful for beginners. Please note that any pattern that isn’t a multi-stitch pattern will not come with the numbers. More information on why that is will be included in other ‘how to read’ posts.
So, what can these numbers do for us? For starters, the numbers tell us how tall the cuff is; or, in other words, how many rows it has. I’m aware that the website tells us that the cuff is 6 rows high, but I prefer to count rows as how many beads tall the cuff is. For this pattern, you’ll be going around the cuff 12 times– and making it taller 12 times– so I think it’s easier to think of it as 12 rows high.
This is all pretty easy so far, right? The one part that trips people up is starting new rows. As you do rows in multi-stitch cuffs, where you start on the pattern is going to shift right a spot every row. For example, row 1 is going to start at that 1 on the far right. Row 2 is going to start at that two that’s up and to the right of the 1. Row 3 starts up and right to that two, so at the white 3. Below, I’ve illustrated this.
[ID: An image of the same pattern from before, with the numbers, except with a blue line travelling diagonally from the first 1 on the far right to the 12 at the top that’s one spot left from the middle. End ID.]
The blue line illustrates where you’ll be starting your new rows every time you, well, start a new row. As you do the row, you’ll come back to the far left of the pattern and put down beads that you missed.
So that’s essentially the gist of it. You start with a single consisting of the beads on row 1, then you put a bead on your string from row 2 and go through the bead after that. If it’s confusing, don’t worry. It was to me too. Reading the post on actually making one will probably make it seem less convoluted (seriously that was a LOT of information all at once, wasn’t it?).
Go take a break, and maybe try out a pattern for yourself. I’m gonna go hope I have enough beads to make this for the multi tutorial!
Dollar Tree’s baby shower section (in a party aisle) has huge pastel-colored safety pins. They are not actual safety pins, they don’t come apart, but they’re cute. They’re sold in packs of 12 where I live.
Walmart has some pre-strung beads, but you’re better off looking in-store for that. Walmart also has small, usually cheap, bags of a few (or maybe even only one) assorted specialty beads. I use these sometimes, and I haven’t had issues.
And hey, can’t go wrong with cutting up children’s necklaces n stuff, right? As long as said children aren’t super attached to it and don’t need it, that is.
Pinterest, fulfilling it’s original idea, is full of inspiration. I think you need an account to search the site, though, and you probably won’t be able to narrow it down toomuch.
r/kandiandr/beadsprites have pictures of kandi and Perler/Hama/Artkal sprites, respectively.
If you want to do a specific Perler, I like to use the Beadifier. You can customize the brand of beads your generated pattern uses, how many boards it fits on, and the main usage of the site is to make a beadsprite pattern from a picture. It’s insanely useful. (P.S. if I use the Beadifier, I like to make a private pattern of it on Kandi Patterns so I know how many beads I’ll need. I usually never publish these generated patterns unless I modified them, because otherwise it was pretty effortless to make them.)
Once you get to a certain point, this doesn’t really help anymore. But searching for kandi tutorials on Youtube can give you some inspiration. I guess if you’re reading most of my posts, though, those may not be working for you.
Tiktok has a kandi tag that’s inspired me before. If you want something hard, you can always ask @/ghostinthecrowd if you can remake their designs. The worst that can happen is they say no, so it’s totally worth asking.
Then, if you’re feeling superlazy or tired or low or any combination of things, you can just make character or song singles. You can really do anything with singles, the possibilities are literally limitless. They can be as simple (like basic pony beads and letters) or as advanced (beads and charms and glow in the dark stars and colored letter beads) as you’d like. This is for you, so do whatever you have the energy/patience for.
Holiday Sale !Get30% OFF your order when you purchase 2 or more items of any price ! Free shipping on orders $35 and up ! I’ve got some new stuff listed, like a sweet gengar patch ! ♡ Shop Here ♡
Also giving away a $5 Off Coupon Code to three random people ! Reblog to enter !
hey friends ! my etsy shop is officially reopened ! i have a new halloween kandi bracelet grab bag up right now, as well as fairy kei/decora kei accessories ! Reblogs would be super duper appreciated as my shop and art commissions are my only source of income ♡