#assemblage art


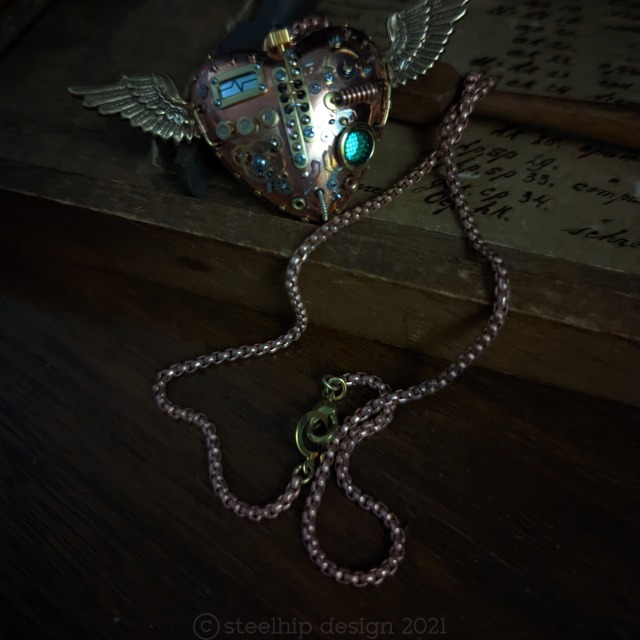
My latest heart.
I know - another heart. I still love making them and, at this time of year, I get a lot of requests. Each is unique - sometimes on purpose, sometimes to cover up an accident - drill scratch, hole in the wrong place etc. The heart itself is vintage - new old stock from the 1970s - a lucite core with a thick copper plate. They are still available but, eventually, I’ll have to find an alternative. I’d love to find similar wood hearts - that could be hinged with a secret internal compartment. If anyone knows where something like that can be sourced - let me know. Dimensions would be 1 ½ inches wide/high and about ¾ of an inch deep so they could be cut and hollowed out.
The next one I’ll be making will be a bit different - a central “window” with a flashing red LED - with batteries that can be replaced. It will have to be a symmetrical design with a feature taking up that much real estate on the heart. I’m starting it tonight and I’ll post a video of it to show the “flash”.


SS Cicada
I don’t know where I got the idea for a dirigible cicada miniature model but here we are. Falling asleep with my YouTube queue probably with videos on the recent 17 year cicada cycle followed by the use of airships during WW1 must have blended together in my subconscious. I enjoyed creating the last insect - the custom bee - I had to do another but this was too large for a piece of jewellery.
So I worked on each separate section, hoping it would all fit together in the end. That’s always the scary part - will the wings fit on the body? Will the scale of everything maintain the illusion of an actual, albeit fantastical, airship once joined? Unlike very clever model scene makers I don’t work with a scale ruler. As I don’t fabricate or cast metal there is no real point - I’ll still have to adjust a part in my collection to fit.
I started with the wings - they bring everything together and set the scale. Like the last piece - the body is a brass screw electrical terminal. The abdomen has two main parts - the high copper piece with a grill and a lower section made from a cut out earing drop I filled in with resin. The wings are also filled with resin and a very light dusting of green and gold mica.
I’ve been making miniature nebulas lately so that is where the glass “hot air balloon” came from. It is fitted with a vintage brass bead cap, chains, tiny brass drops and internal details. While I was searching for pieces I came across the hand blown green glass bead with a swirl pattern. I had to incorporate it but it was difficult to do so. Adding a piece to one side of a symmetrical design alters the way it hangs. The swirl on the bead is matched with the black swirled disk hanging under the balloon.
She has wrapped wire legs with metal crimps, two brass and steel “propellers” affixed to the front, one large rear flag and bunting on the secondary “balloon” tether. Everything attached is done so using screws and very rarely, glue. I have no idea how many separate components I used but it would be well over 100. I’ve been working on and off for a week - probably about 40 hours not including the time sourcing parts, taking photos and writing this. The rigging was a nightmare. The chain at the back, connected to a “U” shape piece is the ship’s anchor.
A friend who is a genius wood worker turned some gorgeous wood bases for me. I think it’s Jarrah. It has four brass legs on the bottom. The hanging mechanism consists of a filigree disk, a vintage brass corrugated bead and assortment of brass rods, copper and brass tubing and beads. The top section pulls out so it can be packed for shipping.
One final surprise. I left a hole in the body for a tiny green LED light. It is difficult to use - turning on by pushing the light into a battery. But it could be used on special occasions to show her off. The battery type is a bit exotic but available online.
I’m thinking about entering her in a local art competition before putting her up for sale. I hope you like her.
Star Box II
Well I enjoyed making the first solar system box - I had to make another. This started as a basic pine box. I stained it, swapped out the hinges and latch, created the “windows” and covered them with mesh and brass frames. You can’t see it but there is a lock washer (it looks like a reverse gear with internal teeth) in each porthole illuminated by mounted LEDs. The six sides are covered with riveted struts, brass features and vintage cut star cabs. The central orbit field has a solid metal ring and twisted wire frame with brass claws. I created tiny brass winders over two vintage gears with round cut outs. Two different kinds of alarm clock winders are located on each side. There is also vintage brass knurled nuts on the sides. Finally there are 3 brass star cutouts above the hinged side.
The planets are driven by an internal wood disk with embedded magnets. I also did a similar thing as the last piece - drilled holes in the lid and disk sitting above 4 LEDs. As it spins the “stars” twinkle. The lights and motor have separate battery packs with switches. Sorry, I’m still not clever enough to rig a single battery pack and external on/off switch. Next one….
I’m really enjoying this foray into these larger projects. It’s my inner prop builder coming out. Unlike the last one - this one will be for sale in my Etsy shop.


Steampowered Pollinator
Sticking gears on everything is debated in the steampunk community. Some just love the gear in its own right, others say sticking gears on everything and calling it “steampunk” misses the nuance and aesthetic of the genre. I’m in the middle - I use gears but not “orphan” gears and they must look like they actually have a purpose in the design. They can imply movement.
I’m telling you this because I wanted to make this piece with no gears. I wanted it to look like a miniature steam engine powering this little guy. Starting with a brass shelf support pin I drilled numerous holes to attach the “engine”, exhaust, wings, head and legs. Everything is screwed in.
He needed a purpose - in situ - so I made him a stand, bracket with a copper and brass flower to “fly” to. It’s curled around the main support. He can be taken off the bracket but I really like seeing him “working”. He is a combination of parts from jewellery supplies, watch parts, electrical supplies and miscellaneous hardware.
Thanks for looking! I really appreciate all the support I get from my Tumblr community.
Post link


The Metropolis - Capital City.
I see a lot of watch innards in my work. Using a disassembled movement, the “skeleton” of any watch, as the basis for a tiny city has been rolling around in my head for a long time. Most of the holes for the “buildings” are already there. I sometimes need to pop the “jewels” out, usually low grade rubies, so all the holes are available. Many of the “buildings” are seriously tiny, sub 1 mm wide and a few millimetres high. They can also be very sharp. My first attempt wasn’t great as I couldn’t get the “buildings” straight and parallel. Take two using putty hardened before installing all the “buildings”. Third time’s the charm. A little futuristic city with a range of buildings, tiny details and a central “lake” using clear resin. You can’t really see it in the photos.
Here is the dilemma I faced:
It needed to be photographed without the glass so you can see the details, texture and how light plays off it at different angles. It is designed to be a pendant on a chain but for that use I have to stick down the glass dome permanently. If you want it as a piece of art, sculpture, desk ornament, assemblage - I can leave the glass unattached. If there was a way I could do both I would but I can’t see any way to do that using my current skills, supplies and equipment. If it’s displayed on a shelf close to eye level it would be great to keep the glass on to avoid dust but also be able to take the glass off to see all the minute detail. It will also get a lot of attention as a unique jewellery piece on a long chain.
So I leave that option to you - just let me know. It will be the same price for either option.
Components:
- Silver tone tubing - polished
- Two part putty
- Vintage silver tone watch movement
- Assorted watch stems
- Assorted watch bar springs
- Assorted winders
- Assorted balance staffs
- Earring posts
- Pins
- Electronic probes
- Clear resin
- Assorted tubing
- Miscellaneous parts
- Assorted crimps/beads
- Pinions
- Glass dome
- Brass disk
- Brass setting tray
- Eye up loop
Build time: 7 hours
Under the glass dome the pendant is just under 2 inches (4.5cm) high and 1 inch (2.4cm) wide. The chain would be brass gold tone rollo link at the length you would like to wear it at with a lobster claw clasp.
Thanks for looking!
Post link


Pink Tritium Bug
Yes, another tritium piece and a bug. Kept this one a bit more conceptual - not so accurately insect. She is very cute.
I started with a pink tritium vial, sealed within a second glass vial. The legs are lever action earrings - that can be moved, bolted on to a bracket. The brass top is screwed into a cord cap. The “face” is a solid brass six sided cabochon. I screwed a bolt into the flat back and then bolted it on the cord cap on the end. Finally I wrapped fine gold tone wire around the head/face join to form antennas.
Please note: pink is one of the least bright tritium tubes. My camera changed the true colour so I used digital manipulation to correct the colour values. My graphics/web design skills are still useful.
She’s slightly over 1 ½ inches long, 1 inch wide and stands ¾ of an inch high - excluding her antennas. I was going to sell her as a pendant - and if someone wants to wear her I can attach to to some chain joined with clasps to her wings. If you need more photos of that - feel free to contact me. You would have to be very careful wearing her - the antenna are fragile. Leg bolts might also loosen with movement and may need to be tightened.
The tritium is estimated to glow for 10 to 15 years without the need for a charge or batteries.
.
Post link
