#mixed metals


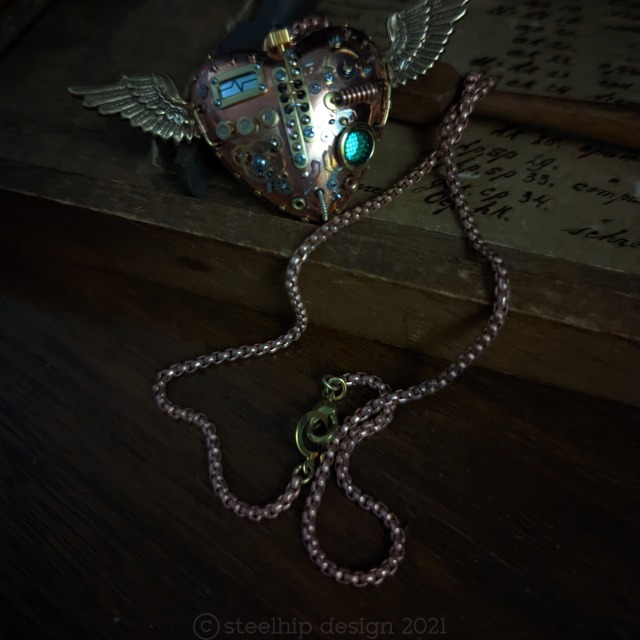
My latest heart.
I know - another heart. I still love making them and, at this time of year, I get a lot of requests. Each is unique - sometimes on purpose, sometimes to cover up an accident - drill scratch, hole in the wrong place etc. The heart itself is vintage - new old stock from the 1970s - a lucite core with a thick copper plate. They are still available but, eventually, I’ll have to find an alternative. I’d love to find similar wood hearts - that could be hinged with a secret internal compartment. If anyone knows where something like that can be sourced - let me know. Dimensions would be 1 ½ inches wide/high and about ¾ of an inch deep so they could be cut and hollowed out.
The next one I’ll be making will be a bit different - a central “window” with a flashing red LED - with batteries that can be replaced. It will have to be a symmetrical design with a feature taking up that much real estate on the heart. I’m starting it tonight and I’ll post a video of it to show the “flash”.
Well I’m sitting in hospital unexpectedly - nothing too serious. I was going to post this last night but I was in too much pain.
So this is a proof of concept. The word “magical” is used far too much but that was my ambition. Something of unknown use and unknown provenance.
Proof of concept is the build I make all the mistakes on - motor too fast, planets too large and high, LEDs wiring wrong and ugly battery packs. Internally this might not be saleable quality.
The video isn’t great, sorry. When I get home I will take some still photos of all the decorations and detail. It was inspired by those magnetic ballerina jewellery boxes from the 1960s. She would dance around a mirror when the box was opened.
I initially covered the neodymium magnets and attached the planet on a post. Wrong. They fell down, stuck to each other with such force they ended up broken. So I’ve gone for simple using the magnetic force to hold the metal spheres. I will include several spare magnets and planets.
I hope you like it!
Steampunk


Steampowered Pollinator
Sticking gears on everything is debated in the steampunk community. Some just love the gear in its own right, others say sticking gears on everything and calling it “steampunk” misses the nuance and aesthetic of the genre. I’m in the middle - I use gears but not “orphan” gears and they must look like they actually have a purpose in the design. They can imply movement.
I’m telling you this because I wanted to make this piece with no gears. I wanted it to look like a miniature steam engine powering this little guy. Starting with a brass shelf support pin I drilled numerous holes to attach the “engine”, exhaust, wings, head and legs. Everything is screwed in.
He needed a purpose - in situ - so I made him a stand, bracket with a copper and brass flower to “fly” to. It’s curled around the main support. He can be taken off the bracket but I really like seeing him “working”. He is a combination of parts from jewellery supplies, watch parts, electrical supplies and miscellaneous hardware.
Thanks for looking! I really appreciate all the support I get from my Tumblr community.
Post link


I ordered some amazing brass stamps over Christmas and here is one put to use in the latest mechabug. Watch parts feature heavily in this guy with layers of parts on his face, head and along his top “backbone”. His “legs” are repurposed lever action earrings - cut and adapted for this use, with watch winder stems at the end. Flat semicircle brass stamps form the main skeleton all threaded on a brass rod with sleeves and springs between them. Threading the gears and minute pinions on the “top” backbone was very tricky - a lot of swearing at inanimate objects.
He is 2 inches long, 1.5 inches wide and stands 1 inch high. He’s designed to just sit on your desk or shelf, keep you company and impress guests. He has a hanging loop so it would look like he’s walking down your wall.
When I was researching anatomical bugs for this project I accidentally found myself looking at the Russian spy cockroach - very interesting. So here is the steampunk version. Love to see him come to life…
Post link


Light Spider
This has been a long time in the making. The parts have literally been sitting on my work desk all year. First problem was creating the abdomen from two perforated domes - something that could be opened and closed. So I found a tiny little hinge and fashioned a swing hook latch. Next major problem was the legs. Another artist who I admire greatly solders watch winding stems for insect legs. I wanted to use the same materials but I don’t copy. So I used sleeves, cord end tubes with loops, tiny rubber rings and brass rods. They are screwed to a brass ring. I did want a lot more detail in the cephalothorax but decided to go simple with a stepped brass finding with brass rings attached underneath for the central screw. It’s more wild wild west than a real representation of a spider.
The glow is from the innards of a LED “fairy globe” sold on one of the big wholesale sites for party decoration. I took it out of the plastic ball and put it in the spider’s abdomen. The light pulses slowly on and off. Batteries can easily be replaced. It doesn’t have a switch so I just break the circuit with a toothpick between the battery and terminal to turn it off.
It’s 3 inches wide, 2 ½ inches long and 1 ½ inches high.
Thanks to all my followers - I really appreciate all of you. I hope you have a wonderful New Year and fantastic 2019!
Post link


Tritium Powered Assassin Bug
No, not really “powered” by tritium but that would be fantastic. It’s just a fantasy mechanical winged insect with a tritium rod in the abdomen.It’s hanging from a stick pin so it can attached to clothing. The legs are vintage watch stems attached to brass rods. Nearly every connection is nuts and bolts - tiny nuts and bolts. The centre piece is brass with a square top screw securing the glass vial to the body and head.It’s estimated the green tritium will glow continuously for 10 to 12 years. It doesn’t need “charging” from a light source like regular glow in the dark.
It’s 1 ½ inches long, just over 1 inch wide and stands ½ an inch high. It’s US$185 shipping included. If you are interested in buying it - drop me a line with your paypal email address and I’ll invoice you.
Post link

Simply refreshing.
Explore the Marine Modern Kitchen and discover the beauty of a navy palette paired with mixed metals.
Post link

Mixing metals – here a stainless steel apron-front sink, Polished Chrome faucet and brass hardware create an edgy, contemporary feel while bringing in traditional accents.
Post link


Inspired by a California casual vibe, designer Kerrie Kelly chose a navy palette to showcase her White Zeus Extreme and Albedo countertops.
Post link


I did not do her piercing, but I did help cultivate her gorgeous septum stack!
Featuring gold jewelry by @buddhajewelryorganics@bodygemsgoldbodyjewelry and BVLA
Post link

Necklace artist handmade lanyard lariat lavalliere
Local artist made lariat or lanyard style necklace in shades of rose, pink, purple and cream. Necklace is on gold tone chain and contains - amethyst, freshwater coin pearls, dyed oyster shell, clear polished quartz, rose polished quartz, raw rose quartz, dipped pearls (glass beads dipped in a medium that makes they look like pearls), blown Venetian glass beads.
http://stores.ebay.com/thecurrentfashion/Jewelry-/_i.html?_fsub=10888364012
http://stores.ebay.com/thecurrentfashion
https://poshmark.com/closet/modcall
#TheCurrentFashion
#style#fashion#eBayFashion#eBay#ShopMyCloset#artist#jewelry#necklace#lanyard#lariat#lavalliere#mixedstones#mixedmetalsjewelry#mixedmetals#stones#colorful#colorfuljewelry#colorfulnecklace#goldtone#chain#chainnecklace#quartz#amethyst#beads#localartist#FloridaFashion#glassbeads#handmadejewelry#handmadenecklace
Post link