#michelle murray


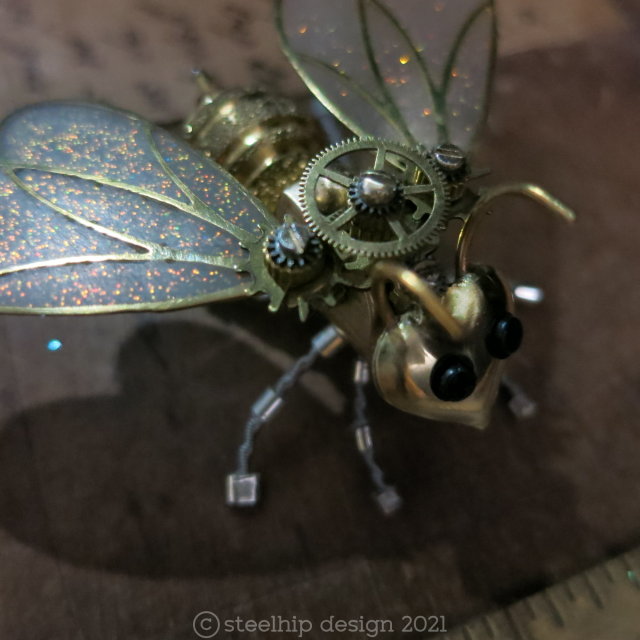


I had a client recently ask me to make a steampunk mechanical bee for her and gave me a photo of a tattoo for reference. This is the result. The wings were a problem as I wanted them light. I ended up cutting down two brass pendant bases and filling them with UV resin. They then had to be sanded back to the brass and finally polished. I was aiming on transparent but the frosting works. Her body is an old brass electrical terminal cut to fit. Her wire legs are threaded through the body for security. The crimps are for effect and to stop the feet scratching if worn as a pendant.
She also contains an assortment of gears, pinions, screws, bolts, rivets, an electrical probe is her “stinger” and her wire antenna do rotate. I hope the client likes her but if not I’ll try again. I’ve already had interest so she will sell either way.


What a dapper chap! I was inspired by a few posts and popularity of my LED experiments in design. Found an old skull charm, gave him goggles and cobbled together a top hat from an XL brass eyelet, some cut brass tubing and walled setting. I attached it at a slight jaunty angle. Couldn’t resist installing a tiny LED within the skull set in resin. Like my other pieces it’s powered by putting a small clutch battery pack on a small post. The whole piece is set on a stick pin so it could be worn on a cravat or dress coat. Unfortunately, the LED has made it very difficult to photograph accurately. The light seems too bright but in reality it’s just an eerie green glow. Perfect finish to a gentleman’s outfit who dabbles in the macabre and dark arts. The batteries are easy to replace.
Post link


The Detector
I’ve been overdosing on documentaries about CERN, the Large Hadron Collider, quantum physics/mechanics and proof of the Higgs Boson. As a science illiterate it fascinates me. That massive tube full of magnets, cameras, detectors and liquid nitrogen is an incredible instrument. Simply awe inspiring. These docos play in the background in my studio and I would occasionally look up to see the massive size and complexity of the machine.
This started with simple flat brass rings with eight holes and some rescued snake chain I cut into eight lengths. This design wasn’t thought out - I just had to wing it. I vaguely wanted a “cage” to hold a glass vial with a Tritium vial in it. Etsy doesn’t like Tritium (their sandpit - their rules) so I sell those pieces off Etsy. It basically glows without the need for a charge - it glows constantly for 10 to 15 years. But I’ve been working with UV resin and recently purchased some tiny LEDS. So I set an orange LED into a gold tone cord cap with UV resin. Then I put a glass tube into the cap and slowly poured resin into the tube stirring it frantically to produce air bubbles. Normally I’m fighting against air bubbles in resin so trying to form and quickly cure them was surprisingly difficult. I didn’t even know if the LED and electronics was going to work after pouring resin on them. The light refracts and diffuses on the bubbles. I was thrilled when it all worked.
Once I had brass beads on the end of each chain length I threaded a range of beads, pinions, tubing and 5 brass rings to stabilize the tube. I still had no idea if the vial would fit through the middle and how I was going to attach it to the structure. This is where the magic often happens - it fit like it was designed with precision. To fasten it within the tube all I had to do was slide another cap on the top of the glass vial and seal it with a screw.
As you can see - when unlit there is a small silver tube, slightly hidden by the brass tassel. To turn the light on - insert that tube into the battery pack - a tiny silver tone tube with a central hole (3/8 x ¼ inch). Once inserted it turns the LED on. Batteries can be replaced easily by unscrewing the cap.
During the day - it’s an unusual mecha deco design - at night with the light - the wow factor.
It sort of looks like a little mechanical cephalopod with those 8 tassel “legs”. I’ve designed this to be worn low on the body - Gatsby length with a long chain. It’s hitched high on the display bust just to show scale and fit it into the photo. If you want it to be higher - I’m happy to alter the chain length.
Post link


Steampowered Pollinator
Sticking gears on everything is debated in the steampunk community. Some just love the gear in its own right, others say sticking gears on everything and calling it “steampunk” misses the nuance and aesthetic of the genre. I’m in the middle - I use gears but not “orphan” gears and they must look like they actually have a purpose in the design. They can imply movement.
I’m telling you this because I wanted to make this piece with no gears. I wanted it to look like a miniature steam engine powering this little guy. Starting with a brass shelf support pin I drilled numerous holes to attach the “engine”, exhaust, wings, head and legs. Everything is screwed in.
He needed a purpose - in situ - so I made him a stand, bracket with a copper and brass flower to “fly” to. It’s curled around the main support. He can be taken off the bracket but I really like seeing him “working”. He is a combination of parts from jewellery supplies, watch parts, electrical supplies and miscellaneous hardware.
Thanks for looking! I really appreciate all the support I get from my Tumblr community.
Post link


Orrery Locket
I wasn’t sure why I bought the ball locket from one of my regular suppliers but I’m glad I did. I really wanted to attempt putting an orrery model in something that small. It was far too small for arms or any rotation so it’s fixed - no movement at all. The gears are there to imply movement - nothing more. I created the black round ½ ball base in black resin. It is held there by a screw through the base of the locket and into the resin. The next challenge was finding ball head pins to represent all the planets within our solar system. Sorry to Pluto but there was no room left.
Perfect to add the wow factor to your Victorian and/or Steampunk costume but versatile (and symbolic) enough to be worn with contemporary fashion. It’s on a very long (Gatsby length) chain so it sits low on the body. This will be a great length so it’s easier to show friends and family without getting yanked or strangled.
Components:
Bought filigree textured highed ball locket
Black resin ½ ball
Assorted ball pins
Thin hollow pipes
Screw
Vintage gears
Brass washer wing
Brass tone rolo chain
Assorted rings
Lobster claw clasp
Build time: 7 hours
The pendant is just under 1 inches (2.4cm) wide and 2 inches (4cm) long including two large hanging links. The chain is brass gold tone rollo link, 36 inches long with a copper tone lobster claw clasp. It is designed to be worn low but can be altered if required.
Thanks for looking!
Post link


This is a recent commissioned piece - a Christmas gift for my client’s partner. I was going to mount the spring loaded clip holding the vial on a plain rectangular piece of brass.On a whim I held it over the copper ring that was on my work area. Although it’s quite simple I’m really happy how it’s turned out and will take this concept a bit further in the next piece. I’ve got to buy more tritium as I’m down to my last few sticks - just yellow and pink left.
Post link


Mindspace
To paraphrase the great Carl Sagan “we are all made of space stuff”. The carbon atoms that make us existed when our solar system first formed. This piece is designed to make us think about our existence on our planet in our little corner of the Milky Way galaxy.
This is made backwards, layer upon layer over 4 to 5 days. I can’t see the end result until the final layer is cured and the resin is polished to transparency on her forehead. I leave the facial features slightly frosted so they can be seen. There are air bubbles but I think they work within this piece.
All the planets are there - in order and relative size within reason. The sun and planets are sitting above a vintage copper clock hairspring. The black background was necessary for dramatic contrast. She will be available in my Etsy store.
Post link


Tritium Powered Assassin Bug
No, not really “powered” by tritium but that would be fantastic. It’s just a fantasy mechanical winged insect with a tritium rod in the abdomen.It’s hanging from a stick pin so it can attached to clothing. The legs are vintage watch stems attached to brass rods. Nearly every connection is nuts and bolts - tiny nuts and bolts. The centre piece is brass with a square top screw securing the glass vial to the body and head.It’s estimated the green tritium will glow continuously for 10 to 12 years. It doesn’t need “charging” from a light source like regular glow in the dark.
It’s 1 ½ inches long, just over 1 inch wide and stands ½ an inch high. It’s US$185 shipping included. If you are interested in buying it - drop me a line with your paypal email address and I’ll invoice you.
Post link