#steampunk art


Hello everyone! This is my latest work, a miniature factory created inside a watch case. Most of it has been built by using tiny watch parts. It is a factory which turns stone into gold. The stones are fed into the machinery on the top right, to go through a process of complex transformation inside the factory and come out as gold in the bottom right. The bits of gold I used are actual 9K gold. Enjoy!
Post link


Hello everyone! This is my latest creation, a tiny flying ship with three figures working on it. There is a steersman at the helm, a lookout on the top looking through a telescope and a stoker shoveling coal into the steam engine. The flying machine has been made out of tiny watch parts and the entire scene has been bulit inside a vintage pocket watch case. The front has been closed with a piece of glass from an incandescent bulb that I have cut to size. Enjoy!
Post link


Hello everyone! This is a private commission I made, a miniature robot inventor’s workshop. It is made primarily from watch parts and contains a good deal of tiny objects, tools and details. I built it on a pocket watch case and closed it on top with a glass dome. Enjoy!
Also check my Etsy shop to see some of my other creations:
www.etsy.com/shop/MicroJewellery
Post link


My latest piece, a miniature factory which converts tiny pieces of stone into gold. All the machinery has been made with tiny watch parts and other metal bits and has been fitted inside a vintage watch case. Made to be worn as a pendant. Enjoy!
If you want to view more of my work don’t forget to visit my Etsy shop and website:
www.etsy.com/shop/MicroJewellery
Post link


My latest creation, an ultra-tiny robot inventor’s workshop made inside a watch case. The inner diameter of the watch case measures 1.6cm or 0.6’’. All the tiny robots have been made by assembling many tiny watch parts. The inventor is holding tools while working on one of the robot’s inside. Fitted with a chain and closed with a piece of glass on the front, it has been made as a wearable necklace. Enjoy!
Available at my online shop:
www.etsy.com/shop/MicroJewellery
Post link

This one was fun to build. It is an ultra-tiny robot workshop with a man hard at work building and repairing robots. It is made almost exclusively from tiny watch parts. Some of the features, such as the tools on the table, are a little hard to discern. I took most of the pictures without the glass but the final piece is closed with a piece of glass on the front. Enjoy!
Available at my Etsy shop:
www.etsy.com/shop/MicroJewellery
Post link


My latest miniature world, this time made inside an old clock case. This is a factory of diamonds: rocks are being fed by workers to the complex machinery in order to go through various stages of processing, be refined and become diamonds. Made mainly from clock and watch parts as well as various other metal bits and parts. Enjoy!
View more of my work by visiting my Facebook page or Etsy shop:
www.facebook.com/microjewellery
www.etsy.com/shop/MicroJewellery
Post link


My latest piece! A miniature scene of an astronomer observing the motions of the cosmos.
In the sky there are planets, stars and meteorites. The astronomer is sitting in a natural scene amidst grass, rocks and bushes. There is a table next to him with a candle, quill pen and a book where he is noting down star charts and astronomical observations.
To view my other work you can visit my Etsy and facebook pages:
www.etsy.com/shop/MicroJewellery
www.facebook.com/microjewellery/
Post link


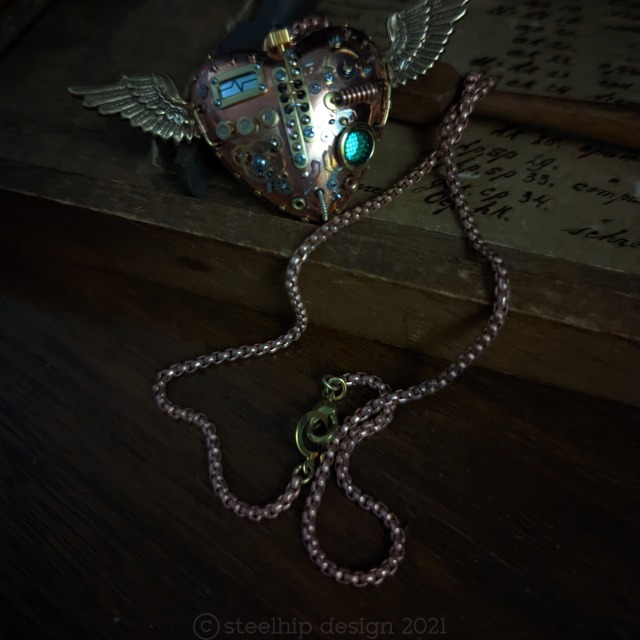
My latest heart.
I know - another heart. I still love making them and, at this time of year, I get a lot of requests. Each is unique - sometimes on purpose, sometimes to cover up an accident - drill scratch, hole in the wrong place etc. The heart itself is vintage - new old stock from the 1970s - a lucite core with a thick copper plate. They are still available but, eventually, I’ll have to find an alternative. I’d love to find similar wood hearts - that could be hinged with a secret internal compartment. If anyone knows where something like that can be sourced - let me know. Dimensions would be 1 ½ inches wide/high and about ¾ of an inch deep so they could be cut and hollowed out.
The next one I’ll be making will be a bit different - a central “window” with a flashing red LED - with batteries that can be replaced. It will have to be a symmetrical design with a feature taking up that much real estate on the heart. I’m starting it tonight and I’ll post a video of it to show the “flash”.


SS Cicada
I don’t know where I got the idea for a dirigible cicada miniature model but here we are. Falling asleep with my YouTube queue probably with videos on the recent 17 year cicada cycle followed by the use of airships during WW1 must have blended together in my subconscious. I enjoyed creating the last insect - the custom bee - I had to do another but this was too large for a piece of jewellery.
So I worked on each separate section, hoping it would all fit together in the end. That’s always the scary part - will the wings fit on the body? Will the scale of everything maintain the illusion of an actual, albeit fantastical, airship once joined? Unlike very clever model scene makers I don’t work with a scale ruler. As I don’t fabricate or cast metal there is no real point - I’ll still have to adjust a part in my collection to fit.
I started with the wings - they bring everything together and set the scale. Like the last piece - the body is a brass screw electrical terminal. The abdomen has two main parts - the high copper piece with a grill and a lower section made from a cut out earing drop I filled in with resin. The wings are also filled with resin and a very light dusting of green and gold mica.
I’ve been making miniature nebulas lately so that is where the glass “hot air balloon” came from. It is fitted with a vintage brass bead cap, chains, tiny brass drops and internal details. While I was searching for pieces I came across the hand blown green glass bead with a swirl pattern. I had to incorporate it but it was difficult to do so. Adding a piece to one side of a symmetrical design alters the way it hangs. The swirl on the bead is matched with the black swirled disk hanging under the balloon.
She has wrapped wire legs with metal crimps, two brass and steel “propellers” affixed to the front, one large rear flag and bunting on the secondary “balloon” tether. Everything attached is done so using screws and very rarely, glue. I have no idea how many separate components I used but it would be well over 100. I’ve been working on and off for a week - probably about 40 hours not including the time sourcing parts, taking photos and writing this. The rigging was a nightmare. The chain at the back, connected to a “U” shape piece is the ship’s anchor.
A friend who is a genius wood worker turned some gorgeous wood bases for me. I think it’s Jarrah. It has four brass legs on the bottom. The hanging mechanism consists of a filigree disk, a vintage brass corrugated bead and assortment of brass rods, copper and brass tubing and beads. The top section pulls out so it can be packed for shipping.
One final surprise. I left a hole in the body for a tiny green LED light. It is difficult to use - turning on by pushing the light into a battery. But it could be used on special occasions to show her off. The battery type is a bit exotic but available online.
I’m thinking about entering her in a local art competition before putting her up for sale. I hope you like her.

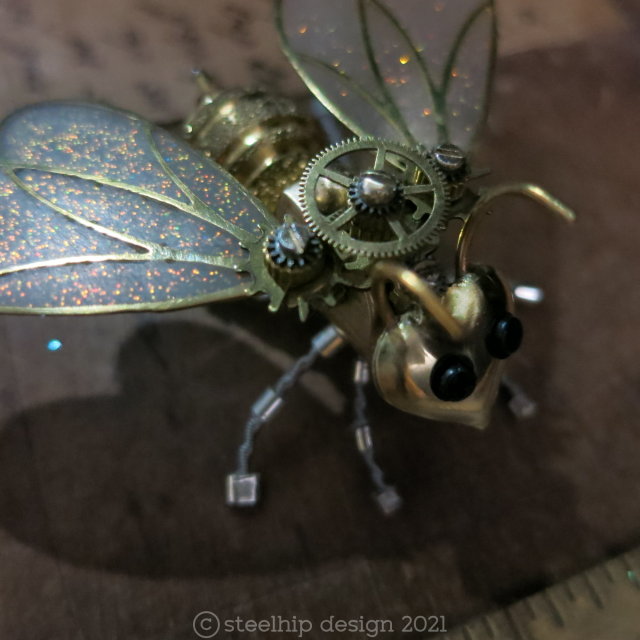


I had a client recently ask me to make a steampunk mechanical bee for her and gave me a photo of a tattoo for reference. This is the result. The wings were a problem as I wanted them light. I ended up cutting down two brass pendant bases and filling them with UV resin. They then had to be sanded back to the brass and finally polished. I was aiming on transparent but the frosting works. Her body is an old brass electrical terminal cut to fit. Her wire legs are threaded through the body for security. The crimps are for effect and to stop the feet scratching if worn as a pendant.
She also contains an assortment of gears, pinions, screws, bolts, rivets, an electrical probe is her “stinger” and her wire antenna do rotate. I hope the client likes her but if not I’ll try again. I’ve already had interest so she will sell either way.
Well I’m sitting in hospital unexpectedly - nothing too serious. I was going to post this last night but I was in too much pain.
So this is a proof of concept. The word “magical” is used far too much but that was my ambition. Something of unknown use and unknown provenance.
Proof of concept is the build I make all the mistakes on - motor too fast, planets too large and high, LEDs wiring wrong and ugly battery packs. Internally this might not be saleable quality.
The video isn’t great, sorry. When I get home I will take some still photos of all the decorations and detail. It was inspired by those magnetic ballerina jewellery boxes from the 1960s. She would dance around a mirror when the box was opened.
I initially covered the neodymium magnets and attached the planet on a post. Wrong. They fell down, stuck to each other with such force they ended up broken. So I’ve gone for simple using the magnetic force to hold the metal spheres. I will include several spare magnets and planets.
I hope you like it!
Steampunk


Still playing with my little LED lights and tritium. I found these great paracord beads - expensive but totally worth the money. Beautifully turned brass with “windows” - three vertical holes interspersed with a long window around the whole bead. I sealed the holes and poured resin into the center and embedded the LED leaving the connector post exposed so the battery pack “clutch” can turn on the light.
The top photos are “BlueBot” with a domed cap making him look a little like a certain famous robot that I can’t mention because I don’t want a trademark strike. It can be worn without the battery pack and brass ring. Unfortunately the photos make the light seem much brighter than it is in reality. It just gives off a blue glow.
The middle photos are a design I wanted to revisit with a blue tritium stick in a glass vial and silver tone sleeve. Very cyberpunk. I combined it with a horizontal post hanger with mechanical bits and pieces.
Final piece is a little “Green rocket”. The top has a small silver tone stepped cap on top and serrated exhaust funnel over the battery pack. It can also be worn without the battery pack. Again, the photos don’t convey the light well. It gives off more of a green glow and isn’t that bright in reality.
The LED necklaces are on long chains to be worn mid length. The battery packs are very secure and the batteries can be replaced easily. I’ll list them in my Etsy shop. Etsy doesn’t let me sell tritium (I don’t agree with it but their sandpit - their rules) so if you are interested buying it - drop me a PM. It’s US$125 including shipping/tracking from Australia.
Post link


What a dapper chap! I was inspired by a few posts and popularity of my LED experiments in design. Found an old skull charm, gave him goggles and cobbled together a top hat from an XL brass eyelet, some cut brass tubing and walled setting. I attached it at a slight jaunty angle. Couldn’t resist installing a tiny LED within the skull set in resin. Like my other pieces it’s powered by putting a small clutch battery pack on a small post. The whole piece is set on a stick pin so it could be worn on a cravat or dress coat. Unfortunately, the LED has made it very difficult to photograph accurately. The light seems too bright but in reality it’s just an eerie green glow. Perfect finish to a gentleman’s outfit who dabbles in the macabre and dark arts. The batteries are easy to replace.
Post link


This is made from a gold plated fuse, used in high end stereo for superior sound quality. They have such a great look - atompunk/mid century - I didn’t want to really alter the look. The internal gold plate “S” connection has such great form I couldn’t improve on it. I’ve sold several attached horizontally on a cord for men’s jewellery. Audiophiles love them.
But I wanted to highlight it with light. On the bottom of the fuse I’ve installed an LED with a connection post running through the base cap. The light is turned on by plugging that pin into a small silver tone battery pack. It holds tight to the pin. The battery pack unscrews at the top so batteries can be replaced. The bracket holding the fuse is not fixed so you could turn it up the other way and have the battery pack on the top of the fuse. To balance the piece without the battery I created a similar post on the other end.
Why should fun jewellery, brave jewellery design using light be the domain of gaudy kitsch - plastic flashing Christmas earrings, disposable dance/rave accessories and cheap novelty toys for kids? Why can’t it be used in high quality unique design? Yes, it’s a bit mad scientist and will certainly attract attention whether the light is on or off.
Post link


I’ve been waiting to make these for a long time. Finally had all the ingredients and a bit of bravery. What many people don’t realise is making something new is always a risk, possibly ruining expensive supplies. Fortunately these turned out well. A simple glass locket filled with a vintage pocket watch spring, tiny metallic “planet” spheres, a half round golden “sun” all fixed in place with clear resin. It makes for a subtle yet intriguing piece of jewelry. Understated.
The tiny ones are seriously small - the lockets are under an inch wide. I’ve attempted some reality to the planets: Mercury is tiny and silver, Venus earth’s sister planet is gold and the same size as Earth, Earth is silver, Mars smaller than Earth and copper. The giants start with Jupiter large in copper, Saturn slightly smaller than Jupiter and silver tone, Uranus is gold, Neptune is smaller and silver and finally, Pluto, tiny and metallic black. I can’t keep any accuracy in relation to the size of the sun - it’s seriously huge in comparison.
The larger one, just over an inch wide, was gold but arrived very scratched. Instead of it sitting in my pile of rejects I decided to “distress” the patina to a brushed copper with the original gold poking through in places. It works. It also has a very light dusting of holographic glitter as a star field.
If there is the demand I thought about customising these. With a birth date, time and place I can generate a natal sun chart - where the planets were at the time of their birth. If there is serious clumping I might have to take some artistic license when positioning all the planets. It would require a 2 week build time for supplies and for the resin layers to cure.
If you are looking for a masculine gift I can put them on a black rubber or leather cord.
Post link


The Detector
I’ve been overdosing on documentaries about CERN, the Large Hadron Collider, quantum physics/mechanics and proof of the Higgs Boson. As a science illiterate it fascinates me. That massive tube full of magnets, cameras, detectors and liquid nitrogen is an incredible instrument. Simply awe inspiring. These docos play in the background in my studio and I would occasionally look up to see the massive size and complexity of the machine.
This started with simple flat brass rings with eight holes and some rescued snake chain I cut into eight lengths. This design wasn’t thought out - I just had to wing it. I vaguely wanted a “cage” to hold a glass vial with a Tritium vial in it. Etsy doesn’t like Tritium (their sandpit - their rules) so I sell those pieces off Etsy. It basically glows without the need for a charge - it glows constantly for 10 to 15 years. But I’ve been working with UV resin and recently purchased some tiny LEDS. So I set an orange LED into a gold tone cord cap with UV resin. Then I put a glass tube into the cap and slowly poured resin into the tube stirring it frantically to produce air bubbles. Normally I’m fighting against air bubbles in resin so trying to form and quickly cure them was surprisingly difficult. I didn’t even know if the LED and electronics was going to work after pouring resin on them. The light refracts and diffuses on the bubbles. I was thrilled when it all worked.
Once I had brass beads on the end of each chain length I threaded a range of beads, pinions, tubing and 5 brass rings to stabilize the tube. I still had no idea if the vial would fit through the middle and how I was going to attach it to the structure. This is where the magic often happens - it fit like it was designed with precision. To fasten it within the tube all I had to do was slide another cap on the top of the glass vial and seal it with a screw.
As you can see - when unlit there is a small silver tube, slightly hidden by the brass tassel. To turn the light on - insert that tube into the battery pack - a tiny silver tone tube with a central hole (3/8 x ¼ inch). Once inserted it turns the LED on. Batteries can be replaced easily by unscrewing the cap.
During the day - it’s an unusual mecha deco design - at night with the light - the wow factor.
It sort of looks like a little mechanical cephalopod with those 8 tassel “legs”. I’ve designed this to be worn low on the body - Gatsby length with a long chain. It’s hitched high on the display bust just to show scale and fit it into the photo. If you want it to be higher - I’m happy to alter the chain length.
Post link


Steampowered Pollinator
Sticking gears on everything is debated in the steampunk community. Some just love the gear in its own right, others say sticking gears on everything and calling it “steampunk” misses the nuance and aesthetic of the genre. I’m in the middle - I use gears but not “orphan” gears and they must look like they actually have a purpose in the design. They can imply movement.
I’m telling you this because I wanted to make this piece with no gears. I wanted it to look like a miniature steam engine powering this little guy. Starting with a brass shelf support pin I drilled numerous holes to attach the “engine”, exhaust, wings, head and legs. Everything is screwed in.
He needed a purpose - in situ - so I made him a stand, bracket with a copper and brass flower to “fly” to. It’s curled around the main support. He can be taken off the bracket but I really like seeing him “working”. He is a combination of parts from jewellery supplies, watch parts, electrical supplies and miscellaneous hardware.
Thanks for looking! I really appreciate all the support I get from my Tumblr community.
Post link


Automata X
Another steampunk goddess made with a range of watch parts, brass bits and pieces, electrical probes and two part resin. She can look very intimidating from one angle yet strangely zen from another. She’s in my Etsy shop.
Post link