#tutorial


BRAND NEW TUTORIAL! MONKEY and APE HEADS! I’m creating the world’s first true ENCYCLOPEDIA of drawing tutorials under the hashtag #howtoTHINKwhenyouDRAW, all of which is FREE for EVERYONE, FOREVER - you can see EVERY TUTORIAL on OUR MASSIVE INSTAGRAM HEREandOUR GIANT TWITTER HERE!
PLUS!CLICK HERE for 300 EXTRA FREE TUTORIALS!
Lorenzo!
Post link
I’ve been making some videos for work so I’m slowly getting over my fear of being on camera. A lot of people comment on the hair I use for my character, Duchess Cecilia, so I decided to put together a shortish video about how I do it. I’m NOT good at doing hair, so please excuse my messy braiding I also show how to wear a veil over it and show a few different head accessories.
If you don’t really like hair at all, the video briefly features a very grumpy fat kitten, so it’s probably worth watching just for that.
Hellooo!
I’ve been asked for my mom’s mazurek cake recipe, and so I thought, that if I’m already translating it to english, I can share it with all of you :D Maybe there will be more interested persons in it!
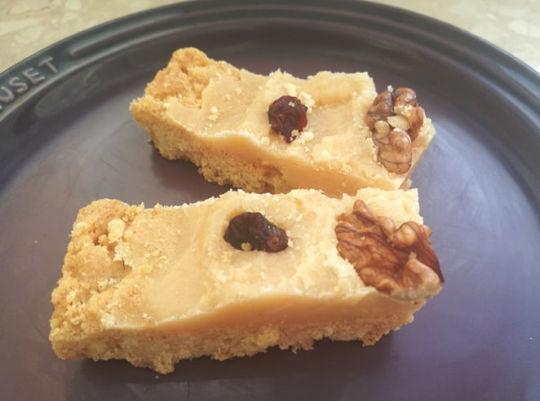
Mazurek is a flat traditional polish cake (pie?) served for Easter. It’s usually a shortcrust pastry dough and a sweet topping (chocolate, caramel cream, nut paste etc), decorated with dried, candied fruits, nuts, icings and more. Though it can have many more variants and in every region and every house it can be different.
Let’s get started! (the recipe under the cut)
Ingredients:
Dough:
- 300 g (1.27 cups) all-purpose flour
- 150 g (5 ounces) cold butter
- 100 g (8 tbsp) sugar
- 3 raw egg yolk
- 2 tbsp sour cream (18%)
- pinch salt (but you can add more to get a different effect. If you like salted caramel, you can add 1 tsp of salt to get salty dough and sweet caramel topping. My mom did it this year and it was super good!)
Remember, the colder ingredients for the dough the better! So took out all products from the fridge right before baking.
Topping (kajmak/caramel/dulce de leche?) not sure how to translate it
- 0,5 l (2.1 cups) milk
- 400g (32 tbsp) sugar
- 16g (4 tsp) vanilla sugar
- 50 g (2 ounces) butter
- (0,5 tsp of lemon juice is optional)
Preparation!
-dough-
- Prepare your ingredients for a dough and combine all of them. For cold butter you can grate it on a grater, or chop it with a knife to get smaller pieces, to combine it better with the rest of the products. Knead the dough until you will get a smooth, even texture. Remember that this type of dough likes cold, so the less it will have a contact with your warm hands the better.
- Place dough in a plastic wrap and refrigerate for at least 30 minutes to 1 hour (but it can be more).
- Heat oven to 180 C/355 F
- Take your baking sheet and cover it with a thin layer of butter.
- Take out your dough from the fridge and place it on the baking sheet as an even, flat surface with a crust. You can roll it or put it peace by piece.
- Bake for about 30-40 minutes (but depending on the oven it can be less or more. Just look at it from time to time to decide if it’s starting to be crispy or is still raw).
- When backed, leave it to cool down completely.
-topping-
- Put all ingredients, except from the butter (and lemon juice), to the pot.
- Start cooking it gently on a low heat for about 30-40 minutes. Don’t forget to stir! Do it until the milk will start getting thicker and brown. You can check the consistency on a glass surface, if it’s congealing, it’s ready.
- If you decided to use it, add lemon juice almost at the end of cooking, stir more.
- When finished, take it off the heat and add butter. Stir it together to combine.
- Pour it all on a baked crust.
- Decorate! You can add on top anything you like. It can be dried or candied fruits, all kind of nuts, sprinkles, cookies, chocolate, icings, coconut shreds and whatever really! Usually poles make some images from all of those ingredients to make them look like flowers, bunnies, catkins and all easter related things, or just do interesting arrangements, so the only thing that limits you is your imagination!
- Leave it to congeal.
- Eat and enjoy! :D


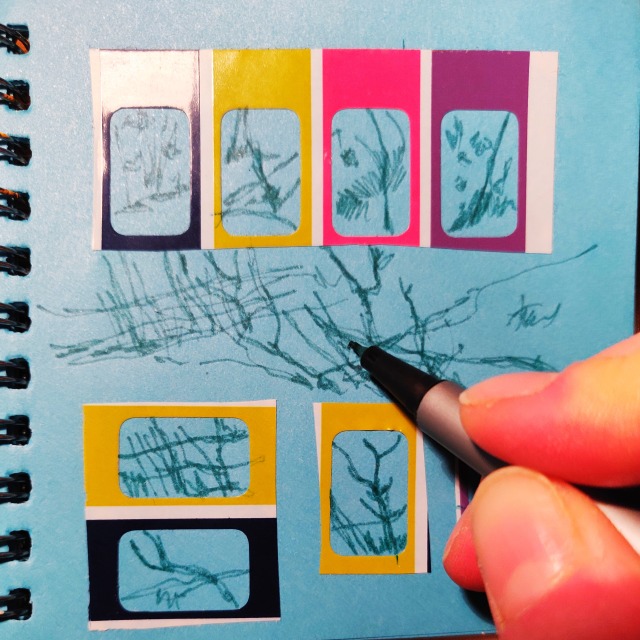
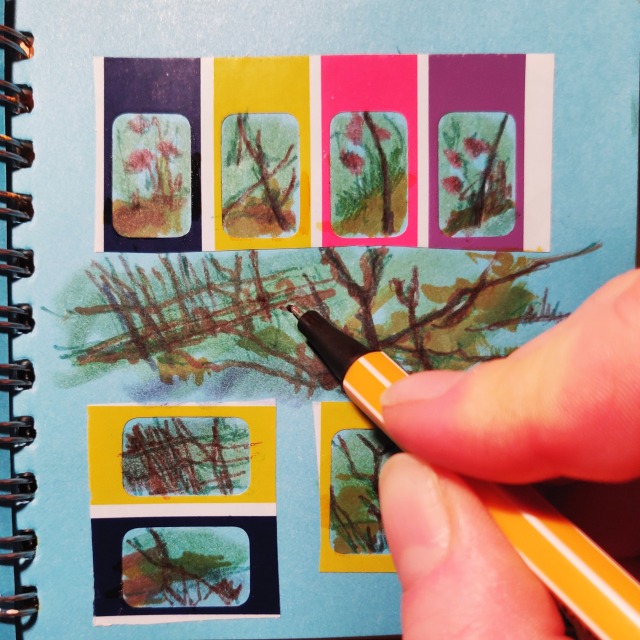
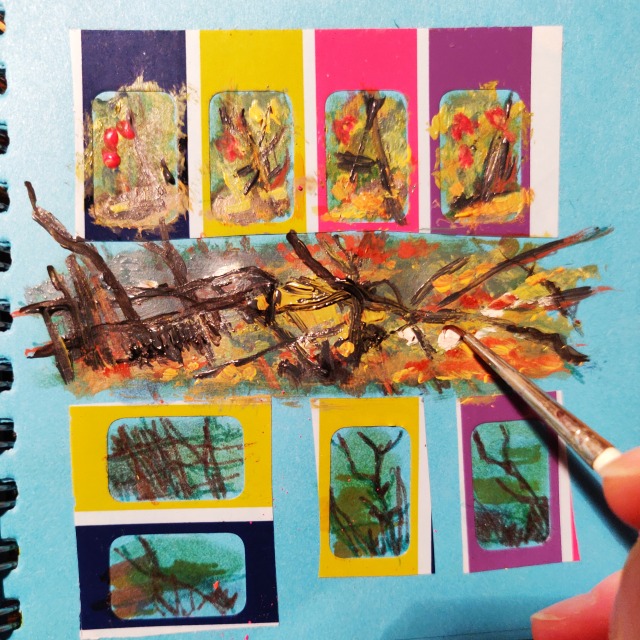
Gonna post this silly little tutorial thing here too, just in case it helps anyone else out or if anyone was curious about how I personally like to colour stuff!
Enjoy reading my chicken scratch :^)
Post link


Fabric Choice for Cosplay panel. This is just the bare bones and the examples, since I talked about and explained things in person.
(One thing I’d like to add right here though, since I was asked about it in person — I don’t go into enough detail about the difference between dupioni and shantung. Dupioni is stiffer and more crinkly [it makes a rustling noise] as well as having a more pronounced surface texture; shantung is softer and suitable for draping [where dupioni isn’t] and has a smoother surface texture.)
Nothing in this panel is definitive, and the examples given (even of the different fabric types) are just that — examples. You will encounter many, many more types of fabric than this out in the wild, but this is meant to give you a general overview so you can hopefully find your way.
This information is for personal reference only, and not meant to be used for your own panel. You can share this/reblog this; just don’t re-present it as your own.
Here is a link to the pdf file of the presentation, in case this photoset is difficult to read. It’s slightly confusing but all I could get my computer to do, so here’s how you read it: the 4-slide pictures read left to right, top to bottom. The 2-slide pictures read top to bottom. The 4-slide pictures have to be read across first. I couldn’t get that to switch in the version of Reader I’m using, so sorry for any confusion. The pdf file should read correctly, with one slide per page.
If anyone has any questions, comments, or corrections, please let me know. :]
Post link

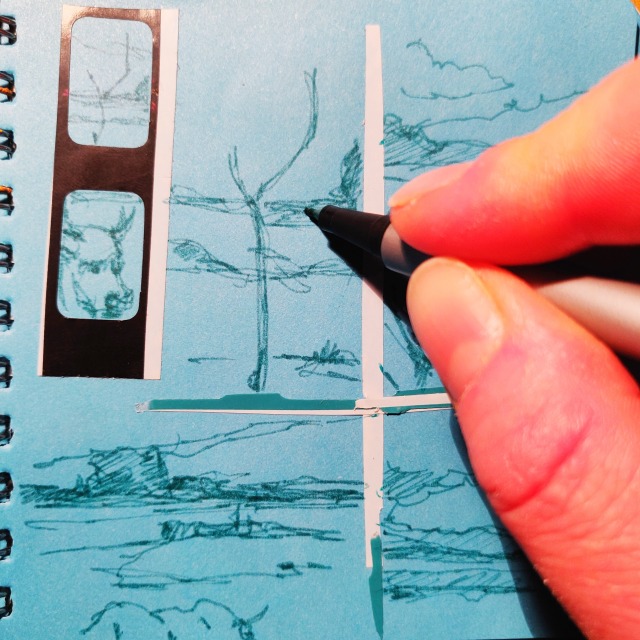
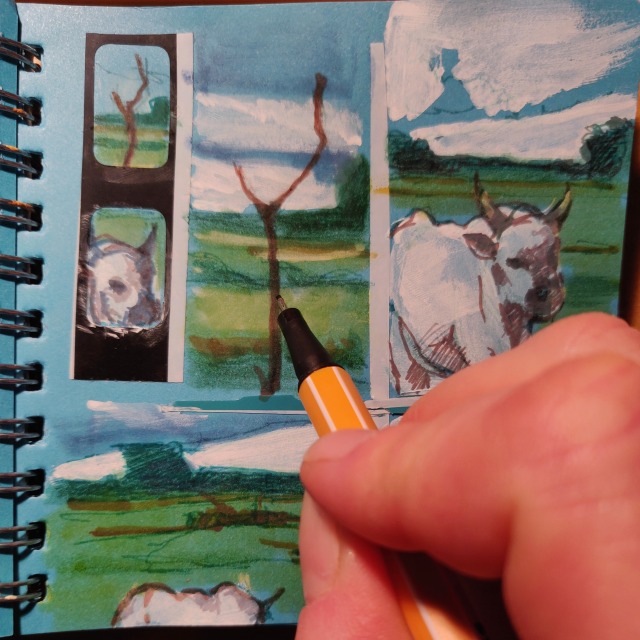
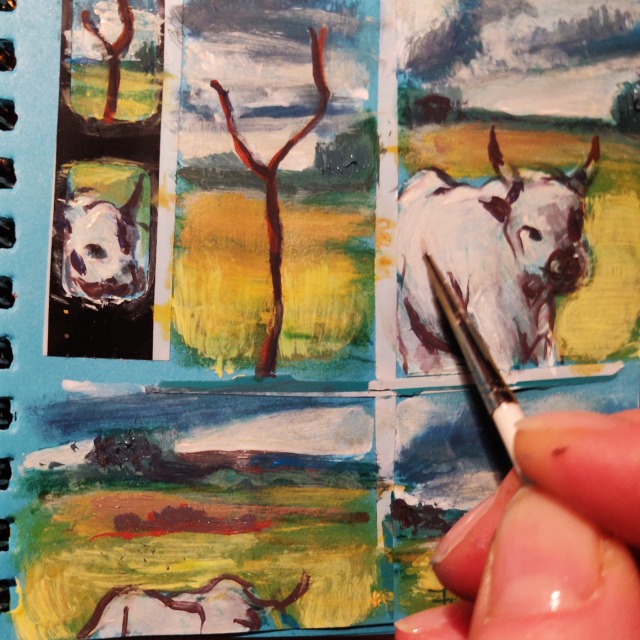
The100dayproject in progress


#the100dayproject2022 days 80-83.
#the100dayproject 2022 giorni 80-83.
100-дневный проект дни 80-83.
.


.
The 100 day project 2022 - Yulia A Korneva
.
.
#the100dayproject2022 days 76-79.
.
#the100dayproject 2022 giorni 76-79.
.
100-дневный проект дни 76-79.
.
.
.
.


sketchbook 100 day project 2022 pre-order | Shop on line - Yulia A Korneva


#the100dayproject2022 days 73-75.
.
#the100dayproject 2022 giorni 73-75.
.
100-дневный проект дни 73-75.
.
.
.
.
Hi, I genuinely don’t know what to say other than “Here’s my icon tutorial!” so uh, here’s my icon tutorial!
I made TONS of timestamps incase anyone seeing this is only interested in a specific part for editing icons!
+here’s a link to where i download most of the textures from
How to make a stimboard for an alter!
Disclaimer: This is just how we do it and decided to make a system based one because there’s a few non system specific ones avalible.
Also we only make boards on mobile so I’m afraid there won’t be a PC equivalent.
Step 1, decide which alter you’ll make a stimboard for.
This is probably an easy step but for us (due to our amount of members) takes a long time. If you have any ‘new’ alters, birthdays, or irl events (such as alters who have come out of dormancy), you could make it a gift for them.
If you still can’t decide we’d reccomend using a wheel of names to randomly decide what alter you’ll make one for
In this example we will be making a stimboard for our Ohto Ai (Wonder Egg Prioroty) introject.
Step 2, find out what the alter likes/dislikes.
This is again probabaly and easy step, however due to communication issues it can be hard to work things out.
The most direct way is to ask, but if that won’t work scrolling through the stim/stimboard tags to get ideas is always fun.
For this board we know that it likes: eggs, sunflowers and natures including skies. As well as the colors: yellow, green and blue.
Step 3, find the middle GIF
We start with the middle GIF first because (if you don’t already have one) it can give you a color scheme to work with.
We go to Google, type in the name of the character/introject and look at the results.
If you’re using a GIF of this introject then you can always type in ’[Name] gif’ but we just like to use Google search function.

If you hit the abacus looking icon then hit GIF- it will narrow all your results to GIF’s.
Step 4- Crediting the middle GIF
So first thing is that you need a 'linking object’ such as a symbol, letter or emoji. You can make these in any pattern you want- just make sure that there’s a space between them so they don’t get mixed up.
Then you hilight the middle symbol and hit the chain option in the bottom right corner and a link box will appear.
Go back to where ever you found your middle GIF, copy the link and paste it.

Step 4, finding stim GIF’s on tumblr.
As perviously mentioned we have a 'specific breif’ to work with so I know exactly what GIF’s I am looking for.
So we’ll start with sunflowers because they’re her favorite GIF type!
Just go to the tumblr search bar and type in the stim you’re looking for. In this case it’s 'sunflower stim’. This can also be edited for speficic colors (ie 'yellow sunflower stim’) or themes (ie 'nature sunflower stim’) so make it as specific as you need to!
Then you scroll, find a GIF that you’d like and then save the image you want to use.
We want to use these sunflower gif’s by @//beestim
Step 6, crediting GIF’s
HOWEVER the most important part of the process by fat is to credit these GIF’s so if other people want to use them they can with out the worry of being reported for stealing GIF’s.

Click the arrow on the bottom left corner, and a multitude of options will appear.
We always save ours in the notes app, but if it doesn’t automatically have the software you’d like to use, then click the 'other’ option and scroll until you find the app you want to use.
Save the link under a memorable name, and then go back to tumblr and hunt for more GIF’s.
We often do our boards with patterns (ie the four coner gifs fit one theme and the middle ones fit another) but this breif is a bit more complex than 2 specific types of GIF.
Step 7, credit the rest of the GIF’s
Just use the method above and copy/paste the correct links into the corresponding item.
Step 8, You’re done! Marvel at your own alter board!
This board can he found here! If you have any questions feel free to ask!

Want to turn an old chair into a piece of garden furniture? (Note emphasis on the word “garden.”)
Here’s an example, complete with tutorial, via Bridgman Furniture.
Post link


Shibari Tutorial: Hand Ties
We’ve got a whole variety for you this time! These work on the arms or legs, and in the case of the Zip Snare, any part of the body so long as you have enough rope (about 30’).
- Tutorial 1: The Cat’s Paw
- Tutorial 2: Prisoner Cuffs
- Tutorial 3: Zip Snare
♥Always practice cautious kink! Have your sheers ready in case of emergency and watch extremities for circulation issues♥
Post link


This week’s tutorial is the Corset Harness. You’ll need 50-80’ of rope, depending on how long you want to make the actual corset bit.
Once you get the weaving down pat, it’s super quick!
Re-blog for the people awake during reasonable hours. ;)
If you’ve got any requests or suggestions for future tutorials tweet me @fetishweekly.
Post link


Free-zing Fresh Fonts 1
Since a lot of people are asking my favorite typefaces, I’ve decided to post some. And I will post more once or twice a month. By the way, these fonts are free so hooray for that! :-) Just be a great ‘googler’ for you to find them all. However, you will not be able to download the whole font-family in some fonts like Museo. But still, you can have its 300 and 500 weights. Hope you guys like them!
Geared Slab /Mission Gothic /Ranger/Museo
Post link

A new thing I am doing is little tutorials on how I do STUFF! My tutorials are free! You can always support via Patreon if you enjoy these and find them useful! I look forward to making more! (high res available on Patreon) GET OUT THERE AND MAKE WAVES!
Post link
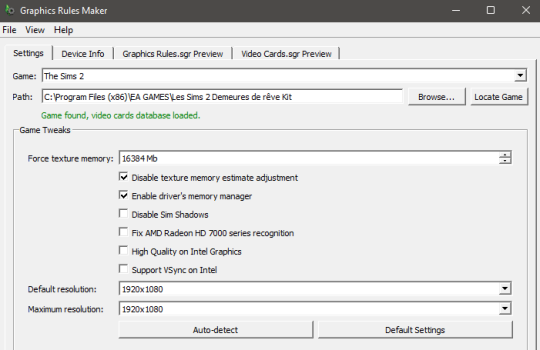
It took me the entire day to reinstall the game on my new computer, to make all the adjustements for it to work on Windows 11, find the right settings with the Graphic Rules Maker, and… my game loads twice faster from Windows to neighborhood view, then it loads at least TEN TIMES faster to enter a lot, everything runs so smoothly, even in very heavy CC lots and neighborhoods, with all settings at high, Origin downloading the Sims 4 at the same time, talking to my best friend on Discord, recording a video… like… IS THIS HEAVEN ?! I’m about to cry. Tears of joy of course. But still !
I think the next week (or maybe even the next month) will be about enjoying my game and nothing else. I’m so, so, so happy, you can’t even imagine !
Perhaps you would be willing to share how you made Sims 2 work on Windows 11. There was someone asking for help with getting their game to work with Windows 11. Thanking you in advance
Oh ! I followed a few tutorials actually.
First I did this as usual :https://gardenofshadows.org.uk/gardenofshadows/index.php?topic=21931.0
Then the last part of @anibats tutorial (the part about the dxvk file) : https://www.youtube.com/watch?v=ac1PyUxKoNU except that I wrote 16384 instead of 8192 in the file she talks about and in the Graphic Rules Maker as I now have 32Gb of RAM.
And I learned something important here to complete Anibats tutorial : https://docs.google.com/document/d/19JMr-FQSU3AlF7Kyvcrr7awTiHBDQSUNLG6qfaI6rOs/edit
Grant “Everyone” full control to the TSBin Folder before copying. Otherwise, Windows may lie () about copying the d3d9.dll file to the folder. You’ll know you haven’t done this if the d3d9.dll file looks like it is there but no log file or cache files are generated.
If “Everyone” doesn’t appear, press “Edit” and then “Add” then type in “Everyone”, press OK, and “Everyone” should appear as an option you can edit the permissions on.
If you did not grant “Everyone” access, DXVK really might not work and/or crash.
⚠️If you had launched the game before granting “Everyone” access and after copying the DLL, you will be in a ditch. Get out of the ditch by deleting the “%localappdata%\VirtualStore\Program Files (x86)\EA GAMES” folder. You can get there by putting that path into Windows File Explorer’s address bar.
That was the only part that was useful to me, but it worth reading it all just in case.
My Graphic Rules settings are exactly these if it helps :
EDIT : my computer specs are here if it helps too.


Edwardian Hairstyle Tutorial
Lots of people requested a tutorial on the somewhat Gibson Girlish hairstyle I’ve done a few times. Fun to do and something a bit different!