#cheap witch

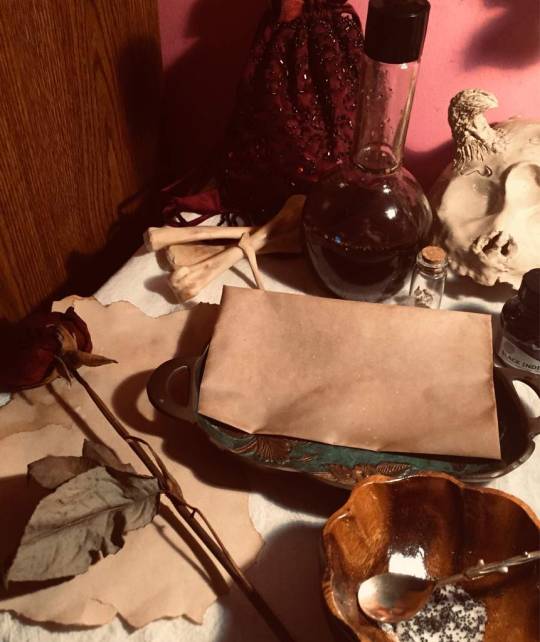
I’ve been writing a lot of incantations lately and this is my take on a return to sender spell with maybe some spice. Hey, they struck first. This is pretty straight forward and all you’ll need is:
- an envelope
- paper and pen/pencil
- sea salt or beach sand
- spider web or knotted string
- bone dust or a small bone
- a tear (optional)
- poppy seed (optional)
note: If you feel uncomfortable with using spider web or bones, leave them out. You could also replace either item with something that looks like a bone— maybe sculpt something! Spider web represents something hard to get out of— tie and make a mess of some string instead. I made some choices such as dying my paper and envelope with coffee. Coffee is known to speed up a spell so this is simply to send this letter quickly. Poppy seed can be used to confuse or dominate people. I mix it with sea salt to represent something eating away at their protection and causing strife. You can see the contrast of black and white. I used a wax seal to close the letter and tied twine around the letter itself.
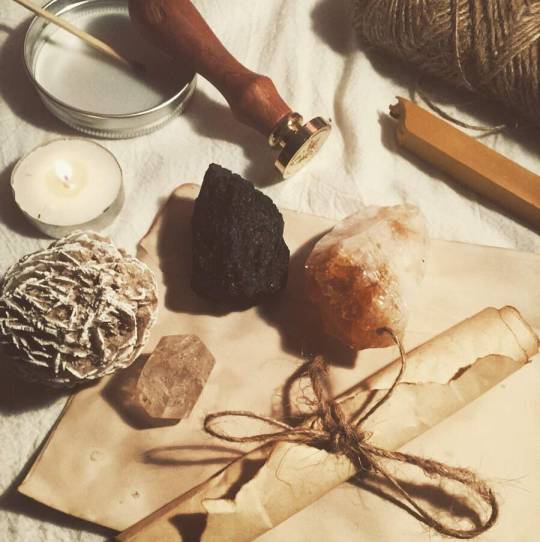
You’ll be making a petition paper of sorts! Write on your paper your target’s name and date of birth. Feel free to add a photo of them or whatever you do have. This person should be someone who genuinely caused you pain or tried to; you’re sending whatever negative energy back to them with tax.
The incantation is pretty literal so after you write your letter you’ll simply add it to your envelope and start reading the below lines. On the first stanza third line, “take no salt” add either your sea salt or beach sand. On stanza two when you say, “left a trail” this would be the time you sprinkle poppy seed.
On stanza three line one, you’d add your spider web or knotted string. When you say, “bone dry” you’ll add your bone dust. On the final line, if you can muster a tear, you’d tap the tear on the envelope’s seal and rub it in with your thumb. You want them under your thumb now. Seal the letter and you’re done.
When you think the lesson is learned, take the letter out of the envelope and either keep it or dispose of it. I suggest burning it.
”Out of balance and out of hand
Twisting daggers in my back
Seal the wound and take no salt
Let my blood have a cost
It left a trail so the path is paved
Let them wish for better days
I have that map so they’ll be lost
The tides have turned and they are caught
Resting in their own little web
Quickly made their own bed
Leave them high and bone dry
Feeling low with damp eyes”
Hey, lovelies. So here’s the thing: I feel wasteful when it comes to empty prayer candles. Of course, a good way to reuse them would be making more candles from their containers. However, that can be a little expensive and I wanted some alternative uses. I thought about it for a while, even googling if anyone had any ideas. Nothing stuck out to me and for weeks I had this empty cylinder on my dresser staring me in the eye. Yesterday, it randomly hit me and I started my crafting. Honestly, this one is really simple like most of my crafts I’ve shown you guys and inexpensive.
I decided to turn it into a wand holder or a incense stick holder, it could be used for both. I even thought about putting it in the kitchen for spoons and things if you’re a kitchen witch. I decided to made the cylinder a tree trunk with roots at the bottom. Another idea I thought of was making a squid which might be neat for a sea witch but more difficult.
What I used:
- an empty and clean prayer candle
- air dry clay
- clear quartz and amethyst
- glitter
- glossy mod podge
- a mechanical pencil
- acrylic paint and paint brushes
I didn’t really want to do a brown tree trunk, I decided on purple even though I didn’t have enough purple paint. I mixed together Apple Barrel’s Cool Blue and Flag Red in case the color is something you specifically want. In the pictures, it looks kind of brown though. The crystals are optional and you can replace them with anything you want. My glitter, prayer candle, and mod podge were all from Dollar Tree. My air dry clay is by Crayola and was about 5 dollars and from Walmart. My paint was also from Walmart.
First things first, I covered the entire container in clay, smoothing it out a little. I took a mechanical pencil to create the texture of the trunk by just drawing and making lines randomly (later I’d gently do the same for the roots). At the bottom, I started the roots which were my biggest hurdle. I made some of my roots more intricate and tiny and as a result they did come off and I had to fix them. I let the clay dry before mixing my paint and painting it all the dark purple. After some time drying again, I mixed together pink glitter, silver glitter, and mod podge. I painted on the mod podge and let it dry again. Lastly, I took my crystals and wrapped more clay around them and on the very back to place them against the trunk. After letting that dry, I repeated the painting process and added the mod podge. Some more time drying (whew) and I was done! Easy peasy lemon squeezy.

It’s me, ya boy. I have been less active as of late and for that I apologize. Mental health break! On amino, I used to post a lot of crafts as well and I randomly remembered someone saying they wish they also had a craft for a cheap athame. At the time, I sort of put it on my list for things to attempt but did forget about it. However, I randomly got it in my head again and now here we are.
For this I used:
- a kitchen knife and a pocket knife (both from Dollar Tree)
- air dry clay (from Walmart)
- some glossy mod podge (from Dollar Tree)
- acrylic paint, paint brushes, and a sharpie marker
Experiment with design ideas, I just went in blind but you can choose to make things more intricate and planned out. I actually advise that you do that, honestly.
I just took some of my clay and wrapped it around the handle of both knives until I was happy, smoothing out any crevices and prints. Then I worked on adding anything else to make the athame a little more special and decorative. After having the clay dry, I went in with my acrylic paint. Feel free to paint moon phases, pentacles, runes, sigils, wards, or etc. I thought about painting a quote on one of the blades but changed my mind.
For one athame, I had a few cracks from a fatal accident involving my cat (he’s a bully). I used sharpie marker to fill in the cracks and did some spiral designs for the handle. Lastly, after all is dry and well, I coated them with mod podge and let them dry again. Then bam, they were complete.
The most expensive item for these beauties would be the air dry clay. I actually made a chalice along with these and still have more clay left so you get bang for your buck. I chose the Crayola air dry clay, 2.5 lbs in the container. If I remember right, it was around five dollars. You could buy many colors to paint with, glitter, press crystals into the clay, or anything else you can think of. I just used white, black, and gold paint in small bottles.

Candles and wax are used a lot in magick. Fancy, good smelling candles are really expensive though - well, they aren’t anymore!
Dollar stores like Dollar Tree have candles and candle holders, but they generally only have white candles (or white and red). This is okay but sometimes a witch just needsthat colored candle or wax. Here’s how I make my own colored candles on a budget.
Note: I have a wax warmer that I use for this project, got it on sale at Walmart, its normally 15$ + tax (if you don’t have a wax warmer you can melt your wax in the microwave, but please do it in increments of 15 sec or less and make sure it does not catch on fire.)
Supplies - total cost 2$ (if you don’t already have these things lying around your house)
- Tea light candles (pack of 16) - 1$ at Dollar Tree
- Crayons (pack of 48) - 1$ at Dollar Tree
How to make it
- Take the wax and wick out of the aluminum holder, careful not to crumple it
- Separate the wax from the wick
- Select the color you want from the crayons
- Put the tea light wax and a chunk of crayon into the wax warmer and let it melt, stirring it together.
- There you have it! Colored wax! If you’d like it to be a candle, place the wick back into the aluminum that the candle came in and pour the colored wax around it.
Hope this inspired some of ya’ll to get witchy even when you feel like you can’t afford it!