The Monument Quilt: A public healing space by and for survivors of rape and abuse. The Monument Quilt is an on-going collection of stories from survivors of rape and abuse. Written, stitched, and painted onto red fabric, our stories are displayed in city and town centers to create and demand public space to heal. The quilt resists the popular and narrow narrative of how sexual violence occurs by telling many stories, not one. The quilt builds a new culture where survivors are publicly supported, rather than publicly shamed.
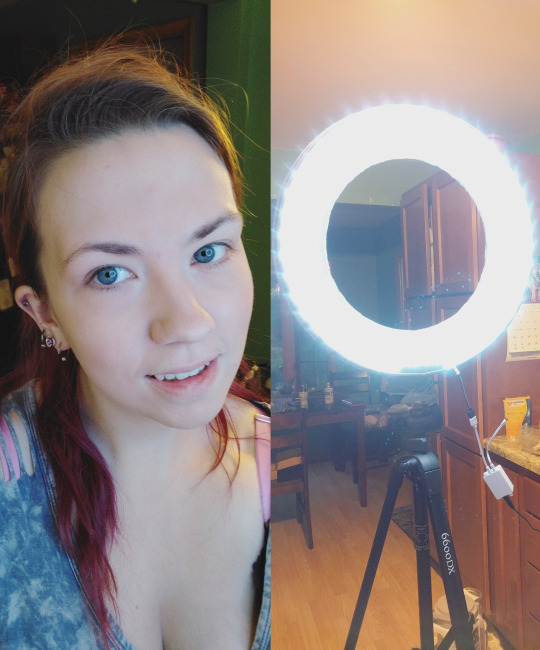
I made my own SUPER CRAPPY dimmable/ color changing ring light for under $30. The goal of this project was to keep it as cheap as possible while still being functional for the single day we need it.
I found a tutorial that used an extra wide wooden wreath base, but I could not find them anywhere. I found the normal width ones, but they were only 12″ diameter and I wanted to go larger. I decided to use foam board because it’s cheap and the ring light isn’t getting moved around. If you have the tools available to you, wood wouldn’t be a bad idea.
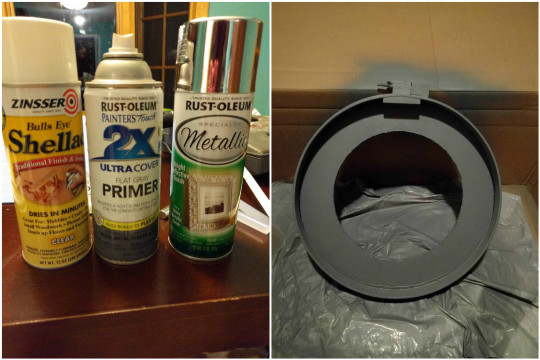
Materials Needed: 18″ Quilt Hoop: $9.25 w/ coupon 2xFoam Board: Had ($4.50 w/ coupon) LED Kit:$14.50 E6000 Glue, Super Glue - Had (~$3.50 each) Primer + Silver Spray Paint + Shellac- Had (~$15 total) Hotshoe mount/ adapter or Tripod mount, depending on how you want to mount the light. I’m using a spare for my Tripod
First off, you can tell even in the product photo I linked above that the quilt hoop isn’t perfectly round. If you’re using a wood base you’ll probably need wood clamps to hold the ring to it in order to keep it steady while your glue dries.
First step is to trace the inside of the hoop and cut out the circles on your 2 pieces of foam board. Make sure you make a mark so you can line them up later, since it’s not a perfect circle. You can see in my photo I traced the outside and then had to fix it, don’t be me.
Next I used E6000 to glue the 2 pieces together and let them dry for 2 weeks while I did other things for at least 20 minutes, you don’t want them to slide around. Make sure you only glue near the outside, we don’t want to cut through glue later.
Next I opened up the hoop (see photo below) and used E6000 on the inside and outside to secure it open. I smoothed the glue out with a plastic knife so it’ll look better painted. While that is drying, find the center of your ‘circle’ as best as you can. Pin your measuring tape there and measure so that you have a perfect circle 6″ from the center. That will leave us with a 3″ ring area.
It doesn’t look perfectly round in that photo but I promise you that it is. Now we’re going to cut it out. Score your circle carefully with the X-Acto knife and then keep cutting until you get through each/both layer. In later images you can see that I attempted to smooth the inside with hot glue - don’t do this, it looks awful.
Now, I put my foam board rings into the hoop and used hot glue to secure it on the front & back and fill in any gaps
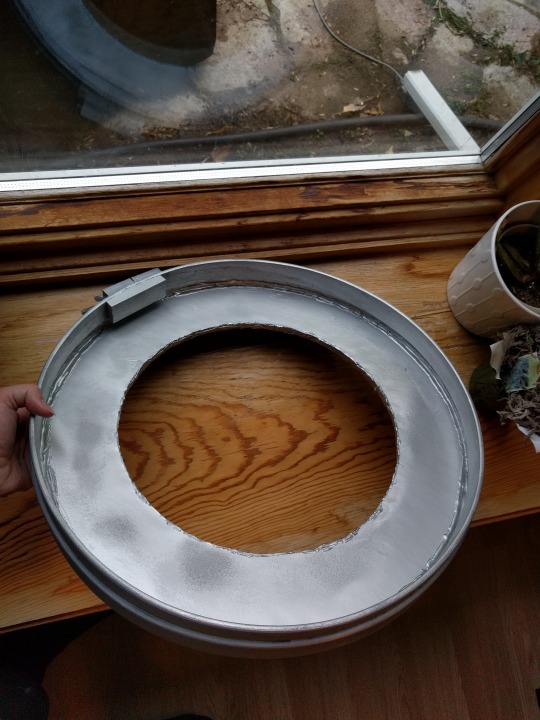
Yay! It looks like a thing! Now for painting. You can just use the silver paint if you want, but I’m using multiple colors because I had them. Primer + Shellac is going to give you the best reflective finish spray paint could give you. You can also lightly sand in-between each coat (this is required if you made the back part of the ring out of wood).
Primed! I did about 3 coats over the entire thing- front, back and sides. I let it dry for about 15-30 minutes in between each coat, but this primer dries fast. Next I sprayed just the center ring with the metallic silver. Make sure you spray the paint somewhere else first because this kind can be pretty watery, even if you shake it up. After spraying 3 times and letting it dry completely over night, I Shellac’ed the metallic area 3 times. I overdid the shellac and you can see spots of it, but it doesn’t really matter as long as it’s shiny.
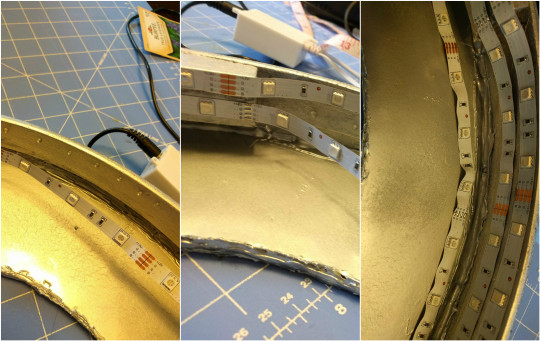
Make sure you test your LEDs before you start gluing! I used gel super glue because it dries much faster than E6000 for the LEDs. I just put drops and held the LEDs down, starting from the top and ending with the inside. Because the last layer is on the flat part of the ring, I had to kind of force the LED tape to turn.
Mounting is a bit of a challenge because the bottom is so flimsy, so here are 2 ways. Tripod: Reinforce the area where the hoop closes with E6000. When that dries, saw off the wood block right above the screw. Attach your Tripod base with glue or by screwing 2-4 screws through it & to the wood chunk. I also think a permanent mount on the back of the ring would work very nicely and be sturdy. Hotshoe: If you want the ring to go around the camera, you will need to add a little wood block to the inside of the ring so it can sit on the hotshoe mount like this:
(Photo from here, my inspiration for this tutorial)
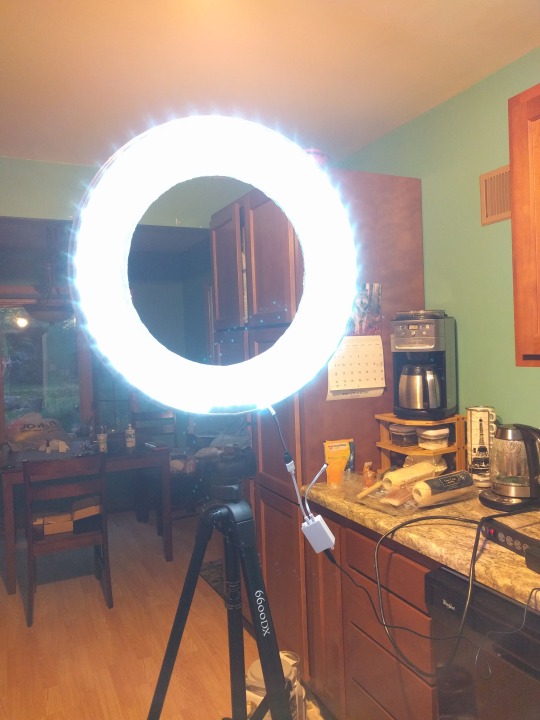
I drilled a single hole into the base and screwed the tripod mount in, but because it’s so weak it needs to be reinforced or fixed. My temp solution was duct tape so I could take photos.
Boom. It’s ugly but it works! The remote has a ton of options.
There you have it! Cheap and simple ring light. Perfect for cosplayers and crafty people who have a lot of this crap lying around :)
You can make beads out of things you find in nature: shells, nuts, berries, antler, bones, petals, seed pods, bark, sticks, and stones.
For nuts, bones and shells you need an all out a small hand drill to create the hole to string through. Acorns, hazel nuts, small vertebrae and all poocka shells are all excellent examples. With a fine drill you can turn any of these into lovely beads. If you have bigger pieces of bone, stick, antler, or shell that you need to cut down, you may also need a fine toothed saw or a carving knife to make the smaller pieces you can then drill for beads. And perhaps a bit of sand paper to smooth them out. If you really get good with carving you can make shaped wooden and antler beads, although just making flat disks of beads is plenty awesome enough too.
Berries and seed pods need only be pierced with a blunt ended needle while they are fresh and put directly onto string to dry. You might want to move them around a bit every few days while they are drying so they don’t stick. Rowan, holly, elder, and hawthorn all make decent beads like this. You can also cut and dry pieces of leathery fruits like apple and dry them into beads.
The papery bark of birch and cedar can be rolled with glue into cylindrical beads. Some larger long petals can also be preserved into beads in this manner. Coat the bark or petal in glue and then roll it, set it out on plastic wrap or wax paper and let it dry.
Petals like rose petals can likewise be partially dried and minced up and then worked into a paste to roll into round beads, then pierce the balls with pins and let dry to create lovely scented beads.
For stones and harder bones, you need a dremmel to drill through them to create beads. Or if you find stones with natural holes in them, like holey-stones/hagstones, they make wonderful beads.
The lovely thing about making beads out of natural materials is they are excellent for prayer beads, charms, and witchy magic. Rowan on red thread is traditional for protection and travelling. A rowan prayer bead set would be great for counting as you go into trance for hedgecrossing. Hawthorn is often associated with the white faced goddess and the beads could be great in a devotional piece to her. Rose rosary beads are excellent for Mary Mother of Peace. Antler or Horn is excellent for many a god like Pan, Cernnunos, and Callieach. Oak and Acorns are great for Dagda, and Hazel for Brighid. A sea shell bead would be excellent for Aphrodite or Mannanan and sea witch magic. The list goes on. Be creative and have fun!
I’ve noticed that a lot of people have been asking on how to this or that with sigils, so I’m making the huge list of resources we have on our blog a rebloggable post for any that would like to have it compiled on their own blog for easy access and use. As I update the references page, this post too will be updated, so keep an eye out for any future additions / modifications.
Please note that many methods of creation and charging will overlap within these articles; you do not need to read all of them, we are just providing a variety for you to choose from; pick whichever you like, and read until you find a method you like / have enough information to come up with your own method(s).
Please be aware that some articles suggested here were not thoroughly read by us (the moderators of this blog), and any information within should be read critically and with a grain of salt.
*The ~ symbol means those articles are posts on Tumblr
*We, the moderators of this blog, are not responsible and will not be held accountable for any actions taken as a result of reading these articles; any action taken, and any potential consequence due to, is the responsibility of the party performing said acts. We do not condone the use of these methods, particularly to minors (due to sexual nature); any minor performing anything found within these articles is doing so of their own free will and choice
~Richtor
I’ve directed some of you to this post recently so I thought I’d reblog it! It has a ton of awesome information, I learned most of what I know from this post. ♥
Hey friends! Some (most?) of you may already know this, but just in case you don’t, here is how to remove class restrictions on crafted armour in Dragon Age: Inquisition. If you do this, you’ll be able to craft any type of armour for any type of combat style!
To remove Light Armour restriction: Craft armour with Dales Loden Wool in the primary slot
To remove Medium Armour restriction: Craft armour with Snoufleur Skin in the primary slot
To remove Heavy Armour restriction: Craft armour with Silverite in the primary slot
Dales Loden Wool is dropped by Red Templars in the Hissing Wastes, Emprise du Lion, and the Arbor Wilds
Snoufleur Skin can be hunted on the frozen river of Emprise du Lion near the village, and in the wheat fields near the second camp of the Exalted Plains
Silverite is found in Emprise du Lion, the Arbor Wilds, and the Frostback Basin
Basset hound update. Project is coming along, but designing a toy for a baby comes with a unique set of challenges, first and foremost, safety. And then it absolutely has to be cute :)
The frame seems to be working well! Dearborn is obsessed with it, as she was with the hoop. I thought I’d add in my standard-sized mason jar mug so that you guys could get a better sense of scale, since Dearborn is quite small, but I think I just made it look kind of like a weird still-life.
[ID: A photo of my cross-stitch lap frame with the Good Omens stained-glass-window cross-stitch mounted on it; crouched beneath and just behind the frame on the right side is Dearborn the tortie. Next to her and a little closer to the viewer is a mason jar mug full of Diet Coke and ice cubes.]
Nothing quite as nice as buying high quality, good priced crafting gear from a properly local #smallbusiness – @bigbeadlittlebead . Looking forward to restocking some jumbo #stitchmarkers at www.shop.raeyn.com.
Crafting Globes by Hand with Bellerby & Co. Globemakers
To see more of Bellerby & Co.’s handiwork, follow @globemakers on Instagram.
Bellerby & Co. Globemakers (@globemakers) is one of the only companies in the world still handcrafting globes — everything from molding a perfect sphere to personalizing the maps to painting details — and they have no intention of stopping. “A globe is a true representation of the world,” says Jade Fenster, longtime partner in life and work of company founder Peter Bellerby. “A globe may inspire you to travel. It makes you understand where you belong on this amazing world. And sometimes, you might just reflect on its beauty and fragility.”
After learning how to make a globe for his father’s 80th birthday, Peter founded the company in his living room in 2008, and it has since grown to 20 cartographers, woodworkers, illustrators, engravers and painters in a former warehouse space in northern London. “Everything is bespoke, and using old-school methods means that each globe ends up being entirely unique,” says Jade. After placing an order, several months will pass before customers receive their globes — size options range in diameter from 9 to 50 inches (23 to 127 centimeters) — but the wait is always worth it. “It’s rare to be able to purchase something that is made just for you, and will always be one of a kind.”