Really going for the classic, over the top look. I’m still going for realism yet still trying to achieve that “cartoon” look. I’m working on wrapping the rest of the mallet with EVA foam as well as the PVC handle then continue detailing it. I’m using a grinder/ dremal. I will need to sand it as well in some areas. This is when I wish I invested in a airbrush system . I will be painting by hand as best as possible.
Btw, I’m 5'2ft just for an idea how big this thing is.
I’m really sorry! I’ve made a good amount of props, but I haven’t had as much experience with them as I have other aspects of cosplay/costuming. I did as much research as I could to make up for the lack of expertise, but…it wasn’t enough. Thank you OHI Cosplay for the corrections!
****
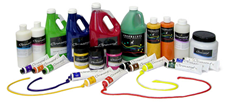
It can be overwhelming to try and select the right kind of supplies for a project, so it’s best to start small. These are some of the most commonly used primer, paints, and sealants for props:
Kinds of Paint
These are divided into two classes (primers often use the same kinds of bases as well):
Acrylic-based
This is what you should be using. Initially designed as the poor man’s oil paint, acrylic is is easy to use, durable, and has a nice finish when dry. It is, however, more expensive than water-based paint and a little harder to clean (but not by much).
When you buy a can of spray paint, the actual paint you’re spraying is usually acrylic-based.
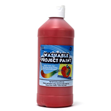
Water-based
Poster paint is water-based. It dries quickly, is easy to clean, and cheap. It doesn’t have the same smooth finish and lifespan as acrylic paints, though.
Primer
You know that scene in The Adventures of Tom Sawyer where he has to whitewash the fence? That was pretty much priming. You’re completely covering up the materials you used to make your prop, blocking out any of its original color and smoothing out the surface so the paint looks the same way on the prop as it does in the bottle.
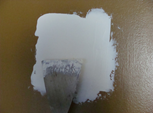
Gesso
Very easy to use, provides great coverage, works for several different kinds of projects, and goes a long way. If you apply it in layers you’ll cover up any bumps in the surface of the prop. You need to sand it to make it smooth.
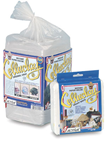
Paper Mache Clay
Requires a little more skill than gesso to use, but allows for molding and sculpting. It totally covers the surface of your prop. You will need to sand this as well.
Paint primer
This doesn’t cover up any bumps; it only blankets the color of the building material. Paints and primers share the same kind of bases (water, acrylic, oil, etc.). You should try to match your primer to your paint, but acrylic primer will work for most projects.
Sealant
This goes on last and is essential to any project. It makes it waterproof, protecting both the paint job and the material used to build the prop. Sealants range from matte (don’t reflect light, like paper) to glossy (reflect lots of light, like glass).
Modge Podge
Also used as a glue, this sturdy and glossy sealant will become your best friend. It really is one of the best products a crafter can have.
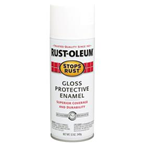
Spray Enamel
Works surprisingly well for how cheap it is. It’s extremely easy to use but will get cloudy if you touch it before it’s dried completely.
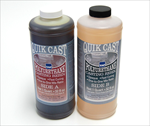
Casting Resin
Also used to make props, resin dries very hard, helping add support to relatively weak crafting materials. It’s a favorite for paper-based projects.
With the selection narrowed down, it’s a little easier to choose what to work with. You can find all of these at any craft store.
You’ve always loved how professional wooden props look, but you have no idea where to start. Watching and reading tutorials is a great way to figure out how you’re going to make something. Take a peek at these projects and see what you can make of them:
Beginner’s Sword (all you need is a marker, a plank, a knife, and sandpaper):
Beginner’s Rubber Band Gun (it’s given by a little kid who uses mixing sticks and hot glue. It’s a great way to get you thinking about layering and open up your mind to different resources):
What you’ll see again and again in here is the importance of planning your cuts, taking your time when you’re cutting and sanding, using primer, and patience. All the time you put into making wooden props will come back to you three-fold: they’ll be able to stand more abuse and will last much longer than most other props.
“Don’t run with scissors” was one of those rules we all heard when we were kids, and probably the one we ignored the most…only to get some kind of cut later on. When you’re working in carpentry, though, those scissors are a heck of a lot bigger and you’ll end up with way worse than a trip to the nurse if you cut yourself with them.
It’s important to keep safe when you’re working on a new project. If you don’t take common precautions before you begin, you could cause serious and permanent damage to yourself. You will also use up way more time and effort than you would normally need to when you’re working with an injury.
Follow these tips to avoid wasting all that blood, sweat, and tears:
1)Wear protective gear. You know how much it hurts when you get an itty-bitty splinter in your finger? Now imagine that in your eye. When you’re working with high-powered machinery, always wear safety goggles. If you’re using unfinished wood or paints, wear gloves. When you’re sanding, put on a ventilator. You don’t realize just how important these are until you’re sitting in a waiting room wondering how you’re going to pay for the extra medical bills.
2)Use the appropriate guards and guides with your tools. They were made to protect from common accidents that happen again and again. If you decide you’re good enough to not use them, you will pay the price for it.
2)Dress appropriately. Don’t ever wear loose-fitting clothing when you’re working. You can’t manage it all the time, and it will eventually get caught in something. At the least you’ve ruined a shirt and a tool. At the worst you’re the one that gets torn up.
3)Stay focused and aware. There’s a reason workshops are large and closed-off areas. When you’re working with such powerful tools, you need to tune everything else out–phones, friends, pets. Distractions=looking away from your tools=injuries and messed up projects.
You also shouldn’t be under the influence when you’re working. You need to be completely in the moment, both mentally and physically; it’s the only way you can put your all into what you’re doing. When you’re drinking or smoking you aren’t all there, plain and simple.
4)Turn off and unplug machines when you aren’t using them. If that means that you only use a single outlet to force yourself to switch between power cords, do it. You’re using stuff that’s meant to cut through limber like it was butter. Imagine what it would do to your foot if you left it on by mistake and put it down on the floor.
5)Put tools away when you aren’t using them. This doesn’t only help you keep track of everything, it makes sure you don’t end up being surrounded by heavy, pointy, metal things.
6)Don’t use dull or dirty tools. This isn’t just about precision. When you use dull blades, there’s a better chance that your tools will bind and kick-back (get pinched between the pieces of wood you’re cutting and fly off in unpredictable directions). That make things go real bad, real fast.
Having them get gunked up by pitch (resin that comes from the wood) will have the same effect. Use a pitch cleaner to take care of your tools and keep them factory-fresh.
7)Don’t let exposed blades or tips point towards you. That might seem like common sense, but it’s also really easy to do without realizing it. Reaching over a table to get a drink of soda is fine, but when that table is full of spinning blades, nail guns, screws, and sanders, it’s a bit more dangerous. You also don’t want to put your hand down for balance only to put it on the sharp edge of something.
The long and short of it is, don’t be stupid. You’re a vulnerable blob of flesh that’s real easy to cut through and you don’t have mind powers that can control your tools or supplies. Take proper precautions and you’ll have a great time in the workshop. Skip them, though, and you’ll have an ambulance taking you out of it. If you don’t believe me, just search for carpentry accidents on YouTube (they’re really graphic, though, so don’t look it up if you can’t handle blood and gore).
When you’re making a drawing, you need to know what kind of paper you’re using. When you’re sewing a shirt, you have to decide on the best kind of fabric. Woodworking is no different.
There are as many kinds of lumber to use as there are species of trees, so it can be hard to choose just one. Since you’re making small portable props, though, you’ll want to work with softwood. These are some of the most popular choices:
A manufactured material made out of several thin layers of wood. It’s cheap, widely available, strong, takes well to paint, and is resistant to warping. However, because the outside veneer protects the wood inside, it cannot be sanded down to give it smooth edges or to remove dents.
A dense and beautiful material that will stand up better than many softwoods. Strong, easy to work with, and relatively cheap, but may warp if exposed to too much water. Good for the bodies of props.
It isn’t actually wood, but a manufactured composite made with fine wood particles. It’s far cheaper than wood and shapes well, but is prone to warping and splitting. It will also dull your tools faster.
BasswoodviaFred Zavadil A light, high-grain wood that’s excellent for carving. Cheap, easy to work with, and takes well to paint, but isn’t meant to stand up to abuse. Best for intricate details.
Balsa wood It’s that stuff you built the tiny planes out of when you were younger. A very light and porous wood best used for layering and detailing. It can be fragile, though, so you need to be gentle with it.
I just realized that I make a LOT of ears for my cosplays! None for this year (I’m surprised!), these are all from past cosplays I’ve done. Can you tell that I do a lot of animal/gijinka cosplays??


")
")
")


")
")

