Detail, Fabric Painting. Wearable Art. Art on Clothing. Detalle, pintura en tela. Arte en ropa. / Sandra Rede 2020 www.sandrarede.com Instagram & TikTok @sandrarede
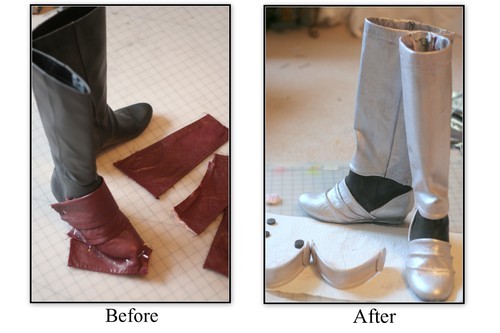
Found the right pair of boots for a costume but they’re the wrong color? Need a detail design painted on something leather? Or do you just need to touch up a piece that has gotten scuffed or marked up? Repainting leather is less difficult or expensive then you might think. I like to buy old jackets form the thrift store and recycle the leather for cosplay pieces. This mean I can get a significant amount of usable leather for less than $10, but often it is an ugly color. Sometimes the color leather I need isn’t even available to purchase on the market. To fix this I simply paint the leather with specialty acrylic leather paint.
Acrylic Leather Paint: Where to Get It
Angelus brand is the most wildly know and recommended leather paint. This brand comes in a multitude of colors: primary, secondary, neon, metallic, glitter paint, etc. I usually purchase mine off of Amazon. Prices can range from $2.99- $8.00 for a 1 oz bottle. Shop around and don’t pay more then $3 -$5 for a bottle. 1 oz may seem little but I promise that the paint goes a long way. If you have a large surface area to cover 4 oz bottles are also available. For $30-$40 you can get a 12 pack of 1 oz bottles in the basic colors. For $13-$20 you can get a 6 pack of 1 oz bottles in the neon colors. If you have a leather supply shop where you live try contacting them and see if they carry the paint for less. EcoFlo Cova paint is another brand that is available online and through Tandy Leather Shop. It has almost as large a selection of colors as Angelus and the price is similar. The wonderful thing about EcoFlo is that the normal bottle size is slightly larger- 1.5 oz. But 2 oz is the largest size available in most colors. In a pinch regular acrylic paint will work too. But I find that the Angelus brand seems to adhere better. Be sure to seal it or it will start to scrape off under ware and tear. I do not recommend using craft store acrylic paint to repaint shoes, it does not hold up well under stress.
How to Use Leather Paint: Tips and Tricks
Leather paint works the same way as regular acrylic paint. You can blend them to create custom colors, drying time is comparable, and you can clean your brushes with water.
Make sure the leather is clean. If you are painting on top of a pre-existing color you will want to strip the shiny top layer off with a little bit of acetone (i.e. fingernail polish remover) and/or fine grit sand paper (200 grit or finer). Be careful not to take off to much or you’ll risk pulling the pre-existing coat of paint off and creating blotchy uneven spots on the surface. I highly recommend using a scrap of leather to test out how much acetone/sanding it will take to strip off the top layer before trying it on the piece you are working on.
This type of paint can also be used on vinyl/pleather but not as effectively. It doesn’t adhere as well, requires sanding in the prepping stage and I find it doesn’t hold as well if the item is under a lot of stress (ex. shoes). If you are changing the color from a dark to a light (ex. the boots pictured above) you may need somewhere between 3-6 coats to make sure it is properly covered.
You can apply the paint using a sponge brush or a regular paint brush. A sponge brush leaves fewer streaks and creates a smoother finish but it will soak up and waste quite a bit of your paint. With a regular paint brush you risk streaks but you can control the amount of paint you are using with less wastefulness. The paint will also work well with an airbrush if you have one. If you water the paint down (especially with the EcoFlo brand) you can use it like a stain. If you get paint on an area of the leather that you don’t want it you can pull it off with a little acetone. I usually dab some on with a paint brush and then pull it off with a Q-tip or paper towel. After your final coat is dry you will want to seal the paint with a top coat. I use either polycryclic or EcoFlo. Polycryclic can be purchased at any hardware store. EcoFlo comes in a several different sheens: matte, super sheen, satin sheen etc. It can be purchased at Hobby Lobby, Tandy Leather and many online retailers such as Amazon.
Fabric Painting Tutorial & Comparison (alt title Unintentionally making small Japanese flags)
Fabric painting is a great way to put designs on a costume, especially when an applique is not possible or wouldn’t get the right look. This works best on cotton or blended cotton fabrics and in this tutorial I’m using airbrush acrylic paint.
For each test I’m using a square of bottom weight cotton with an ironed down freezer paper stencil
Airbrush - Just two quick spurts is enough to cover everything, you can see how wide the spray is and why its important to cover everything you don’t want to paint with the freezer paper
Pros
No touching the fabric, so its great for stencils with a lot of tiny detail or something you don’t want brush strokes on.
Very fast, and the least amount of paint is used (end result is less stiff)
Little labor required
Cons
Many coats might be needed depending on the colors used
Expensive set up costs (~250 for a compressor/brush combo pack)
Depending on the airbrush’s nozzle size it can be very prone to clogging until you get used to cutting the paint with the right amount of thinner.
Paint Brush - Start outside the stencil and drag the paint in toward the middle, this will prevent paint from getting under the stencil
Pros
Cheapest and most intuitive
Can do tiny details if a smaller brush is used, also works well for free-hand
Cons
Can leave a heavy paint layer if you aren’t careful
Have to be careful around the edges to not push paint under the stencil
Can be labor intensive
Sponge - Wet and wring out the sponge before starting, then starting outside the stencil, drag paint toward the middle
Pros
Also cheap & intuitive
Lighter coats than brushing
Does not leave stroke marks
Cons
Not good for small details
Also a danger of pushing paint under the stencil edges
All three methods are very work-able depending on the time you have available. Personally I prefer the airbrush for any heavy lifting, followed by using a paint brush to clean up any over spray or mistakes.
An airbrush is what I used on my koumajou densetsu sash, and while its definitely possibly to paint it all by hand, the amount of time it would have taken would have been far too long. And once you pay that initial up front cost you can use it for many costumes or projects afterward.
Work still progresses on “Bobbin on the Beach”, but very slowly. My workplace went through a huge reorganization two months ago and my schedule changed along with it. I still work the same amount of time, but my free time is now broken up into much smaller chunks. It’s definitely caused me to reconfigure how I manage my quilting time. One night after work, I made this little applique shovel.
The next day, I stitched it down. The day after that I started the design on my punchline element, the cat litter box. About a week ago I got together with some friends to play with Tsukeninko inks. I had a little fun making color swirls in shaving cream, but I dripped water on it before I could heat set it, so I couldn’t fix it. But I can use it as a background for my text.
I printed out my text in the font I liked (and to an appropriate size), and positioned it under my inked, marbled fabric. Then it’s just a matter of tracing the text onto my fabric. There are a lot of good fine line fabric pens out there. I used a .01 Pigma and a .05 Pilot gel pen. Both are permanent and work well on most quilting cottons.
This will be such a fun element to my cat’s ‘beach.’
I seldom do any quilting after September as my job gets ridiculously busy during the holidays. But I’m going to try to do something different and work on my new art quilt a little each day during the month of November at least.
I started yesterday with the eyes. Painted on Silk Radiance with Tsukeninko inks. I think it captured Thumper’s wistful eyes nicely.
Finished the leaf veins yesterday and my hand is still a bit ouch, even though I spread it out over 3 days. I only did one side so it can be worn either way, and the plainer side looks just like an autumn version of the green one I made earlier this year.
I filmed the making of this one, but it’ll still be a while before the video tutorial is finished and up on youtube, since I want to make and film several more so I can try different methods of doing the veins.
Yesterday I had a stand at a local art/crea event. I have no picture of the full booth but I had a great time. Brought a few capes and fabric painting/costume design things and some digital art with me. And to show what I do, I spend a whole day fabric painting. Today I’m working on the rest of it and we’ll see when it’s done. I got the change to talk to a lot of people with different views and different artistic skills.


Fab")
Fab")
Fab")
Fab")
Fab")
Fab")
Fab")


