So, I’m really in need of money right now (starting a new job finally but having trouble paying my rent ahah…)
So I’ve decided to give a try at commissions !
I found those really cute japanese fabrics today, and thought that maybe I could try taking 2 or 3 commissions of handmade/handsewed items :D
I really like doing this, it’s so peacefull and I love small details and sewing small objects ahah
So! idk if anyone would be interested in this….it’d be a big help to me, first on the money side, but also on the “professional” side of it, ‘cause I’ve never taken sewing commissions before and I really wanna start doing some ! So it’d be a really nice way to start doing it =D (I already did a handfull of wallets, phones / Ipad cases for friends and family, so, not ENTIRELY new to it e.e)
For the price, it’s to be decided with the item chosen, but I’d say it would be around 10€ max?
Like:
small wallet/Subway card case : 5€
pencil case/phone case: 10€
Ipad case/reading tablet: 15€(also it’d be special orders, cause I would need to go buy larger pieces of fabric for those ^^)
Of course I’d be shipping them worldwide (sended from Paris, France)
So that is it…if anyone is interested, please pm me _o/
Collar, sleeves and one side sewed, i just need to sew the other side, attach the sleeve and make the hem and I’ll be ready to sell bonnet to the royal navy
Since I got more inspired by my previous space and witch-themed frog plush, here’s .⋆。✧*゚+☆ Stellar ☆+*゚✧。⋆. They’re a horoscope and constellation-themed frog. I hand-embroidered the the stars on their body based off of real constellations.
On the long, third-last photo there are the following constellations: Cancer (my sun sign), Libra (Stellar’s and Orbit’s sun sign), Triangulum (I know it’s just a triangle, but that’s how it really is) and Aries (turned sideways in the photo).
I used the same fabrics as my previous frog, Orbit, because I want them to look like they’re more related to each other. Though the eyes I picked for Stellar are different, they’re made of dark, greyish metal buttons. I also made Stellar a bit smaller, less rounded and their overall body shape is a bit different, like how their snout is less pointed.
Thanks for all the support of my blog everyone! <3 I’ve really appreciated all the interaction and positivity!! ·₊˚⋆ (❀v‿v) ∼ ♡♡♡ ⋆˚₊·
“Make, Sew and Mend: Traditional Techniques to Sustainably Maintain and Refashion Your Clothes”
Forthcoming publication from Page Street Publishing, now available for pre-order via Amazon, Book Depository, and most large book retailers.
“As people learn the environmental and economic toll of fast fashion, they are turning toward more sustainable fashion practices like mending. From running and herringbone stitches to basting, pleats and buttonholes, Bernadette breaks down techniques with step-by-step photos to show people with any level of sewing skill how to achieve the most lasting results for every stitch.
Whether readers are looking to build and maintain a vintage wardrobe or merely want to phase out fast fashion in favor of more sustainable practices, Bernadette has the basics covered for every kind of seamster.”
COMING MAY 17 2022
I saw this and instantly fell in love, but I’m not willing to pay what it costs to get it shipped
I absolutely love this sort of thing. The kind of active archeology that blends research and the skill of experienced trades people doesn’t get nearly enough love!
Hornet from Hollow Knight, 100% hand-sewn by me. The moment I beat this hard but fun, beautiful storytelling of a game, I instantly became a fan and have always wanted to do something as a tribute.
I also wanted to challenge myself in handsewing another plush after the Kuriboh one and thought Hornet is perfect as practice, plus she’s easily one of my favorite characters in the game. Despite her simplistic design, her head shape is actually the toughest part for me to figure out… The plush overall is not perfect but I did the best I could and pretty proud of how she looks!
Special thanks to my talented plush-maker friend (boonmake_ on Instagram) for providing me useful tips in creating Hornet’s head shape and cloth, as well as giving me the white fabric!
(She’s now chilling on my work desk alongside with my small Hollow Knight collection :D )
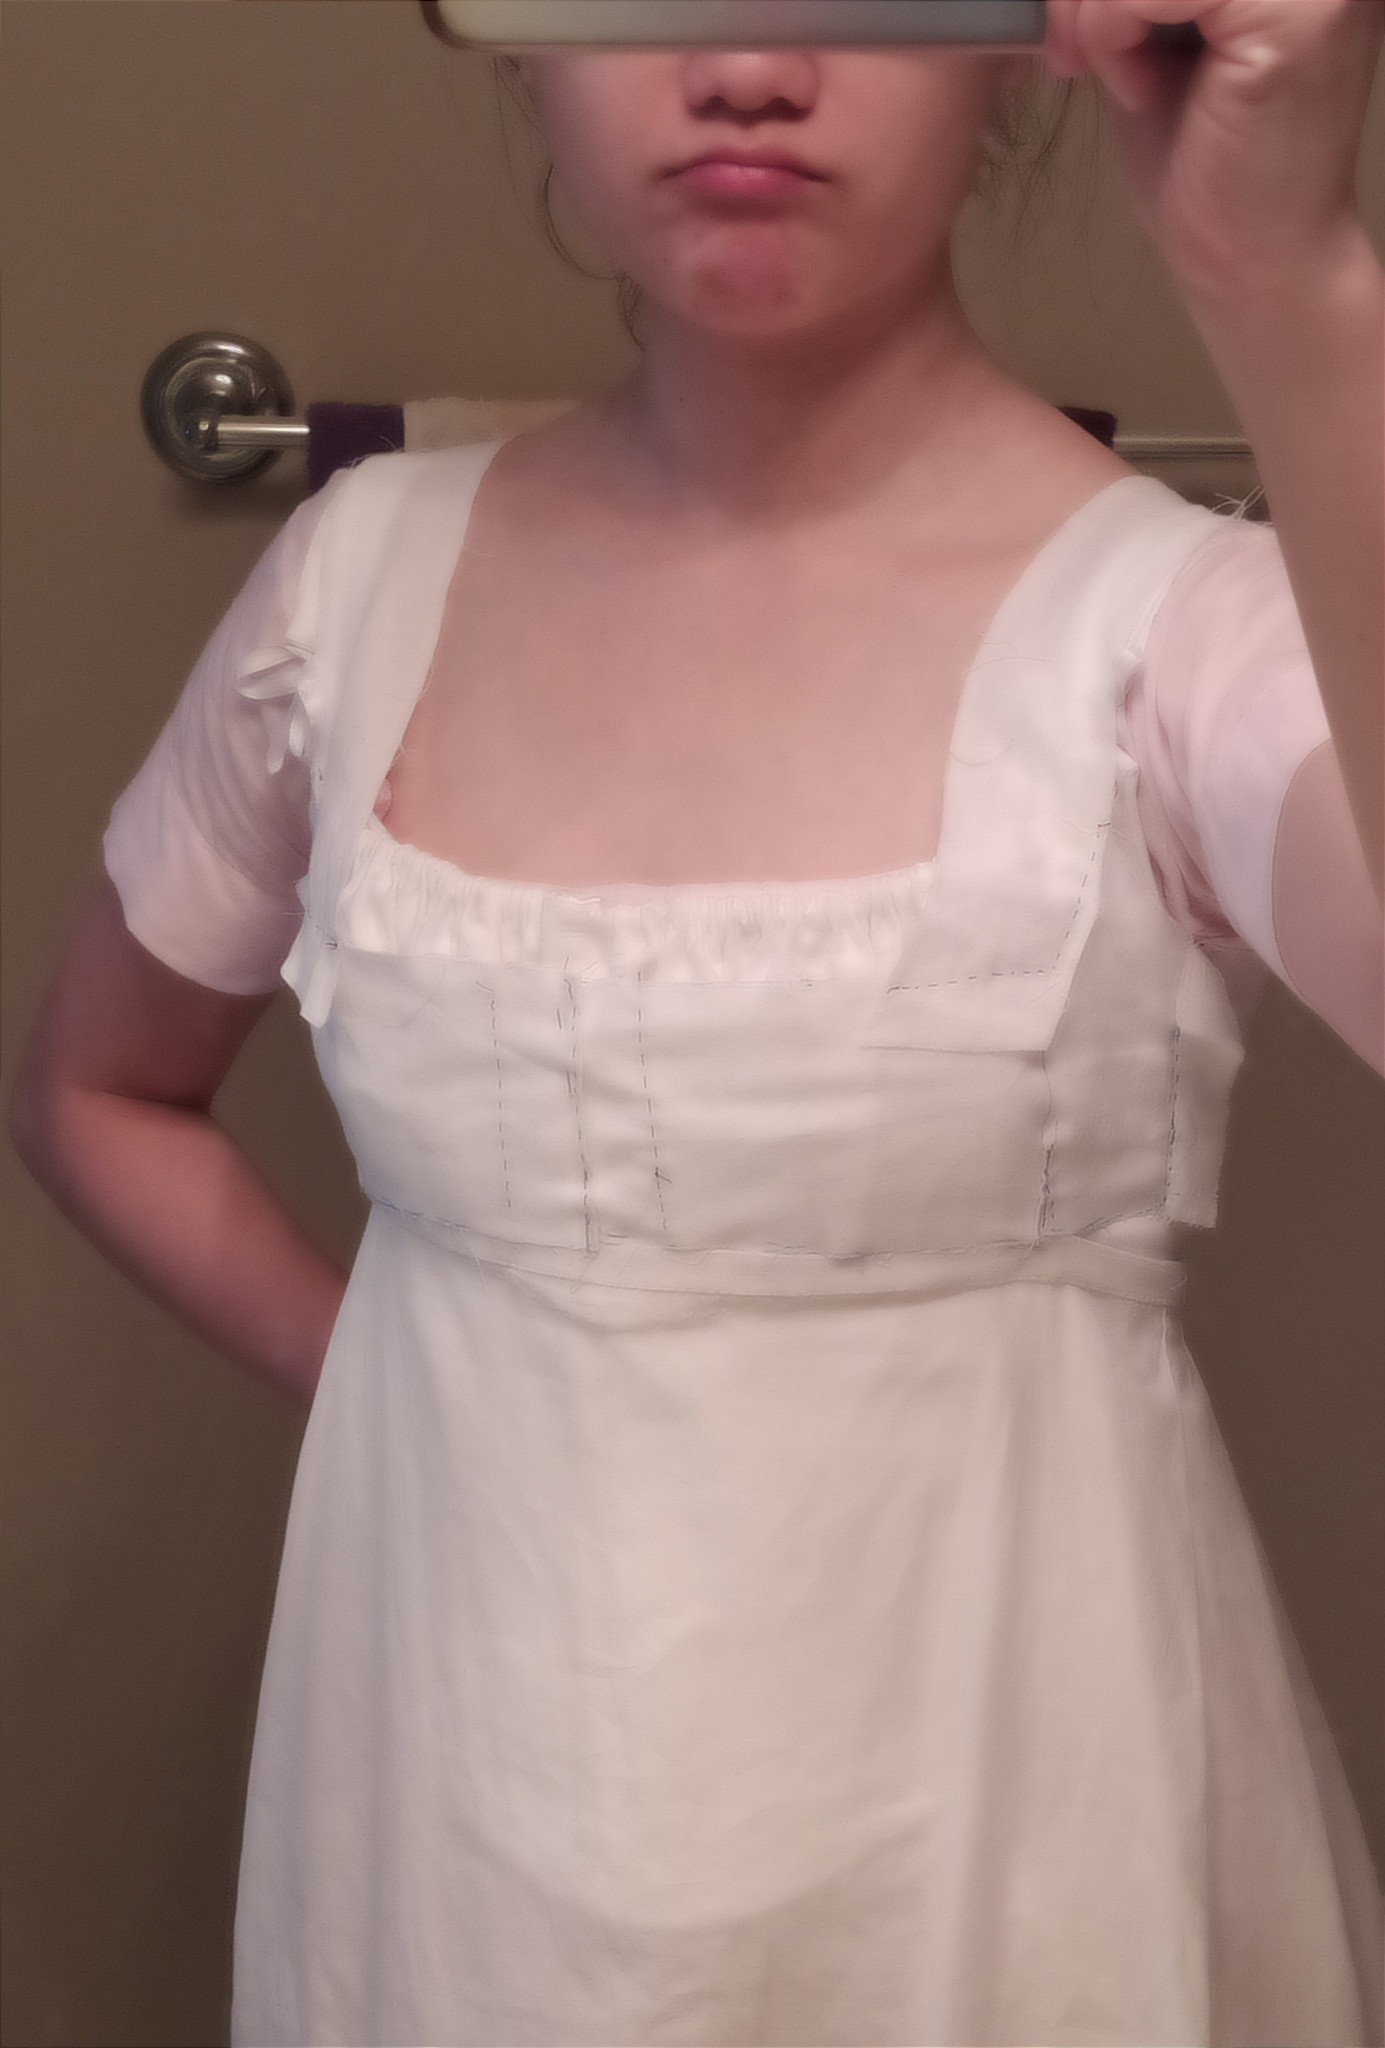
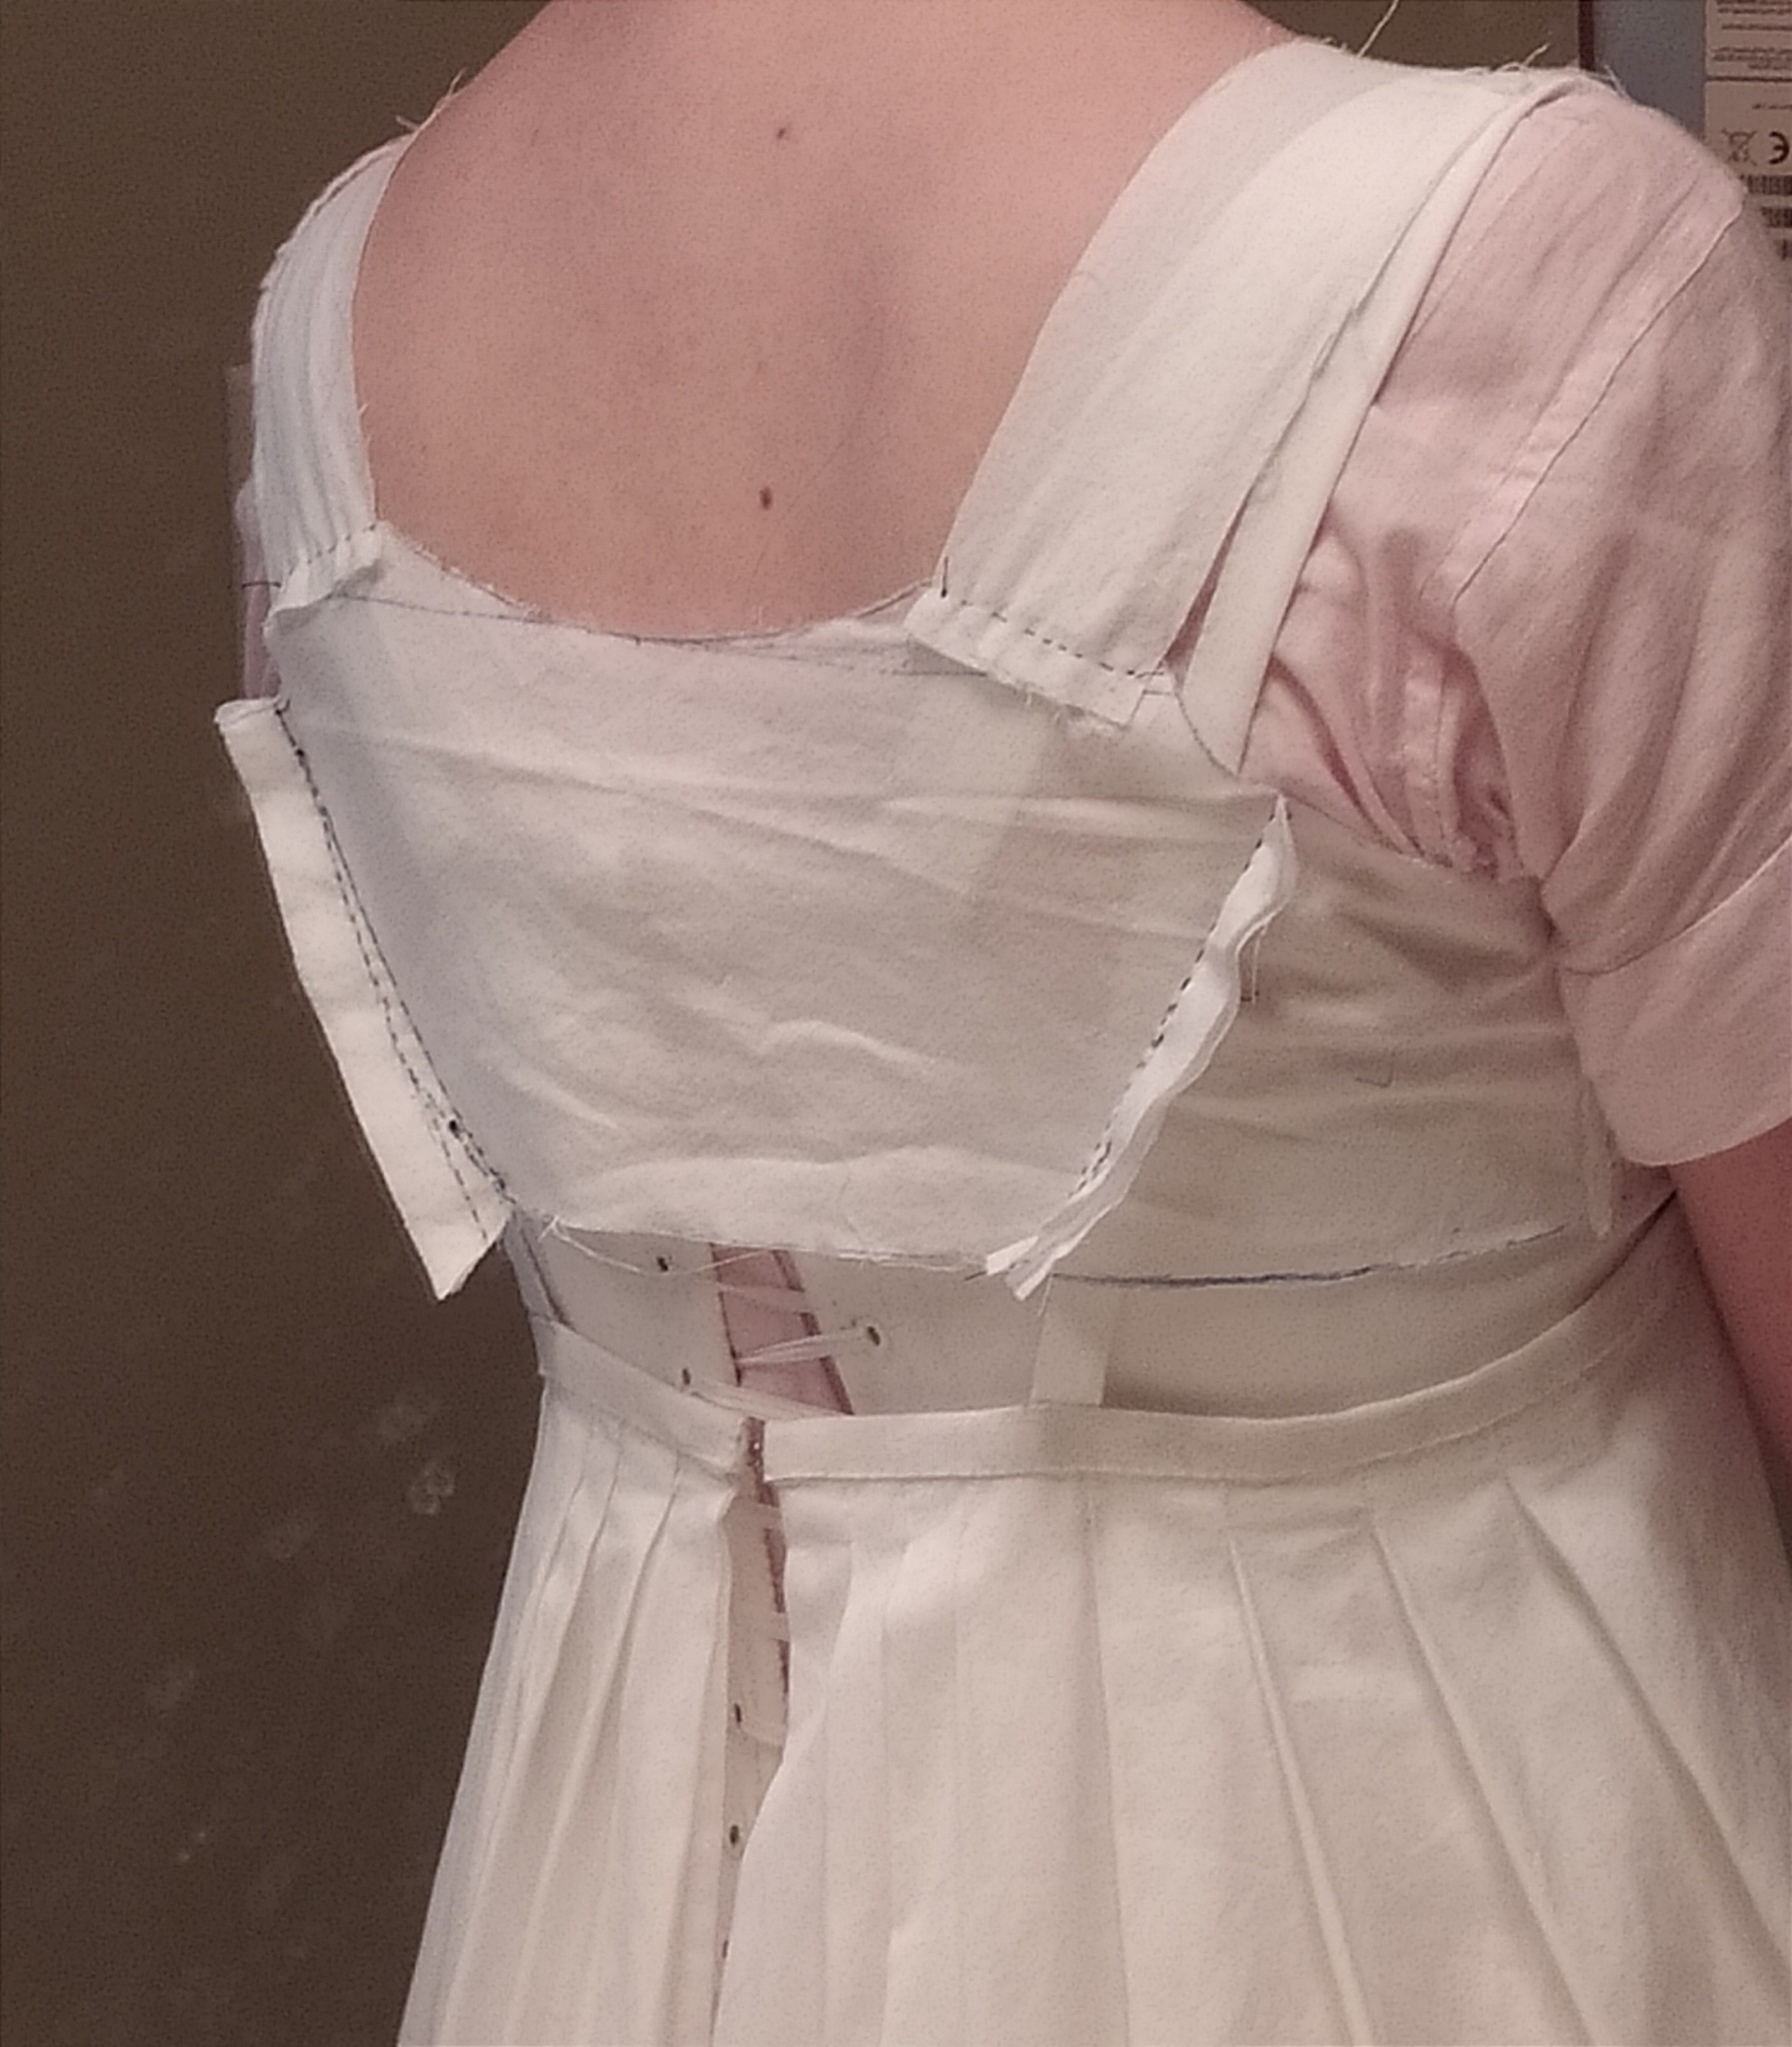
^me, in my shift, stays, partially bodiced petticoat, and bodice mockup. There are so many fricking straps everywhere how did women in the early 19th century not combust in rage every time a strap slipped off their shoulder
So now that the underpinnings for the regency gown have been made and adjusted and adjusted again (I tweaked the Bernhardt stays again, and at this point I think this is as close to the shelf effect as my tiny chest going to get), it’s time to move on to the gown itself.
I don’t have a regency sloper so I had to make one first, by roughly estimating the dimensions of the diamond-shaped back piece, then piecing a bunch of random scraps into the shape of a side-front thing with straps. The side-front pieces will eventually be cut into one piece for the left and right each; I just needed to figure out the shape of them first and I didn’t want to do the “take a giant piece of fabric and cut chunks away and put darts in places” method that Nicole Rudolph used in her drafting tutorial. Idk, it worked well enough. The front pieces pin closed down center front and are going to be covered by the bib front (which I haven’t made a mockup of yet because it’s just going to be a rectangle cut on the bias with two darts to shape the bust). I’ve already traced my mockup onto paper, so my pattern is ready to go once I can psych myself up to cut into the actual fabric. Maybe I’ll make one more mockup from my lining fabric first…
Oh, and my sleeve mockup was a fail because it wasn’t puffy enough and I don’t have enough mockup fabric at the moment to make another one. Not that it matters because I only have 2 yards of embroidered cotton gauze to make this gown. It’s just barely enough to make the skirt and bodice, but definitely not enough for the puffy sleeves. And I’m pretty sure no more of this specific embroidered fabric exists anywhere, so I’ll have to trawl the internet for the perfect shade of off-white cotton gauze. And then hand-embroider it myself
(UPDATE: I managed to find the last scraps of a fabric that is the same design as my fabric but in a different colorway on Etsy. The hem is embroidered in hot pink, which is fine since I only need the off-white part.)
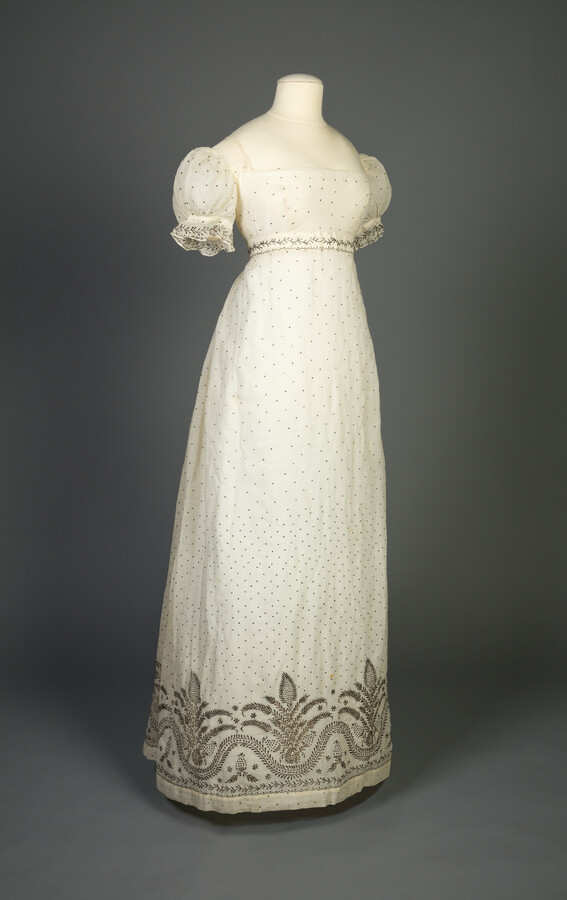
The inspiration gown I set off to reconstruct (but not really reconstruct) is this one, a circa 1810-1815 dress from the collection at the Maryland Center for History and Culture in Baltimore:
There’s an article from their website that goes more into detail on the construction of the dress, with some close-up photos of the details. The original dress actually closes in the back with buttons, but I made the decision to turn my gown into an apron-front style. That would make my gown more complicated than the original, but I don’t live with any other humans and it’ll just make the gown easier to get into and out of without help. (My cat is very smart, but he does not have opposable thumbs.) I may be able to navigate the back-lacing spiral-laced stays by myself, but a back-closing dress with buttons that I absolutely cannot reach just crosses a line too far for me. (It’s a good thing these stays are so comfy, since I Do Not have the energy or patience to unlace them once I get them on.)
The original also seems to have a drawstring in the front, according to some other photos I’ve seen of it, though what the drawstring does is a mystery to me because the bodice front does not look gathered at all, so I’m not putting a drawstring in my gown. The bodice front is cut on the bias, so maybe the string is there to keep it from warping? Idk, I’ll probably just use twill tape to reinforce the front neckline.
Additionally, the original gown actually isn’t embroidered at all. The little black dots and the detail on the hem are actually silver staples which have since tarnished. I actually prefer the darker dotted effect, so I’m opting to go with a cotton gauze with a navy blue floral embroidered hem. I’ll add the dots by hand with french knots.
Also, the museum website doesn’t actually give us a picture of the back of the gown (just close-up photos of the buttons, and even then you can’t even tell how many buttons there are). I have no idea how high the back neckline should be, or how wide the diamond back is, or where the seams are placed, or how tightly gathered the skirt should be, so the back of my gown is going to be entirely conjectured anyway
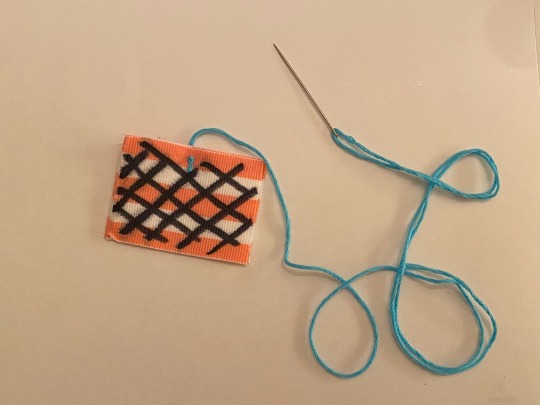
Tutorial for a simple straight stitch, specifically for sewing on patches!
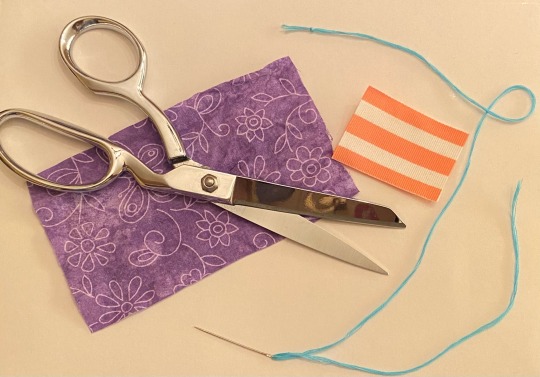
MATERIALS
❥Needle, threaded and knotted at one end
❥Scissors
❥Patch (shown here as striped ribbon)
❥Item you’re sewing your patch onto (shown here as purple fabric)
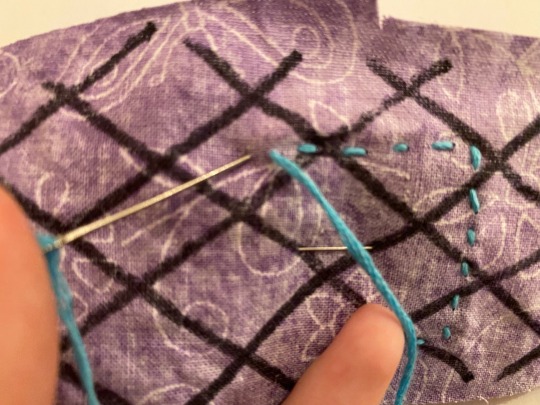
Start with just your patch. Pull the thread through so that the knot lies on the BACK of your patch.
Pin your patch face-up to whatever you’re sewing it onto.
Then, moving your needle over (about 0.5 to 1cm from your starting place), push it through BOTH the patch and the fabric. Pull it taught.
Flip your piece over to the back. Again, move the needle over slightly then push it through, making sure to catch the fabric AND the patch. Pull it taught.
(TIP: make the stitches on the backside as small as you’re comfortable with if you’re sewing your patch onto a bag or piece of clothing. You don’t want the things in your bag or parts of your body catching on and tearing your stitches! I haven’t had a stitch break because it snagged from the outside, but I often snag them from the inside!)
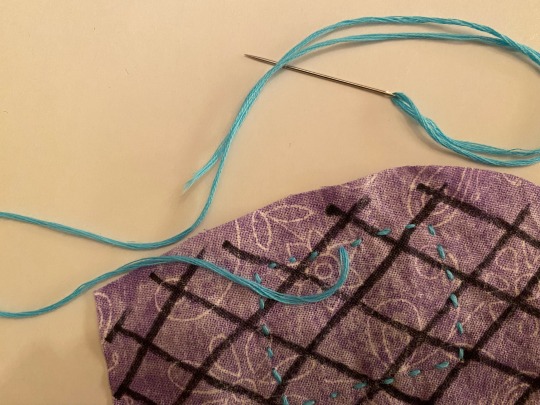
Flip it back over and repeat, moving the needle over and then pulling it taught, flipping the piece over, and repeating.
Once your piece is sewn all the way around, make sure your needle is on the backside of your fabric, like shown:
Push your needle through a neighboring stitch
Pull that until there’s a slight loop, wind your needle into that loop, and pull it taught.
Repeat if you want it extra secure.
You can cut the tail there! If you’d rather hide the thread tail, here’s how I do it.
1 Push the needle through the fabric but NOT the patch
2 Feed the needle through the patch so it comes out somewhere in the middle.
3 Pull it so taught that it wrinkles
4 While it’s wrinkled, cut the tail as close to the patch as you can. You might have to wiggle the patch back and forth, but the tail should end up hidden behind the patch
And that’s it! Here’s how it’ll look:
COMMON PROBLEMS:
-Stitches don’t hold/cause the fabric to fray: You’re stitching too small or too close to the edge! Make your stitch wider and move away from the edge of your fabric!
-Needle refuses to go through patch: either your needle is dull or your patch is too thick!
First, try sharpening your needle: If you have a pincushion, it should have a little emery strawberry! Push the needle tip into the strawberry and twist! If you don’t have a pincushion, get a nail file and twist the needle tip carefully on the filing edge.
If sharpening the needle doesn’t work, then your patch might be too thick! If you try to force a long needle (like the No.5 DMC I’m using) into too-thick fabric, it might bend and break. I recommend getting a short, thin, sharp needle and a thimble. If you don’t have a thimble, my method when I was younger was to duct tape a soda cap to my thumb and use that as a thimble. If your needle still won’t go through even when it’s small, thin, sharp, and you’re pushing it through with a needle, then try superglue. That’s honestly my best advice.
-stitches are messy/different sizes: this one honestly just takes practice! if it REALLY bothers you, get a ruler and a pen and mark dots along where you’re going to sew, 0.5cm apart from one another. It’ll take some trial and error getting the needle on the dots from the back, but from the front it’ll be a breeze.
-Thread keeps knotting/breaking: Another problem solved by practice, try using a shorter piece of thread or pulling it through more gently.
-Patches end up “bubbled” instead of laying flat: First, try adding more pins to hold it on. If that doesn’t work, take an Elmer’s washable glue stick and glue the patch on before you pin it down. You’ll have to use an emery strawberry or an emery board to clean your needle every once in a while, but the glue washes right out when you’re done.
DM me, send an ask, or leave a reply if you need any extra help, I’m finishing up a big commission right now but I should answer within a day or two.
Hope your creating goes well! If you wanna support my work, check my pinned for some ways to do that. I send my love!


")
")
")
")