Visible mending is a decorativeway to fix up an item. Instead of trying to make your mend as invisible as possible, the idea is to make it part of the garment’s design.
Visual mending is not a single technique: it’s more of a mindset. If you’ve got an item you love, it deserves to be mended, and if you’re going to put that love into stitches, why not show them off?
That being said, there are some specific techniques that are popularwith visible menders. Let’s take a look!
Sashiko:
Sashiko is a type of traditional Japanese embroidery that is used to both decorateandreinforcefabric. In visible mending, sashiko is often used to cover up holes with patches or to reinforce thinning fabric. This technique uses a variation on the running stitch.
Regularembroideryis also a popular technique to accentuateyour mends. Check out my embroidery 101 post to learn how to get started. You can embroider patches, or use embroidery to hide or accentuateany stitches you’ve made to fix holes. Embroidery’s also a great way to cover up stains.
There are many ways to add patchesto a garment. My tutorial on patches is a good place to start if you want to make custom-shapedpatches to sew on top of your fabric. You can also sew your patch on the insideof your garment and have it peek out from beneath the hole you’re trying to fix. Fun ideas for this are laceorsuperheroes.
Darning is a technique used to repair holes in fabric by using running stitchestoweaveextra fabric over the hole as to fill it up again. While traditionally darning is done in an invisibleway by using the same colour of thread as your fabric, you can also use contrastingcolours to accentuate your fix. Check out this written tutorial on darning by TheSpruceCrafts.
Visible mending is a creative way to fix up your clothes and give them some personality at the same time.
You should be proudof the fact that you took the time and learned the necessary skills needed to mend your clothes! Show off what you did!
A fun side effect of wearing these obvious mends is that people will notice them. They’ll remember your fixes the next time they’re faced with a hole in their wardrobe, and it will make them more likely to try it for themselves.
These are just a few ways to visibly mend your garments. Want more inspiration? Check out Pinterestorr/Visiblemending on Reddit.
I highly recommend trying out mending your own clothes when they have holes or tears. Even if you’re totally new to sewing and mending and not skilled at it yet, it genuinely changes how you feel about your clothes. Just trying to darn a small hole in an old tshirt, or trying your best to tidily sew it shut will make it go from being just a shirt you own, to being something you’re maybe a bit proud of. If you do visible mending, it’ll also make whatever you fix up into something unique. It’s a nice feeling.
It really is!
Mending your clothes allows you to take a step back from the mass production and planned obsolescence that rule the fashion industry, and to regain agency over your wardrobe.
When you mend something, you truly make it yourown. That t-shirt may have been produced thousands of times, but the one you own is uniquebecause you’ve infused it with a bit of yourself. That’s something to be proud of, regardless of your skill level!
It’s a bag sort of a thing, with boro and sashiko. I enjoyed using bits of scrap leather, as well as fabric scraps going back many years. I like using fabric almost like papier mache - layering small pieces and “gluing” with sashiko. This is a good size for my sketchpad.
My aunt made this cushion many years ago. It’s a Lord of the Rings themed cushion. The silk had become fragile and tattered from use, so I patched and stitched it. I used a slightly shinier, iridescent stuff to patch behind the silk. You can just about make it out below.
Visible mending is a decorativeway to fix up an item. Instead of trying to make your mend as invisible as possible, the idea is to make it part of the garment’s design.
Visual mending is not a single technique: it’s more of a mindset. If you’ve got an item you love, it deserves to be mended, and if you’re going to put that love into stitches, why not show them off?
That being said, there are some specific techniques that are popularwith visible menders. Let’s take a look!
Sashiko:
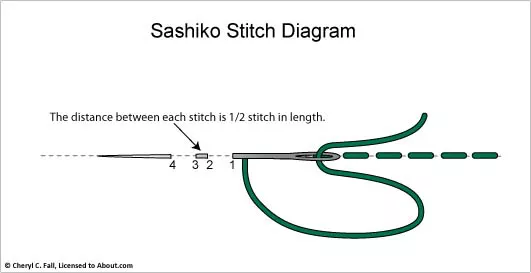
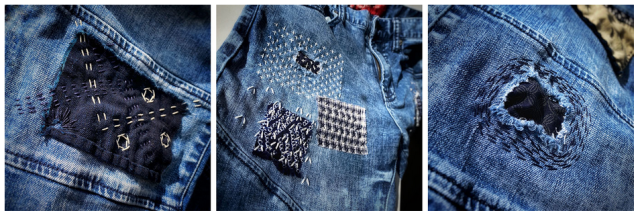
Sashiko is a type of traditional Japanese embroidery that is used to both decorateandreinforcefabric. In visible mending, sashiko is often used to cover up holes with patches or to reinforce thinning fabric. This technique uses a variation on the running stitch.
(Image source) [ID: sashiko stitch diagram: the distance between each stitch is ½ stitch in length.]
Someresourceson sashiko:
SashiCo on YouTube: sashiko livestreams and information on the cultural aspect of sashiko.
(Image source) [ID: three examples of sashiko embroidery on jeans fabric.]
(Image source) [ID: sashiko embroidery with white thread on blue jeans fabric.]
Embroidery:
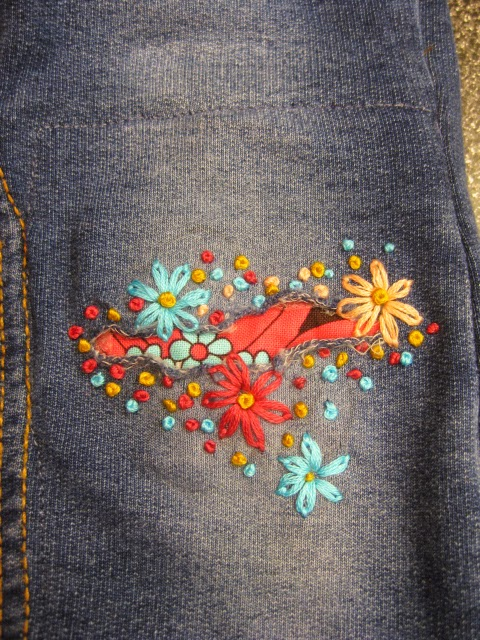
Regularembroideryis also a popular technique to accentuateyour mends. Check out my embroidery 101 post to learn how to get started. You can embroider patches, or use embroidery to hide or accentuateany stitches you’ve made to fix holes. Embroidery’s also a great way to cover up stains.
(Image source) [ID: colourful embroidery floss covers a worn sleeve edge of a jeans jacket]
(Image source) [ID: colourful flower embroidery surrounds a hole in a pair of dark gray jeans. Fabric with a red and black flower print peaks out of the hole.]
Patches:
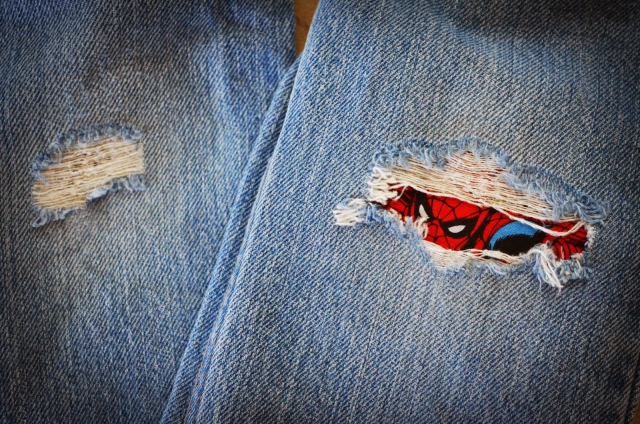
There are many ways to add patchesto a garment. My tutorial on patches is a good place to start if you want to make custom-shapedpatches to sew on top of your fabric. You can also sew your patch on the insideof your garment and have it peek out from beneath the hole you’re trying to fix. Fun ideas for this are laceorsuperheroes.
(Image source) [ID: Spiderman peaking out of a rip in a pair of blue jeans.]
(Source) [ID: a red flannel heart-shaped elbow patch on a gray knitted sweater.]
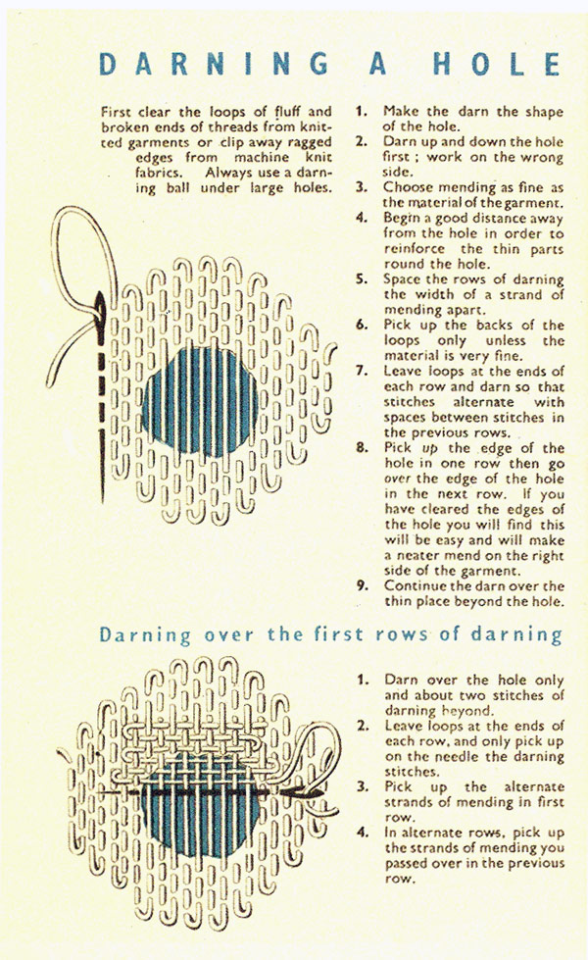
Darning:
Darning is a technique used to repair holes in fabric by using running stitchestoweaveextra fabric over the hole as to fill it up again. While traditionally darning is done in an invisibleway by using the same colour of thread as your fabric, you can also use contrastingcolours to accentuate your fix. Check out this written tutorial on darning by TheSpruceCrafts.
(Image source) [ID: vintage instructions on how to darn a hole.]
(Image source) [ID: four examples of darning on blue fabric with colourful contrasting thread.]
Conclusion:
Visible mending is a creative way to fix up your clothes and give them some personality at the same time.
You should be proudof the fact that you took the time and learned the necessary skills needed to mend your clothes! Show off what you did!
A fun side effect of wearing these obvious mends is that people will notice them. They’ll remember your fixes the next time they’re faced with a hole in their wardrobe, and it will make them more likely to try it for themselves.
These are just a few ways to visibly mend your garments. Want more inspiration? Check out Pinterestorr/Visiblemending on Reddit.
I’ve had these shoes for 5ish years and refuse to let them go bc they are the only shoes that properly support my feet (retail price is 300$, but I got them for free)
Mended the severely worn out sole with super glue, duct tape, and masking tape
Super glued a layer of duct tape to the sole, built up the sole with a lot of layers of masking tape (green), then used a final layer of super glue and duct tape to seal it all in. It’s not perfect, but it lasts a few months
Last week my daughter tried on her favorite pair of shorts from last year. Unsurprisingly, she has grown - and the shorts have not. She was more-than-usual disappointed by this because they were fancy, fun shorts with lace that she never got to wear anywhere and show off (because Covid).
Due to my success last month with downsizing the other pair of jean shorts, I decided I could certainly try upsizing these.
The absolute worst part was trying to unpick the original seam. It was triple-sewed. Parts were orange thread that was at least easy to see and parts were light blue thread that was highly camouflaged. Even with the right tools (a seam-ripper) I’m pretty sure it took me three times as long to undo these seams as it did to sew them back up again. The waistband I just cut straight through.
I took a 2.25 inch (6 cm) strip of similar-weight denim and sewed it to the back of the pants, leaving the waistband loose. Then I sewed it to the front side. The last step was to stitch the raw edges of the waistband to the insert with a zigzag stitch to keep them from raveling.
While it’s a clearly-visible mend, it fits the overall character of the shorts. Getting another year or two of use out of these (don’t know how much more she’s going to grow!) made the task seem worthwhile.
April 5, 2021
@return-of-the-cj Here is the inside view; not beautifully finished but functional.
Icould have pressed the seams toward each other and run an extra line of stitching, as most jeans have on the outside leg seam.
Instead of massacring the Jedi and clones at the Temple of Eedit on Devaron, Savage Opress is captured, frozen in carbonite, and brought to the Jedi Temple on Coruscant. But what can the Jedi do to counteract the Nightsisters’ magical hold on him?
I am learning visible mending so I can repair some clothes i own that are getting pretty old and hole-y! Starting with a patch on this large rip that i think came out pretty well! It looks like a cloud so maybe as i repair other holes i can make a “sky” sort of theme.
Do you have a textile restoration project you need executed by an expert seamstress? Perhaps a quilt, a sweater, an updated a wedding dress? I’m your laydee! Please mail [email protected] with inquiries.
I have a beautiful wool Norwegian Skjaeveland sweater that my husband accidentally & tragically shrank over 8 years ago in the dryer. It has been hanging out, waiting for a new direction ever since. And due to the passage of time it has somewhat faded, felted, pilled, warped, creased, and adopted a few moth holes. Yet, I still can not squeeze back into it, nor have I had the heart to give it away or cut it up, alter it, repurpose it, nothing, as it was and still is my favorite sweater. Finally I have confonted this project. I needed to do something quick. Too elaborate of a plan leads to yet another unfinished project amidst all of the other unfinished projects. And as time is money blah blah blah, I needed to get a move on. So here we have the restored sweater with these added features: {1} Many darned mothholes {2} A good sweater shaving {3} I chose a vintage wool fabric I had in my stash to extend the sides by a few inches each. I chose it because it has a similar color and pattern, yet runs a bit darker and it’s pattern blends acceptably with the main body pattern. I measured, cut, and serged it in {4} I have added vintage doily elbow patches, one needing to be tea dipped or a few seconds to take away a blueish hue it picked up in the laundry {5} I added yet another knit gusset to the sleeve hem in order that it takes on more of an angel wing silhouette. I’m not too down with tight sleeves on a boxy sweater.
Well, there we have it! It is charming and wearable once again! Yay!
In smaller rooms of both Galerie Lelong and Andrea Rosen Gallery, Ono’s 1966 “Mend Piece” is restaged with long tables cluttered with broken cups and plates, and scissors, tape, rubber cement, and string all available to attempt to reassemble the fragments into a new whole.
“Mend with wisdom mend with love. It will mend the earth at the same time,” the wall text states.
Interesting side note:
Curiously, both of these stations are also joined by espresso bars serving coffee in Ono’s Illy collaboration cups, where gold lines represent the mended cracks from catastrophic events, from Hiroshima to Guernica. The coffee is intended as encouragement to linger, and to give the space the sense of community, but it also has an odd commercialism contrast to the anti-material works.
So recently I got super interested in mending my (and my husband’s) clothes. I always loved to crochet & embroider stuff, so mending wasn’t really far from my interests, but still I had to learn how to do it in the right way.
Thought I will share some interesting/handy resources, it can help if you also want to elongate the lifespan of your clothes!
So first I learned the basics of darning with this video:
Then I found some cool tips&ideas about visible mending in this video:
Last but not least, I accidentally bumped into the works of Celia Pym, who is apparently a mending artist! There is a super interesting podcast episode with her here.
Hope this will inspire you too to save your clothes from the trash bin!
☝️Último día para apuntarse al Taller de Bordado Tejano que empezaremos el martes en @galeria_urania @vilaurania ✂️
♻️Recicle-Reuse-upcycle-Mend… and enjoy embroidering your old denim clothes.
♀️I started my visible mending and darning workshops on 2016, and I enjoyed denim’s customizing with adults and children so much… Embellishing trousers with embroidered flowers, mending and repairing holes or tears using beautiful weaved textures and patches.
✨Our old and used clothes need all our love and care ❤️
..
♻️Reutiliza-Recicla-Repara-Customiza Remienda-Zurce y diviértete aprendiendo a bordar decorando tus viejas prendas vaqueras: camisas, chaquetas, pantalones, bolsas…
Este curso es muy fácil, bonito y mágico ✨ Link para inscribirse en stories o en @galeria_urania