After a long time, today I resume my beauty routine with this Korean mask This mask contains silky jelly ingredients that bring a lot of hydration to the skin, reducing the feeling of dryness and tightness of the skin.
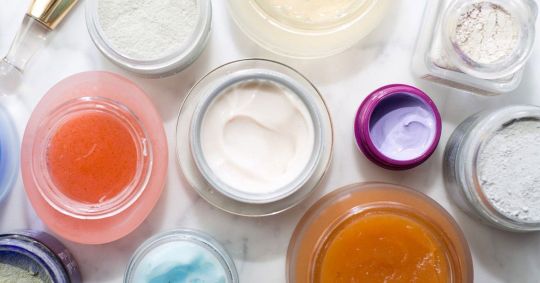
Keep the dullness away and the moisture in place with these skincare products
You’ve likely heard all the basic skincare rules - moisturize regularly, don’t exfoliate too often, never skip even one night of your beauty routine. Each step has a unique effect on your skin, yet all are associated with one common goal: to protect your skin barrier.
Be careful not to use more than one product containing phenoxyethanol in a 6-12 hour time frame!
Phenoxyethanol is a preservative, an anti-bacterial, and a stabilizer found in many products. Its a great alternative to parabens.
Products containing 1% or less are deemed totally safe by nearly all countries, however when using multiple products, each containing 1%, it adds up leading to over exposure of phenoxyethanol. So be cautious not to layer too many products with this ingredient at one time on skin. Over exposure can cause hives, rash, anaphylaxis, and dermatitis on adults, as well as animals and infants { causes nervous system damage in infants ages 3 and younger}.
Here’s a quote:
◇"Most of the concern stems from recorded incidents of bad skin reactions (on adults) and nervous system interaction in infants.“- Healthline
Phenoxyethanol Free Products:
◇ Caudalie VineActive Vitamin C Anti-Wrinkle Serum
◇Herbivore Prism 12% AHA 3% BHA Exfoliating Glow Serum
◇Josie Maran Argan Beta Retinol Pink Algae Serum
My opinion: its totally safe to use ONE product for adults containing phenoxyethanol every 6 hours. That way you wont get over exposure. If you like using more than one product on your face at a time try products that are free of this chemical to avoid harsh side effects. I feel using one or two products with phenoxyethanol wont kill you or even bother your skin ( in my experience) unless you are allergic.
Im totally investing in those products above to avoid over exposure. Lately my skins been very sensitive and red so i want to avoid any and all causes!
You may spend 100$ or more however in the long run your saving 50 to 100$ a month and can replace your own broken nail if you have a nail accident.
• Cuticle remover
• Buffing block
• Nail file
• Nail prep/ dehydrator
• Nail Primer. Alcohol-free
• 2 Dappen dishes or glass cups. Though I wouldn’t want to drink out of it afterwards.
• Acrylic nail brush or just tiny paint brushes. The better the quality the better the nail! Doesn’t have to be expensive just not those nylon or plastic ones
• Lint-free wipes
• Giant/ strong nail clippers and or scissors
• Acylic powder
• Acrylic liquid. It’s recommended to use the medium speed one . Especially if your a beginner. Aka acrylic monomer.
• Nail tips
• Nail glue. Recommend glue- IBD 5 Second Brush On Nail Glue. The tubes tend to get glued shut so I prefer the brush on glues. And I wipe off any glue on the outside to reassure it won’t glue it’s self shut.
• PURE acetone
• Cuticle Oil ( optional )
• Nail top coat and Nail base coat
• Pinching tool ( optional )
• Manicure brush ( optional )
• Cuticle pusher. A 2 sided tool that has a flat end and a knife end. Both sides are very sharp!
• Your definitely going to need a UV LED lamp polish curing Acylic timer light . You can find one for 20$ at Walmart. It’s preferred to buy one with 48w or higher.
Step 1:
Nail Prepping-
1. Apply cuticle remover with a lint-free wipe.
2. Push the cuticle back with the flat side. Be careful.
3. Buff the nail using your buffing block. Remove the dust with the manicure brush or a tissue/ wipe.
Step 2:
Nail Tip Application-
1. Pick out the right size nail tips. Make sure they aren’t too tight or they may pop off.
2. Apply glue to the end of the nail that will meet your nail bed. Don’t use too much or it will get every where. Trust me Ik lol.
Hold down tight for 15 seconds.
3. Cut nails to preferred length
4. File nails to shape them. I prefer squoval and or ballerina tips.
5. File where the nail tip meets your nail bed so it will be smooth. Doesn’t have to be completely smooth. Don’t forget to file underneath the nail tip for a more elegant look. To lessen the under-curve.
Step 3:
Acrylic Time! -
1. Pour the acrylic liquid in one dappen dish and acrylic powder in the other dappen dish.
2. Dip your brush ( paint or nail brush) into the acrylic liquid dish. Wipe the side on the inside top part of the dish to remove excess liquid.
3. After dipping your drush in acrylic liquid your gonna dip it in the acrylic powder. You’ll see it form a cloudy somewhat solid circle of wet powder around the brush. Your gonna wanna wipe it all onto the nail. The amount of powder you use depends on the size of the nail.
4. Quickly but steadily bush the wet powder evenly over the nail and nail tip. Wait a few seconds and it will get hard.
5. File the tops of your nails to even out the hardened acrylic powder for a sleeker look! You may need to file the sides if it gets a bit messy hah. Been there done that.
Step 4:
Nail Painting-
Normal Polish:
1. Apply a top coat over the acrylic nail. Air dry for 2 mins or 10 seconds with the LED light.
2. Apply your favorite color of polish. I prefer pink
And your done!
Gel Polish:
Apply sunscreen!
1. Apply nail dehydrator
2. Brush on nail primer
3. Apply a top coat to the acrylic nail. Let it dry any way you choose
4. Apply a base coat . Dry it with an LED light for 10 seconds
5. Choose your favorite gel polish (great deals on amazon and at Walmart) then brush on your first layer. Dry for 30 seconds
6. Brush on your second layer of gel polish. If you need to do it a third time go ahead. Dry for 30 seconds.
(Optional: place a tiny gem on your nail or flower nail stickers)
7. Apply a top coat. Dry for 60 seconds.
Your all done!!!!! And you look great ;) .
How to clean your acrylic brushes:
1. Soak your brushes in acrylic liquid ( aka acrylic monomer) for 1 hour.
2. Rinse with hot water and rub off the now mushy somewhat soiled acrylic powder.
3. Soak your brushes again for another hour.
4. Rise once more in hot water and rub away the mushy powder stuff.
5. Repeat if needed. Don’t soak brushes too long in acrylic liquid or they will fall apart! Also don’t use too hot of water, please. you don’t want to burn yourself.
How to remove gel polish:
1. Buy gel polish remover nail clips
2. Use a lint free wipes and put some pure acetone on them.
3. Put the now wet wipes on your nail and clip the nail clip onto your finger.
4. Wait 30 to 60 minutes then use your cuticle remover( the flat side) to scrape off the gel polish. It should be easy if you have 100% acetone.
And tour done! Now repaint those nails or whatever you did this for !
Keep the dullness away and the moisture in place with these skincare products
You’ve likely heard all the basic skincare rules - moisturize regularly, don’t exfoliate too often, never skip even one night of your beauty routine. Each step has a unique effect on your skin, yet all are associated with one common goal: to protect your skin barrier.
Hello October! Ladies, even if today we officially feel the autumn vibes our beauty routine lately has been 100% made of summer vibes. So for the first day of October, we will write about our new must have products to keep in your bathroom.
Version française ici (commentaires disponibles sur la version anglaise).
In case you don’t already know Belle Azul, you can read all about it and discover the first products we tried here. This brand coming from Barcelona had our hearts this summer and in order to not go desperate with the summer ending we kept them in our beauty routine lately. Here are our 3 new favorite products from them:
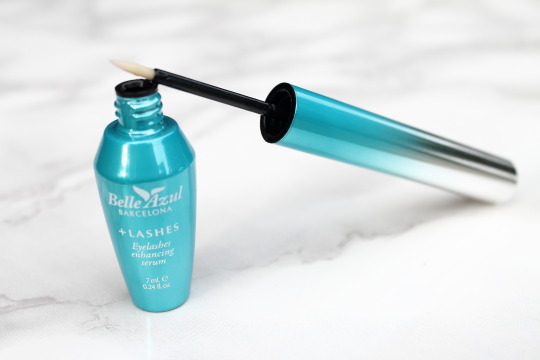
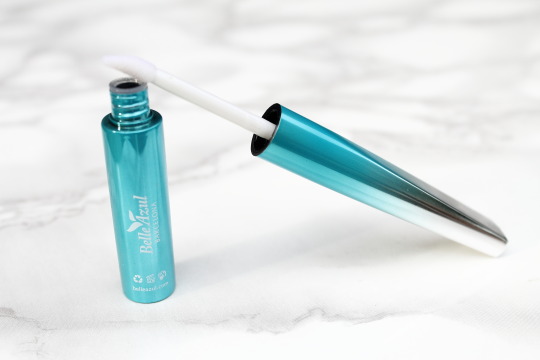
1. The + lashes serum
Who doesn’t dream of having those long real lashes? Of course I do, and that’s the reason why I am always trying many different serums, bases, mascaras, and everything in order to nourish, protect and grow my lashes. I don’t know if I already told you this story but more than a year ago I tried Revitalash, which was great and really helped my lashes to grow faster than ever! After only 4 weeks my lashes were touching my eyebrows. But what they don’t tell you is that if something grows faster, then it “dies” faster. So this is how, by the end of the summer, my lashes all fell one after the other… Since that event, I promised myself to never try anything again that wasn’t made of natural products!
+ Lashes is a serum made of natural extracts in order to regenerate and protect your lashes. We’ve been using it for more than two weeks now, and even if they tell you you get better results in 4-8 weeks, we really catch a difference. We use it twice a day (morning, evening) and can see our eyelashes are getting stronger and thicker. Also, we noticed when demakeup time we are not losing them anymore. We will definitely keep on this one.
2. The + lips gloss
Since Kylie Jenner launched her lipsticks line, it is all about the lips! Because I can’t afford a lip injection, and also because I am afraid of it not looking natural, I am always looking for that one product that will give the same effect for a couple hours. You may have seen it, I am often using the Fullips Enhancers that I found in NY back in April. But in order to get the full effect you have to use a good lip plumper! You guys all know the Dior Lip Maximizer that was definitely my favorite for such a long time? It is not anymore since I tried the Belle Azul one.
+ Lips is made of argan oil (like pretty much every one of their products, which is why we love them so much) but does have that mint smell we loooove! As it is a glossy serum, you can’t put lipstick above; so the serum is really here to use like a moisturizer in order to have natural plumped lips. This is the effect that I like, to have those natural lips because my lips are naturally tinted so there’s no need for me to add lipstick above. Use it 3 times a day, or should we say as much as you want to in order to keep your lips plumped.
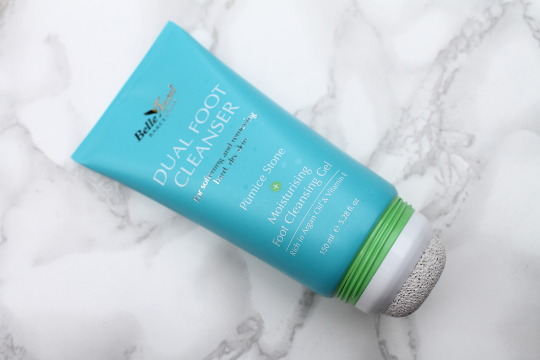
3. The dual foot cleanser
I know, during autumn and winter times (let’s say cold season) you just don’t pay attention to your feet anymore but you should. It is not because you hide them in cute socks that you don’t have to take care of them.
Dual Foot Cleanser is the best 2 in 1 product we have used so far. With its pumice stone and peppermint and argan oil mix it purifies, softens, hydrates and smoothens your feet. Very easy to use also, just squeeze the tube to release a small amount of the cleansing gel then work it into a lather and rub the stone against ares with rough skin. I absolutely loved the smell and how smooth my feet were after it. I recommend you to use it twice a week for really good effects.
Stay tuned #atouchoflove
Because we think you should really try them in order to see the results by yourself we will give you the chance to win those. Not the ones we tried of course, don’t worry, new packages and everything directly coming from Belle Azul.
To do so, go on our Facebook page where we will announce everything on October 12. See you there!
Aaaand we’re back with another Dangerous Beauty post, showing you worldwide examples from yesterday and today. Trust me when I say I have a good-sized list written down with products.
Today it’s all about the complex, the gross and the heart-stopping.
Keep the dullness away and the moisture in place with these skincare products
You’ve likely heard all the basic skincare rules - moisturize regularly, don’t exfoliate too often, never skip even one night of your beauty routine. Each step has a unique effect on your skin, yet all are associated with one common goal: to protect your skin barrier.
Practice “skinimalism” with these four skincare products
Listen, we get it. A 12-step skincare routine can be fun and therapeutic. Your favorite K-Beauty brands have been telling you to collect cleansers like candy for years, and 2020 has been a year of collecting all the moisturizers you see on Amazon. But according to Dr. Muneeb Shah, a viral TikTok dermatologist with over one million followers who goes by @DermDoctor on the app, there are only four skincare products that you really need in your beauty routine.