#cosplay progress


. This pattern works for medieval and vikings out")
. This pattern works for medieval and vikings out")
Link blue robe cosplay pattern (Breath of the Wild). This pattern works for medieval and vikings outfits :D
Pattern: https://etsy.me/36fCUwK
Post link


Now the couple is ready!! Rakan Star Guardian cosplay pattern is now available in the store
https://etsy.me/2oqeQpR
Xayah SG:
https://etsy.me/33cg8nc
Post link


Today Borderlands 3 has been released!!!
Are you thinking about to do Moxxi cosplay? Look the sewing pattern here:
Post link


Hi! New Star Guardian skins has released :P I’m workin in Xayah’s SG pattern now but meanwhile… !!! Ahri, Soraka, Lux, Jinx and Syndra are available^^
https://www.etsy.com/es/shop/AnhCosplay
Post link


We re-watched both Thor 1 and 3 while working on this armor! Had to redo some scrollwork for Thor’s breastplate, but the filling and priming of the foam is almost done. This is the last step before painting and eventually adding the decorative rondels, which we’ll be making with clear resin and LEDs.
Post link

Taking a quick break from posting Colossalcon photos to share some Loki progress! I’ve been working on the leather applique portions - this was made by painting some scrap leather with gold Jacquard Lumiere, then cutting out the scrollwork using vinyl as a stencil. All the little bits we’re then glued down using scoring and a double layer of contact cement.
Post link

Taking a break off sewing and back to armour making. Progress thus far~ so much more to do.
Post link

So I managed to get a heat gun today and continued to work on the crown. My first time playing with therma plastic and heat gunso naturally, I was excited. So what I did was cover the wire with the plastic before bonding them together. I had to at one point glue the piece to the floor to preventing it from moving while I pleated each strand. Many hours and taa daa! Can’t feel the first 3 fingers of each hand right now cause of the heat. Really loving this new gadget. Payday well spent! My sis on the other hand worked on the chest plate for Thranduil. Mostly the detailing. She too can’t feel her fingers thanks to the glue that she was using. Will stop here tonight since its already 3am in the morning.
Post link


So i covered these shoes in glitter for a Jessica Rabbit cosplay. I am still trying to figure out how to walk in them…I have fallen twice so far. Once on my ass and once on my face…this is an adventure.
Post link


More shots of my Zer0 helmet.
@borderlandsgame@borderlands-confessions@vaulthunternetwork@vaulthuntercollective@talesofavaulthunter
Post link
Haikus can be fun/
They make every kill unique/
A gun shot poem…
@borderlandsgame@borderlands-confessions@vaulthuntercollective@vaulthunternetwork@talesofavaulthunter@borderlandstwo
Working on some super cute, furry cat ears!!
Here’s part 1 in a video series on how I made em!

Dying my Katara swimsuit. Hoping to get it finished for this weekend to do a test shot photo shoot! I’ll post it as soon as it’s finished.
In the meantime, don’t forget to check out cosplay photos and progress on my Facebook page at Lil Loud Gal! Hoping to post more of my Katara on there!
Post link

Here’s the finished view of my Fire Nation Katara necklace. Still need to work on the bracers….
Post link


My new Midari Ikishima wig came and this time I styled/ cut it myself!! I was worried I would mess it up but I’m actually very pleased with how it came out! Please enjoy the bonus mophead before photo lmao
Edit: tumblr is a p.o.s. and uploaded only the ref photo, why are u like this
Post link

Photo by @yenra
So I said I was going to start doing more of these breakdowns and I finally feel these costumes are at a point where I’m comfortable with sharing. Seeing peoples in progress work with costumes is one of my favorite things in the cosplay community. This is just a little insight into how I chose to approach these characters!
(Image Heavy Under the Cut)
One of the most fun things about Cosplaying from Dungeons and Dragons campaigns is there is no official art for the characters! Which means you have a lot of creativity to play with designs! You have brief descriptions from the DM or the player characters but otherwise the world is yours! Both my Girlfriend and I designed our respective costumes for these characters and making them look like they go together and match Matt’s description of them was so much fun!
Design
Matt Describes Delilah when Vox Machina first meet her as:
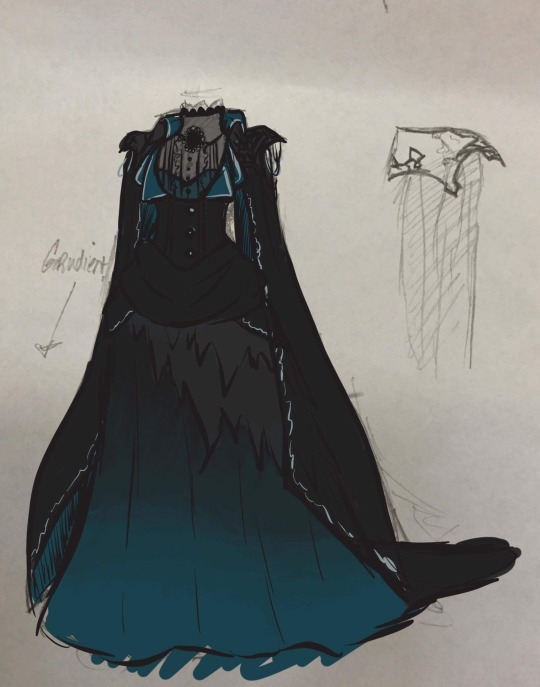
“A beautiful woman with dark auburn hair, pulled up into a tight braided bun. With gloves on her feminine hands, she wore a blue and black gown that had a long, billowing skirt that tapered up to be form-fitting, wrapping up her neck nearly to her jaw.”
I wanted to incorporate the Victorian style Percy is often depicted as wearing into my design to give off a “Lady of Whitestone” feel. I ended up referencing a lot of 1870′s and 1880′s women’s fashion as well as imagery of Necromancer’s in pre-existing fantasy. While I altered my design as I made it, here’s the base I came up with:
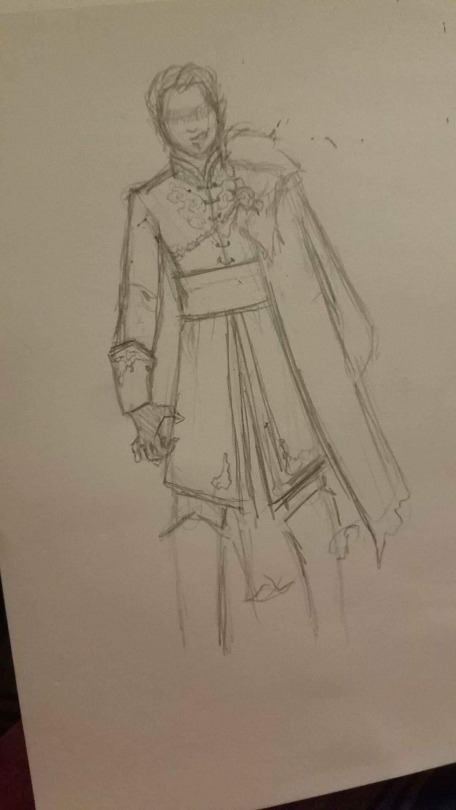
Meanwhile@phoskios worked up a design for Sylas for me to work from.
Matt describes him wearing:
“Predominantly blue and black with gold and red trim. He wore a strip of gray fur cresting over one shoulder and framing his torso.”
I know she referenced a lot of Historic Russian attire, giving her outfit a more “Wildemount” feel. Here’s what she gave me to work with:
Construction
If there’s two things I really love about creating my own costumes its pretty fabric and garment understructure! Oh yeah should probably make that three because small details!
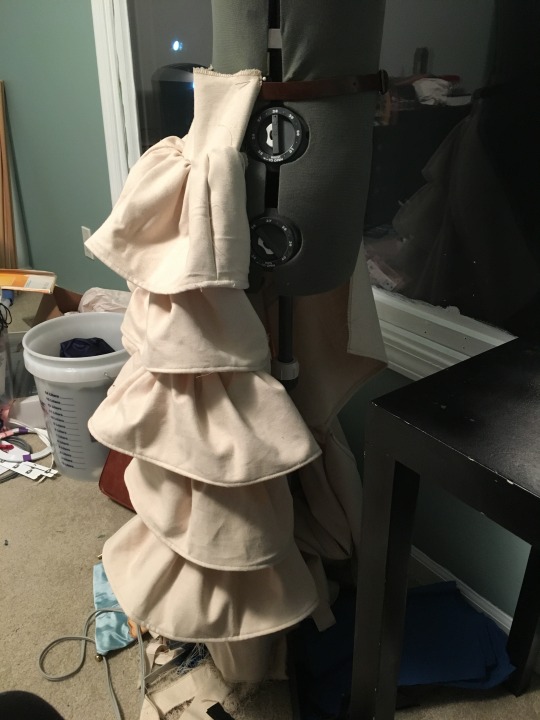
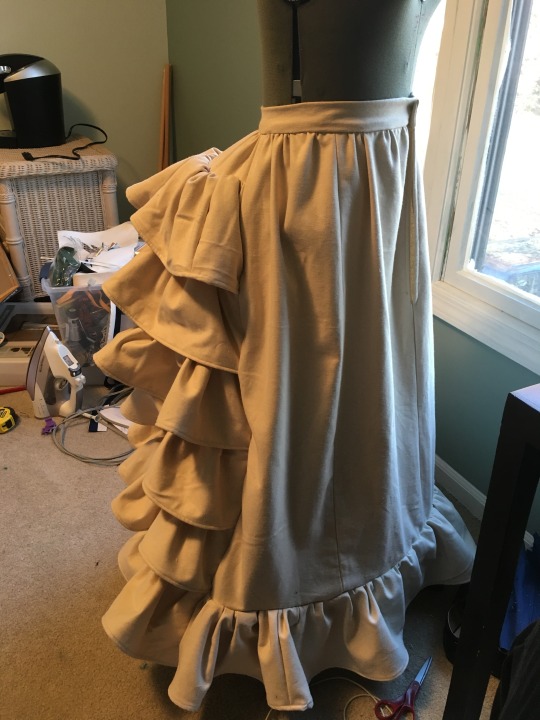
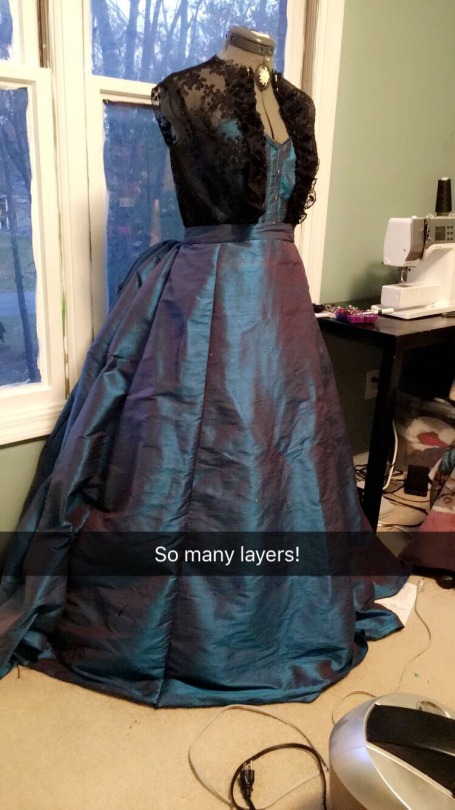
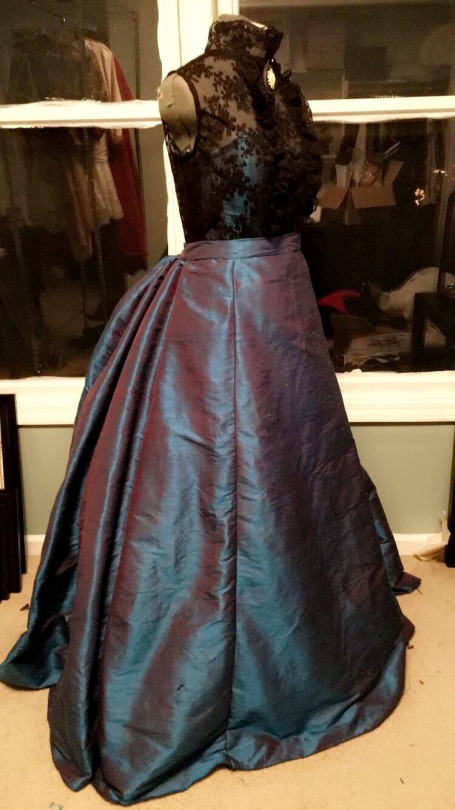
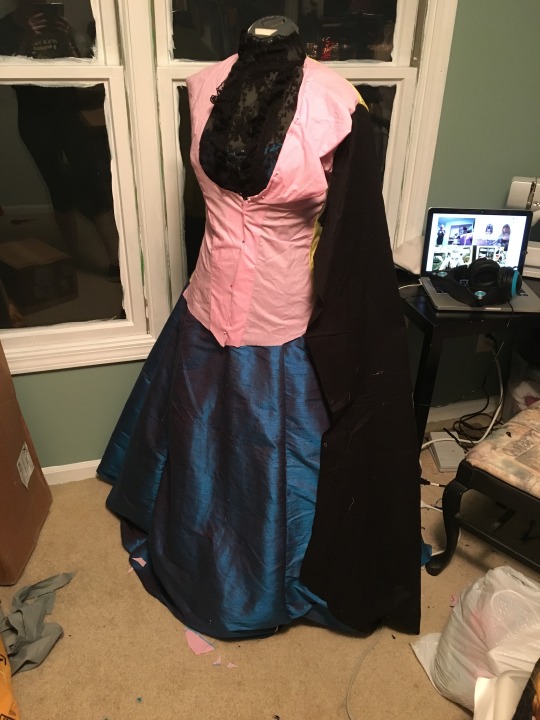
I started off Delilah by making her Lobster Cage or Grand Bustle. (Yay understructure!) I had never made one before so I used Truly Victorian’s pattern. It was much more straight forward than anticipated and would highly recommend it!

I was so excited with how it came out I immediately started draping the blue skirt. It’s made out of a blue silk dupioni. I nixed the gradient in my design for this fabric because I adored the way it shifted colors in the light!
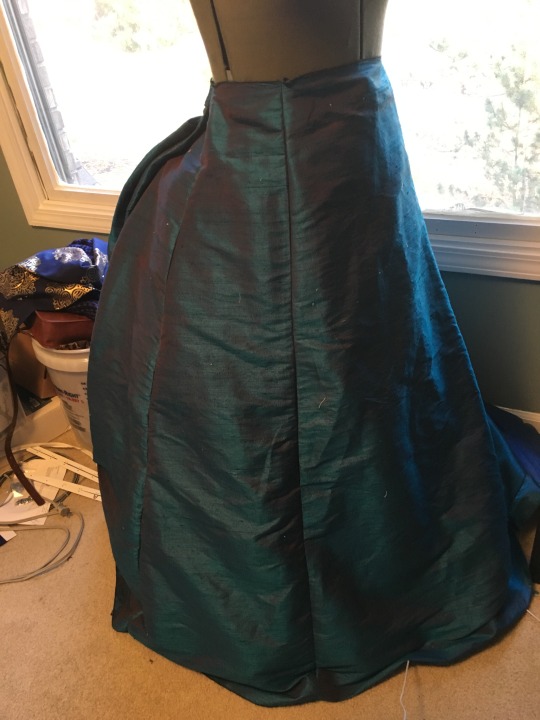
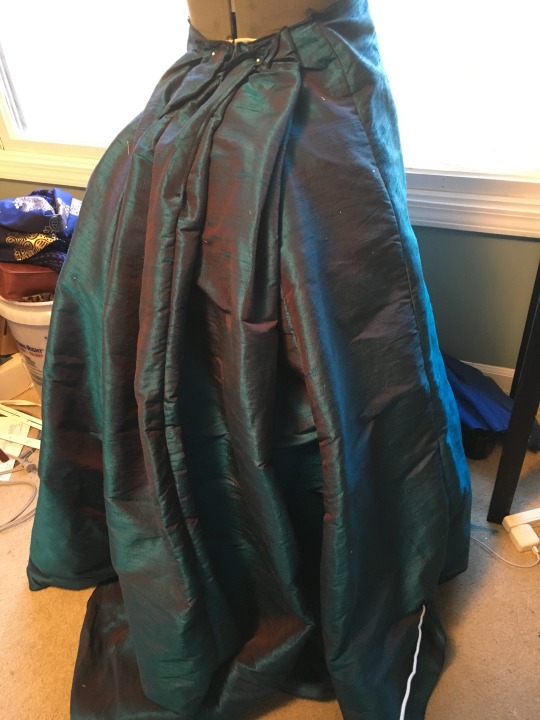
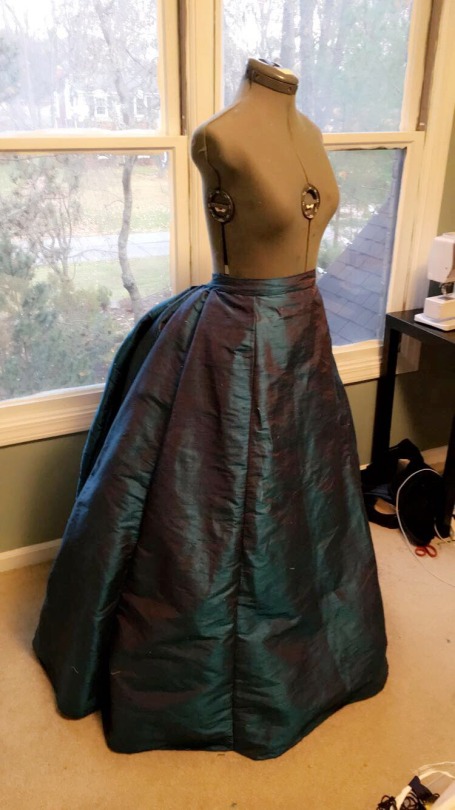
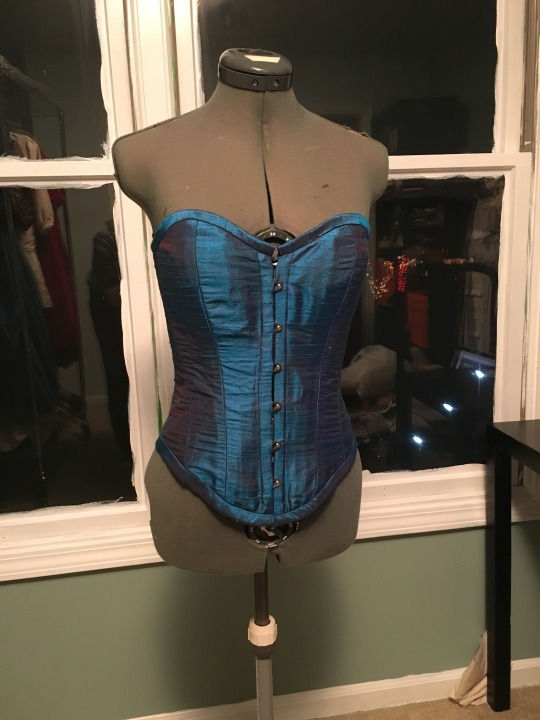
Then it was back to understructure. I drafted and made a spiral boned corset to support and distribute the weight of the skirts. So even though you don’t really see it in the final product it’s doing it’s job under all the layers. Keeping the skirt from bruising my hips (yes this has happened in other ball gowns i’ve made. Heavy skirts are no joke.)

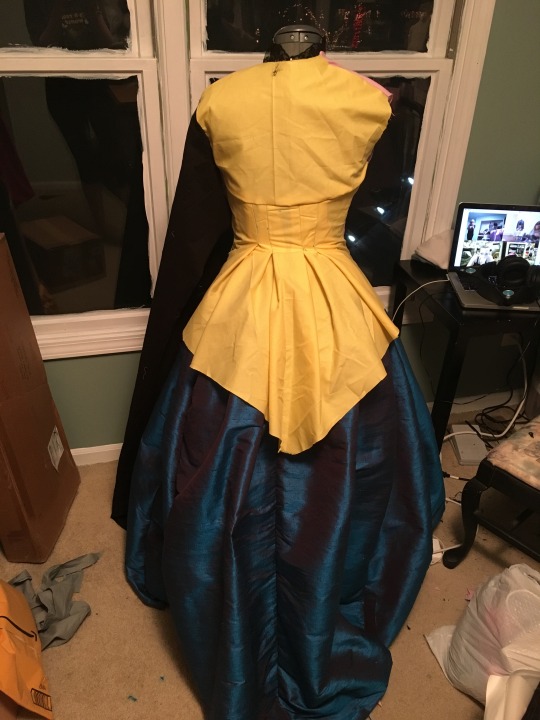
I apparently didn’t take as many pictures of this process, sorry about that. Same with the shirt, which is what I tackled next. It has a false front so it lays nicely and closes in the back so that I can get in and out of it easily. and it makes this costume finally look like it’s coming together!
At this point I needed to start on Sylas. So I decided to tackle both jackets at once. I’m not as comfortable with jacket construction as I’d like to be, so instead of drafting my own patterns for them I used a base and altered them in mock up form. For Sylas I used Simplicity 5386 (The Neo Jacket) and for Delilah McCall’s 7071. Sylas looks awfully silly in pink.
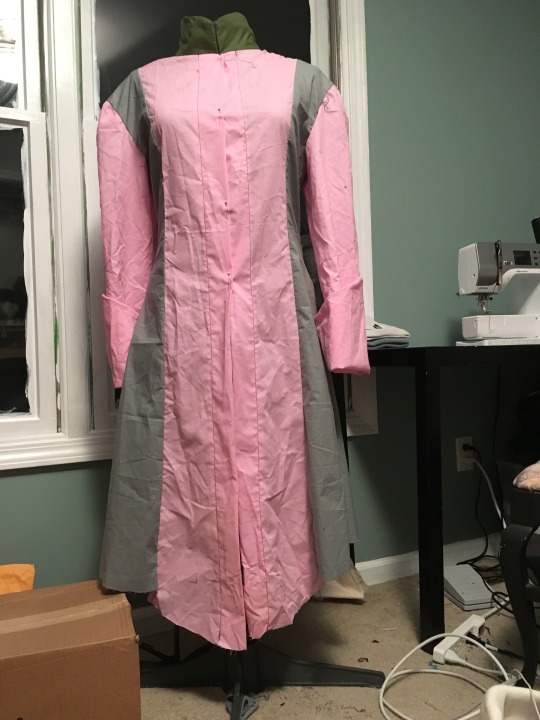
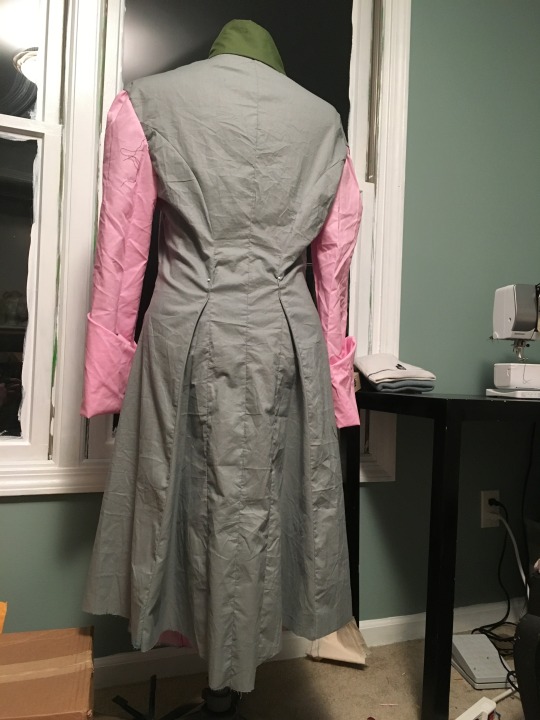
At this point I traveled to Philly and had her try everything on. We went to the fashion district to get fabric for Sylas and I made alterations to the mock up. Cut everything out and started piecing it together.
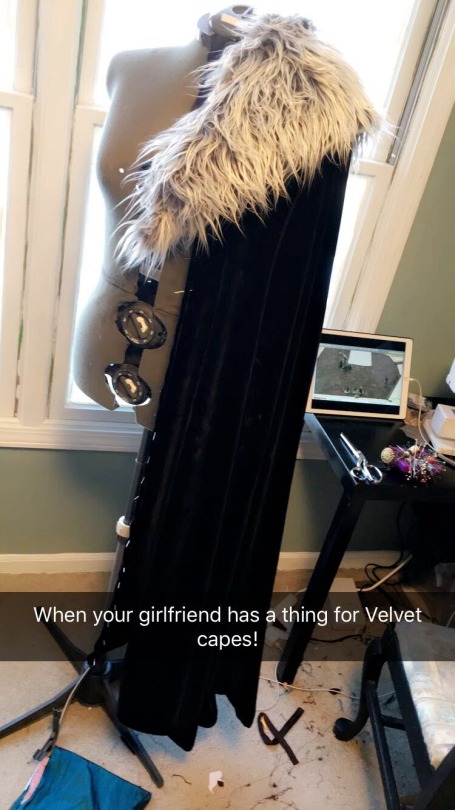
I also cut out her cape and fur while I was there to make sure length was accurate. The cape is made of velvet and is fully lined. I just used a basic circle skirt for the pattern. The fur is a base of batting that is covered and hand sewn in place.
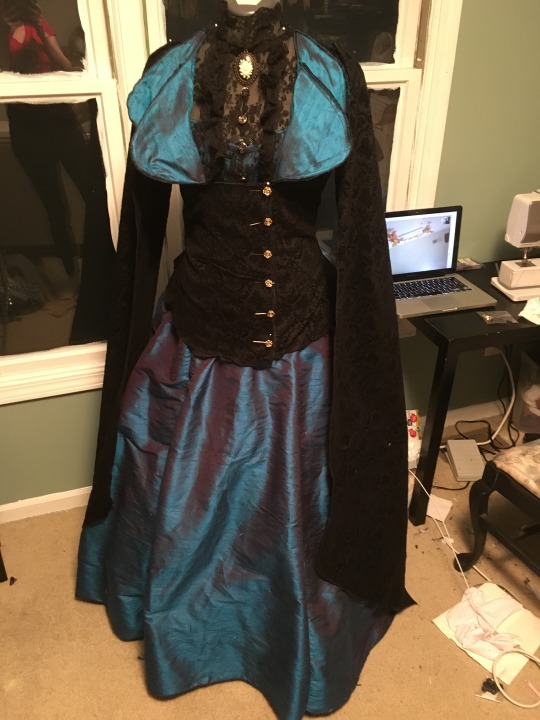
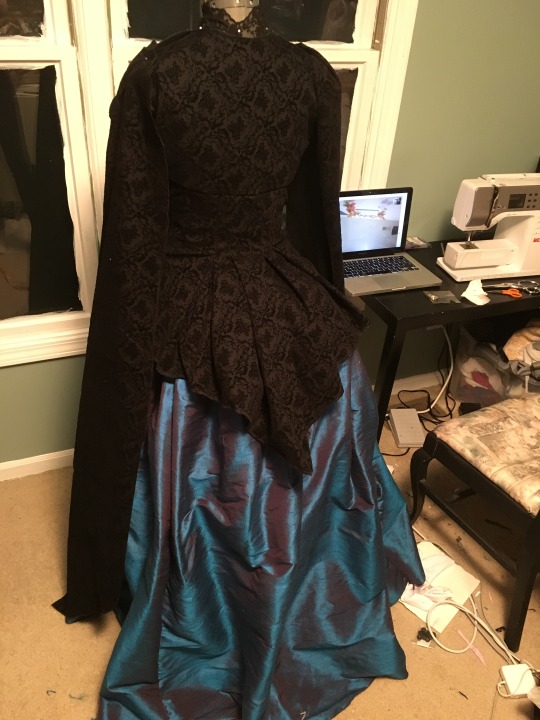
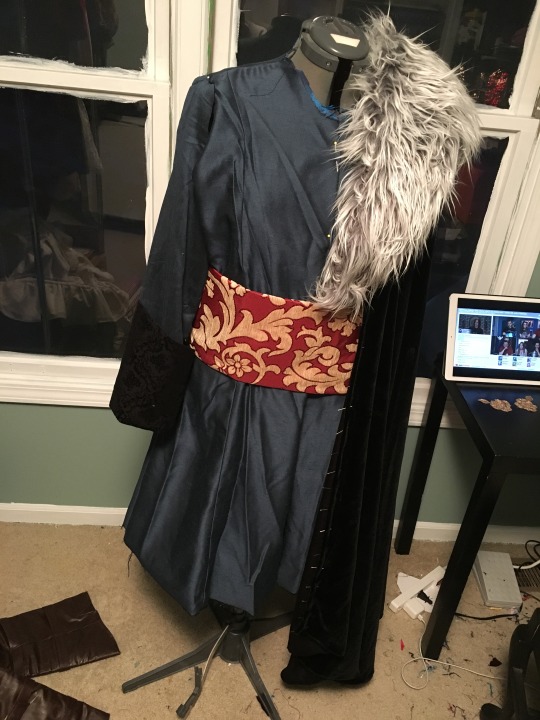
Unfortunately here is where Christmas and the MAGFest con crunch hits and I neglect to take progress pictures. Sylas’ belt for that con was an old table runner found in my house. His Jacket gets lined with the same blue fabric I used for my Delilah. Delilah’s Jacket sleeves get velvet details that are satin stiched on and both Jackets get hand sewn velvet bias tape. Sylas’ closures are painted. My poor girlfriend cuts appliques in the car on the way to the con, and I pull an almost all nighter hand sewing them to her jacket. Both wigs are styled in the hotel room.
After almost 3 months of working on them they’re not done, but wearable for MAG.

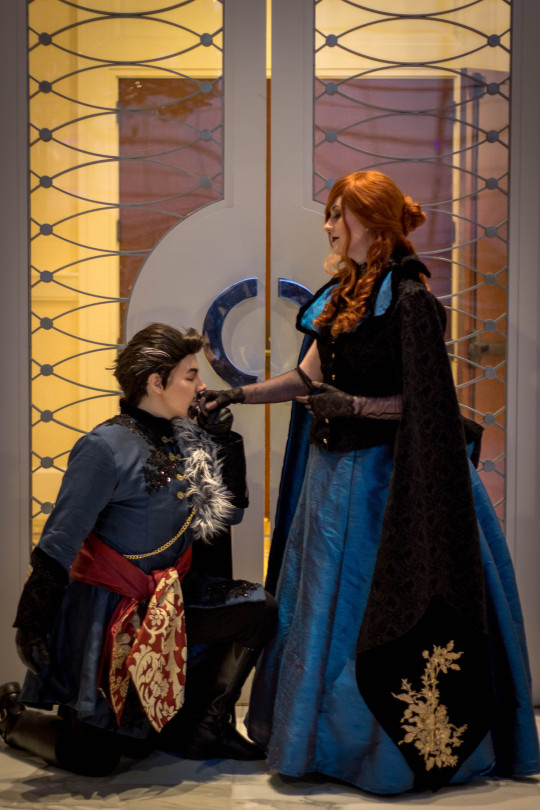
Photo by @strikerthetacosplay
We also do a graveyard location shoot post MAG.
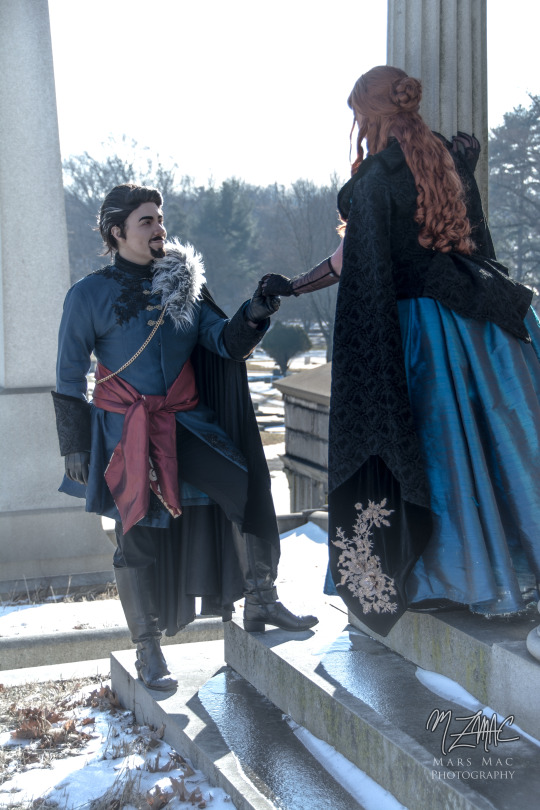
Photo by Marz.mac
Improvements
With MAGFest over we planned to put these away until Dragon*con and make Fjord and Jester for Colossal since it’s a warmer convention. We planned that but ended up deciding to re-wear these instead of making something new. Which means time to get to things I didn’t have a chance to touch before.
Delilah’s only improvement for the con was her velvet overskirt.
Sylas however got a new belt as well as some more appliques and closures. And while his jacket still isn’t quiet finished (It will be for Dragon*con, I promise) these costumes finally feel like they’ve come together for me.

Photos by @yenra
The Briarwoods truly are my favorite villains from campaign one and I adore wearing these costumes. As always if you have any questions my door is always open.
My handsome Sylas and all prop work done by @phoskios
Individual photosets of these costumes can be found here.


Some misc Nyx updates. I think I’ll be done with her by the end of the week.


This is the longest into a build I’ve waited to try everything on so far and do a makeup test. I’m so excited to finish this.


Armor bits. I did not miss working with worbla honestly lol.


I have inhaled so many glue fumes working on this cursed wig. Still a WIP some one free me.


Finished the hand embroidery on my Eivor tunic. Can’t wait for this to be mostly covered up by the rest of the costume.


Tifa Cos-Test
Shop vanessawedge.storenvy.com
Instagram @vanessawedge
Twitter @Vanessa_Wedge


Adventures in wig dyeing! I used a diluted copic marker refill in apple green and it dyed extremely well. Too well. (10 cc’s of refill in a small spray bottle, diluted with 70% rubbing alcohol is quite saturated!) I had to soak it in alcohol to try to get some of it out. It’s pretty but not the green I wanted. :T
I’m using an ardawigs Jeanne & most of Luthian since I really liked envelcosplay’s Nowi wig and that’s what she used.
Whoops forgot to reblog Nowi wig progress to Orosnake. Well, here it is!
Post link


I’m using 1/4” sintra for the buckles. I’m kinda skeptical about it’s structural integrity but it’s what I had on hand. Hope it doesn’t snap or anything. (((>~<))) Using worbla scraps for the design. It now has 5 layers of gesso and some sanding. Gonna prime it with sandable filler primer and try to get it pretty decent.
Thanks to dear-mo who lent me her leather tools, managed to cut, paint, and seal the belts. Splurged and am using 8-9oz veg tanned leather, 2 1/2” wide.
Starting to make those resin gems as well…
Post link