Those buttons were pretty much last minute. I had to improvise with whatever was available in my workshop as my flight was in about 6 hours. I started off with sanding so I can apply the Apoxie Sculpt on a flat surface. I then let it cure for 3 hours (should’ve let it cure overnight till it’s rock solid) then smoothed it out by using 240 grit followed by a 400 grit sandpaper. Lastly, I half-assed a skull shape in attempt to mimic Roen’s iconic skulls. I think it’d be a total pain in the butt to repeat those steps over 20 times (Yes, TWENTY buttons!) Hence, I suggest making a two-part mold and cast it in urethane resin.
Promise we are not actually dead! Life has just been getting in the way and its been kind of crazy!! I promise we aren’t trying to leave y’all hanging. But here comes a good question now that we have a good number of followers on this blog (2.5K?! THANK YOU SO MUCH!!!!) What kind of stuff do you guys want to see on this blog?? Morereaction gifs? Do you want us to post cosplaysevery so often too? Do you want to see ourcosplay struggles? Tell us! Leave comments down below! We want to hear from you! Comment below and message us! We don’t bite! As always feel free to submit questions and reaction gif suggestions to us! We love seeing them all (just one of us is terrible at responding to them. Sorry)
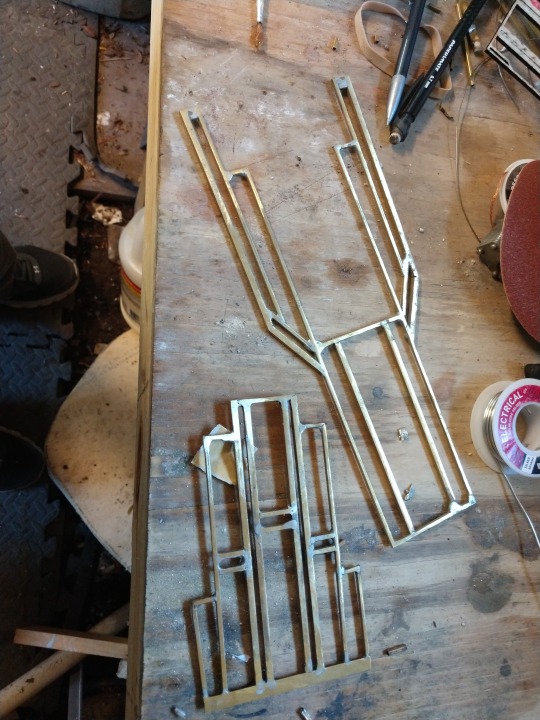
So I’m fairly new to prop making and Ryuko’s scissor blade is one of my favorite props that I have made. So here’s how I made it!
I started with a huge sheet of insulation foam which you can pick up at Lowe’s or home depot.
I then scaled and patterned the scissor to my height and traced it onto the foam using a Sharpie.
I proceeded to hack the scissor blade out with a kitchen knife just because it worked better than my box cutter and exacto blade.
After that I took some sand paper and sanded the heck out of it including all of the finger grips and indents in the blade.
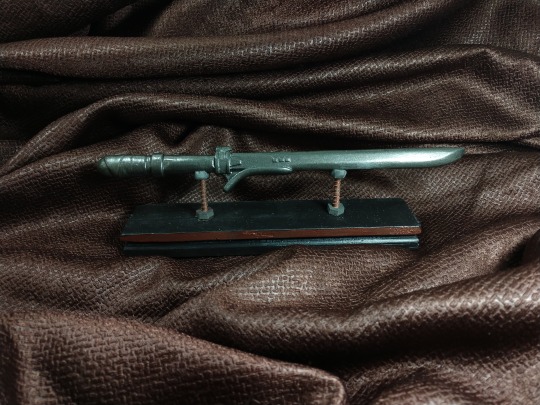
To make it stronger and prime it for color, I painted on 3 layers of wood glue. This also makes the foam not porous so it won’t absorb the paint like a sponge.
To color it I coated it in layers of red plasti dip which is a rubber coating and won’t melt your foam! (Spray paint might melt your foam please do a test on a scrap!)
Finally I added a clear sealant to make sure there was no color chipping.
….and voila! Its done!
Sorry for the lack of progress photos, I made half of this prop while in my dorm up at school also it was the week before Katsu so I was in crunch mode not thinking of documenting the steps.
If you have any questions or anything is unclear feel free to ask!
I decided to spend the week building myself a grappling hook. It’s been one of my dream projects for years to build H.G. Wells’ grappler from Warehouse 13 so I’m unbelievably happy to share the final result.
It’s life size, screen accurate, the end extends for the hooks to open/close and with the exception of some screws it’s fully 3D printed (FDM and resin). Also, I didn’t know I had it in me to 3D model something so complex until this week
Say hello to a BIG project I have been working on! ✨️ I made TWO of these life size plush of Fren, the main character of the upcoming VR game Cosmonious High by @owlchemylabs . The first one you saw revealed by @kindafunnygames-blogduring the trailer reveal end of summer - and this one, Fren 2.0, is now chilling with her creators at their studio!
If you like Fren’s design you’ll want to check out the game’s trailer ! The game has great style, I can’t wait to play it.
In terms of how she was made construction wise, some nerdy fabrication info under the cut:
This large plush had to be treated more like a prop so she could sit up, have long tentacles without pulling on the head fabric, and have the head stay upright on such a skinny neck. These things would never work at this size without structure.
I made an internal structure for Fren’s upper body out of PVC pipe, styrofoam, and jointed plastic armature. I also had to reduce weight much as possible. Her head and large hairballs have firmly stuffed Styrofoam beanbag pellets inside an internal muslin structure to make them lighter! (She only weighs about 28 pounds total). The styrofoam fitted around the T joint in her head (covered in batting too) also helped make sure that the pipe stayed centered, and wouldn’t drift through the pellets over time, and potentially poke against the outer skin. It also supported the continuous piece of plastic jointing more too.
Here below you can see when I made the pattern for her shoes using ductape. A technique that fursuiters often use! (Patterning the rest was other methods). There is also a picture of the masked hairballs before airbrushing, and the rough shoe before refining and the edging was put on (it was a separate piece of foam like a trim). Each shoe is made from 2 pieces of thick upholstery foam glued together. To help insure uniformity each was carved from the same profile and bottom oval template. It is tricky to carve each shoe about exactly the same so the pattern would fit them all, but that’s what experience is for.
Her feet are carved green foam with a sewn plush skin so they keep shape. Her mouth is magnetic, and her eyes are on ultra thin velcro, so she can change expressions. I did airbrushing for her tentacles (the ombre fade) and the stripes on her hair, which required LOTS of masking. I made paper templates to aid in this (especially as I had to do this TWICE!)
The fabric used was Shannon minky, and also low pile Zyfmptex minky, which came in the colors I needed like neon yellow, bright pink, and magenta, and looked better on the hair with the needed sharp edge painted details (low pile holds paint detail better), and also for the mouth and hair discs, so it did not look fuzzy. A polyester fleece (a non stretchy, thin kind, advertised as for doll skin) was used on the eyes as it was a surface the velcro for the pupils would stick to.
I used 1633 Foam Lock spray glue for the green foam parts and gluing batting to fabric. I had never used it before this but I read online about it being recommended for fabric to foam and foam to foam gluing, and it worked very well!! Held super strong, no bleed through, wide light webbing spray from the nozzle.
At the end there was a lot of handsewing to attach the elements together. I used heavy duty thread or upholstery threads. The legs are just press fit glued into the shoes with the 1633 spray (another plus of them being solid foam!). The bottom of the leg has a muslin circle part sewn on there to finish its shape and be stuffed well. The fit was so snug they stayed on without the glue, so with the upholstery glue I had no doubt it was strong enough.