fucked up how cooking and baking from scratch is viewed as a luxury…..like baking a loaf of bread or whatever is seen as something that only people with money/time can do. I’m not sure why capitalism decided to sell us the idea that we can’t make our own damn food bc it’s a special expensive thing that’s exclusive to wealthy retirees but it’s stupid as hell and it makes me angry
bread takes like max 4 ingredients counting water and sure it takes a couple hours but 80% of that is just waiting around while it does the thing and you can do other things while it’s rising/baking plus im not gonna say baking cured my depression bc it didn’t but man is it hard to feel down when you’re eating slices of fresh bread you just made yourself. feels like everything’s gonna be a little more ok than you thought. it’s good.
bread is amazing and it’s also been sold to us as something really hard to make? Every time I tell someone I made a loaf of bread I get reactions like “you made it yourself???” and “do you have a bread machine then?” I haven’t touched a bread machine in probably 10 years. You CAN make your own bread, folks, and it’s actually pretty cheap to do so. I believe the most expensive thing I needed for it was the jar of yeast. It was about $6 at the grocery store and lasted me MONTHS (just keep it in the fridge.) The packets are even cheaper. destroy capitalism. bake your own bread.
You can also make your own yeast by making a sourdough starter, so that cuts cost even more.
But you have to feed the starter daily/weekly and that means it grows quickly, but there are tons of recipes online for what to do with your excess starter. Cookies, pretzels, crackers, pancakes, waffles, you name it!!
Make it even easier - “No-Knead Bread”. All YOU do is mix the ingredients together and wait until it’s time to heat the oven. The yeast does all the rest.
Here’s@dduane’sfirst take on itand the finished product. We’ve made even more photogenic batches since.
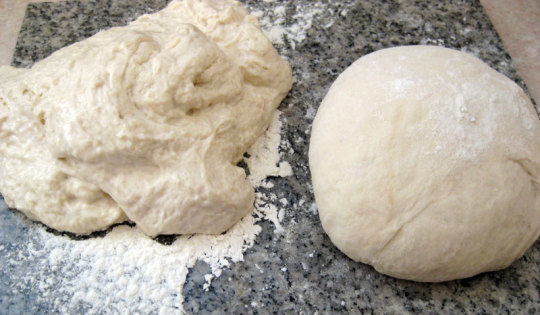
Kneading is easy as well; either let your machine do it, or if you don’t want to or don’t have one, get hands-on. It’s like mixing two colours of Plasticine to make a third. Flatten, stretch, fold, half-turn, repeat - it takes about 10 minutes - until the gloopy conglomeration of flour, yeast, salt and water that clings to your hands at the beginning, becomes a compact ball that doesn’t stick to things and feels silky-smooth.
Here’s what before and after look like.
My Mum used to say that if you were feeling out of sorts with someone, it was good to make bread because you could transfer your annoyance into kneading the dough REALLY WELL, and both you and the bread would be better for it.
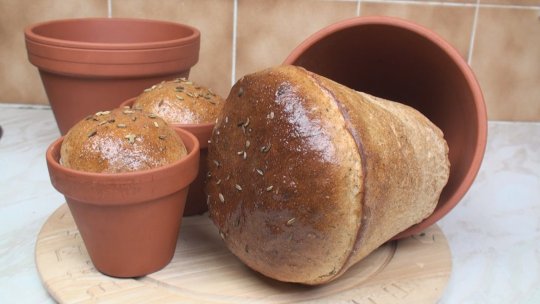
Then you put it into a bowl, cover it with cling-film and let it rise until it doubles in size, turn it out and “knock it back” (more kneading, until it’s getting back to the size it started, this means there won’t be huge “is something living in here?” holes in the bread), put it into your loaf-tin or whatever - we’ve used a regular oblong tin, a rectangular Pullman tin with a lid, a small glass casserole, an earthenware chicken roaster…
You can even use a clean terracotta flowerpot.
Let the dough rise again until it’s high enough to look like an unbaked but otherwise real loaf, then pop it in the preheated oven. On average we give ours 180°C / 355°F for 45-50 minutes. YM (and oven) MV.
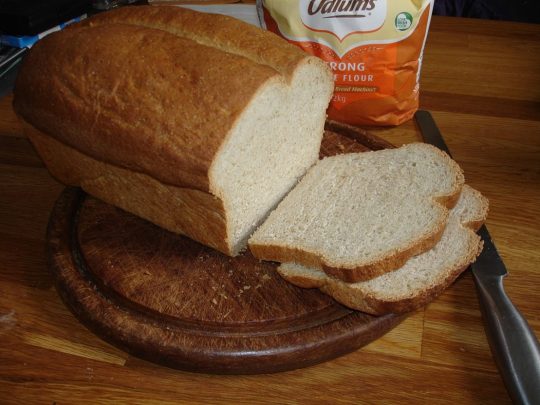
Here’s some of our bread…
Here’sour default bread recipe - it takes about 3-4 hours from flour jar to cutting board depending on climate (warmer is faster) most of which is rise time and baking; hands-on mixing, kneading and knocking-back is about 20 minutes, tops, and less if using a mixer.
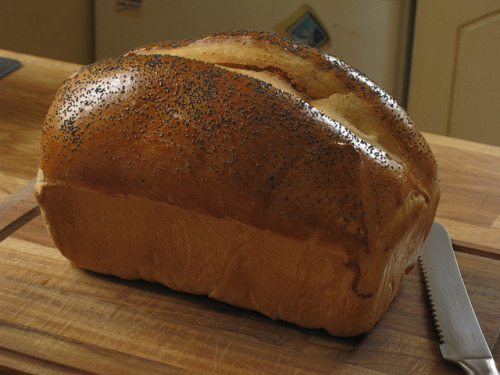
Here ( or indeed any of the other pics) is the finished product. This one was given an egg-wash to make it look glossy and keep the poppy-seeds in place; mostly we don’t bother with that or the slash down the middle, but all the extras were intentional as a “ready for my close-up” glamour shot.
I think any shop would be happy to have something this good-looking on their shelf. We’re happy to have it on our table.
Even if your first attempts don’t work out quite as well as you hope, you can always make something like this…
can we have more posts like this in future please? this is really useful and could help those who are struggling
I have eczema, sensitive, dry, skin. Basically I have shit skin and I have to avoid most products. Most of the products I use on my skin/hair are DIY. Recently I have been using green tea face mask.
Ingredients:
· 1 teaspoon of Matcha green tea
· 2 teaspoons of Water
Instructions
1. Mix it together and throw on face with a cotton ball. If you have extra you might as well throw it on your hair. I do this mask 3 times a week.
I have been using this for a week, and I love the results. My skin looks healthy and has a glow. My skin does not look dry.


. Made to order for US customer. Cast (copy) protection on")
. Made to order for US customer. Cast (copy) protection on")
. Made to order for US customer. Cast (copy) protection on")
. Made to order for US customer. Cast (copy) protection on")
. Made to order for US customer. Cast (copy) protection on")