Helloooo! This is a quick crash course on how to edit/create the script for custom shell buildings. This is not a beginner tutorial! However, I’ve made it super easy for anyone who wants to try!
I decided to start with the script so that experienced cc creators and modders could just take it and go lol. There absolutely will be a more in depth tutorial, that will cover the entire process, as it is a long one!
This part, however, is super important! After looking at the scripts for shells included in the game, I realized that each shell has an individual one.
This is the reason that some prior attempts have resulted in the shell not showing up in-game. The script cannot be copied and applied to a customized clone like other objects.
Now that we’ve solved that mystery, lets get into the tutorial!
Since I’m such a good person lol, I’ve included a prepared template. Everything is basically already coded and ready to go!
It also includes unprotected versions of two core dlls: Sims3GameplaySystems.dll & Sims3GameplayObjects.dll
(I can barely take any credit lol, since the shells in the game have literally the same code with different class names. So, it is a super easy code!)
Creating The Script:
Required programs:
Microsoft Visual Studio - For C# coding, be sure to install the .NET Desktop Development workload. See an installation tutorial for VS 2019 here.
Youdo not need to know how to code C# for this tutorial but it’s great if you already have some prior knowledge and/or experience using VS.
First start by opening the project in Visual Studio:
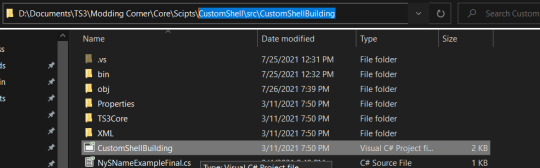
Download & extract thisfolder and navigate to the “src” folder shown below.
Click “CustomShellBuilding” to open the project.
With VS now open, simply follow the directions written in the script (forgive my typos lol, they’ve been corrected):
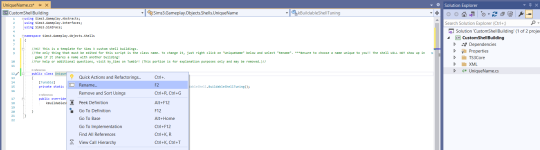
Rename the script class to something that is unique and probably wont be duplicated.
Once you have renamed the class, it will update both in the coding window and in the Solution Explorer.
The notes in green are 100% optional and do not affect the code at all. Feel free to delete them!
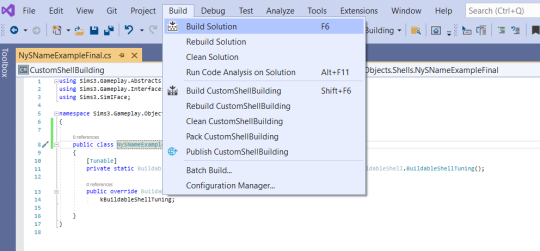
Now that the class name has been updated, the script is ready to build.
Simply, click “Build” in the upper task bar and select “Build Solution”.
This step will create the .dll file that you will need to add to the .package file.
To find the .dll, navigate to the “net20″ folder. The file path should be similar to what is highlighted below.
& Voila, It’s done! You’ve successfully created the script for your custom shell.
Next Steps:
This script can now be used for onecustom shell.
This process must be repeated for additional shells!
To learn how to add the script to the package file, see “Adding The Script To The Package” in this great tutorial on MTS.
The script name added to the OBJK should be the following format:
Namespace.ClassName
Ex) Sims3.Gameplay.Objects.Shells.UniqueName
Use this to create the FVN Hash for the S3SA resource.
Additionally, the Sims 3 Object Modding tutorial on MTS is helpful for beginners to reference.
Keep in mind that this is one step in this entire process. More tuts coming soon***.
It’s a shame it took me this long to figure this out lol! For anyone who is experiencing this little error, here’s a tut on how to avoid it by importing non BG objects correctly lol. So….
Assuming you already know the basics of TSRW and S3PE, I’m just gonna cover the error and how to fix it.
There is already an explanation on how to import the package contents after getting this error, which you can see here. This method works fine but it causes the resulting package file to be completely jumbled and disorganized.
If you get an error that looks like this:
and this:
It means you did not properly import the package. This happens when importing expansion and stuff pack objects into TSRW.
To avoid this error, simply uncheck “Preserve group ID” when importing from package and replace 0x00000000 with the corresponding group ID for that object.
Base game objects have a group ID of 0x00000000
The example below is for a Late Night object, so the group ID is 0x28000000.
If you’re unsure of the group ID, you can see it by opening the file in S3PE.
I hope this helps anyone experiencing this issue! Lol I googled a fix and found the workaround but since I finally figured it out, I thought I’d share!
i’m an absolute sucker for watercolor and learning how to do this has been something of a game-changer for me. so now i am doing my best to show you! this tutorial is very image-based and kinda rambly but if you have any questions feel free to ask! if you find this helpful please consider buying me a coffee
disclaimer:this only seems to work well with larger images. the image i use in this example is about 3500x2500 px and downloaded off of unsplash! you could probably fiddle around with the settings to make it work for smaller images, but idk yet. I also don’t know how well this works with faces.
anyway, tutorial time
the very first thing you want to do is turn your picture into a smart object!
this will give you smart filters which are non-destructive and allow you to swap your image out if you want!
the second step is applying a median filter as shown here!
i’ve found that the best number for radius is somewhere between 8-15. lower for more detail and higher for more abstract looking things. play with it and see what works best for your image!
next you’re going to want to add a find edges filter!
once that is applied your image should look something like this!
you’re going to change the blending mode of this filter by clicking here
and then you’re going to set it to linear burn
next, you’re going to go up into the filter gallery and select the stamp filter
these are the settings i have found to be ideal!
once again you’re going to change the blending mode, this time to screen. this will give an illusion of paper poking through the colors and give it some good imperfect spiciness ✨
now you’re going to go back to the filter gallery and this time you’re going to be selecting the watercolor filter!
once again thes4e are the settings for that which i have found work best
add a new effect layer here
and select pallet knife
use these settings
okay! the hardest parts are all over! thank you for sticking with it this long. now you can add a nice paper texture if you’d like! this is a good one
slap that bad boy on the top layer and set it to multiply and you’re good to go!
thank you for reading and good luck with your watercolor editing adventures!
hello! this is a tutorial on how to purchase a ticket for the live stream taking place on 2022.04.30 at 7pm KST for the fan meeting!
step one:
click the link provided on the 131online tweet (it is currently the pinned tweet). This will take you to the hosting website for the event
step two: on the right side of the page it will show the different packages available. Once you have decided on a package please click the “PURCHASE” button that is circled below in the photo
step 3: a message will pop up and say something like the photo below. Click the red button that says “sign in”
step 4: it will then direct you to the sign in page, to create an account if you do not have one already, click the “hellolive join membership” button. I circled it in the photo below :)
step 5: please enter the information it asks of you including email information, a password for your account, and some basic information about yourself
step 6: once your account is created, use that information on the previous “sign in” page and it should redirect you back to hanbin’s fan meeting page. follow step 2, click the package you want to purchase and follow the purchase information.
step 7: congrats you have a ticket!! once you receive the confirmation page that you have purchased your ticket, check your email to make sure you have purchased the ticket!
step 8: when the live stream starts just click the button, the red button shown below that says “Ener LIVE”
I hope this was helpful and if you have any questions please send an ask to this blog or to @konjoong and we can assist you the best we can!
Free Crochet Pattern! How to Create A Crochet Snug Cowl!
Hello there! I’ve just uploaded my very first Free Crochet Video Tutorial onto my YouTube! Also, I am having a Free Crochet Pattern Giveaway (1) to one lucky Subscriber! Giveaway Rules in the video information section!
this will be a really short and easy tutorial because i follow the same steps pretty much all the time and i use psds instead of creating new colorings every time and you’re proably nor interested in that at all but anyways here we go
here are some examples:
what you have to do first is find a screencap you want to use and i recommend using this blog which is a part of this site (i might or might not be selfishly promoting a site that i run with my friend no big deal or anything please use my caps i will love you forever)
i’m going to use this one just because erica looks gorgeous and really, who needs a reason when it comes to erica? nobody that’s who
now open your photoshop and the picture you want to use and crop the picture so that it’s 100x100 px. all you have to do is set these cropping options
and crop your picture, it doesn’t really matter how you choose to crop it as long as you like how it looks. after cropping your image, apply any sharpening action you like (you can use one of mine if you want)
here’s what my icon looks like so far:
all you have to do now is apply a psd. i used this one but you can use any of my other ones or your own or any other psd that you like
and it looks pretty good already so you can save it and use it but i just like to color the background because i think it make the icon prettier and i just like that effect a lot? anyways, i explained how to make the backround effect here. and it’s actually really easy to do so it will take you less than a minute but will make your icon look really cute and it will also trick people into thinking you put effort in making your icon when you literally spent like 2 minutes
aaaand here’s the result:
if you have ANY questions, just let me know. seriously, don’t ever be too shy to message me because it makes me really happy that people actually read my crappy tutorials so if i can be any help, i’ll be more than glad to answer any of your questions!!
sooo a lovely anon requested a tutorial on how to do something like this:
and i’m not really sure how to call that effect, but it’s actually really easy to make and i hope my incapability to explain won’t make it hard for you to understand :) you need some basic skills for this (how to make a gif and how to color it), i’ve already made tutorials on both of these things, you can find them here: [x]
aaaand here we go
as i said, you already need some giffing knowledge to use this tutorial, so i won’t explain the process of creating a gif, but if you have any questions, let me know!
so, here’s our original gif:
i would recommend you to use a scene without lots of movement, so that when you apply a background color, it covers the backgroung throughout the entire gif (does this make any sense???)
and here is our gif with a coloring:
i’m usually too lazy to make any effort when it comes to photoshop, so i would just save this gif and add it to the gifset, but it’s a matter of taste and stuff, so i’ll just start explaining the whole background thing now :)
and it will literally take you a minute to do it; just create a new layer underneath the coloring and set it to linear dodge
now choose a soft brush and set the size to around 150 px and simply start filling in your background with it. you can choose whatever color you want, but i always try to use colors that suit the color of the scene. anyways, it doesn’t really matter because i always mess up with finding a perfect color and there’s a way to fix it, which we will talk about a bit later :)
here are my brush settings, just in case:
this is pretty much it, especially if you chose a color that fits your gif perfectly. which never ever happens to me, so i have to deal with it every time. but it’s easy :)
just click ctrl+u and this window will appear:
what you have to do is play around with hue until you’ve found a color that you think fits your gif the best :)
this is my result gif:
and this is how my layers panel looks, just in case it helps you in any way:
this is optional: you can also reduce the opacity of this filled-with-brush layer (i have absolutely no idea how else to call it) if that’s what you feel like doing, that’s totally up to you. you can also add some gaussian blur to this layer to soften the edges even more.
and this is it! you just make a gif, apply a coloring, create a layer underneath it, set it to linear dodge, fill it in with a soft brush (not all of it obviously, just the part that you want colored), erase any imperfections you made with an eraser tool (i always need to do it because i fail at not messing up, but you might not need to erase anything)
then, if you’re not satisfied with the color, play around with hue until you like the result. this entire process will take you few minutes or less, so it’s really easy :)
I did my very first artist alley at AOD2015! I did a lot of research beforehand to help prepare, but one thing that I thought was missing from all the articles and blog posts I read was a step-by-step guide from the perspective of a beginner. So, I decided to put one together myself! I’m not entirely sure if this is the right way of preparing, but this is what I did and it worked for me.
Just recently figured out how to make cool fire effects…and it’s EASY AF. If you have Photoshop, creating fire effects is a piece of cake.
Let’s get into it:
So you have your drawing that you want to turn to FIRE, right?
Open up Google and type in fire/flame effects:
It should pop up with some free stock to use. Copy and paste whichever flame image you want to use into Photoshop.
Here I pasted a flame that I will use as an effect coming from Dabi’s hand. Now here comes the important part:
Change the mode to “Screen” instead of “Normal.” This will get rid of that black background. Now, select the flame and transform it to how you desire:
Feel free to change the hue and shape of your flame however you want!
Rinse and repeat for all other flames you want to add! The next step, in order to make the flames GLOW, is to add COLOR DODGE! Make a new layer over the fire effects and whole painting. Change the mode to COLOR DODGE. Switch your brush to preferably an airbrush setting on low opacity.
In this case, there are blue flames, so I will use a very saturated blue in color dodge mode. Remember that the light from the fire would reflect off whatever objects around it. This requires a bit of lighting knowledge and practice. I also added some fire embers sparking from the flames using a special brush setting.
There you go! I hoped this helped some. Some artists choose to draw their flames, which you can and there’s nothing wrong with that. I just choose to cheat…like a villain :)
Woke up at 2am and couldn’t fall back asleep so I made a tutorial on the Photoshop techniques I use most frequently. Starting with the sketch:
adjustment layers: specifically the hue/saturation slider in this case, allows you to color correct quickly
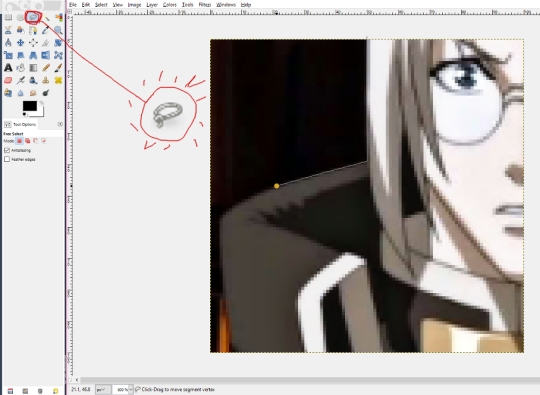
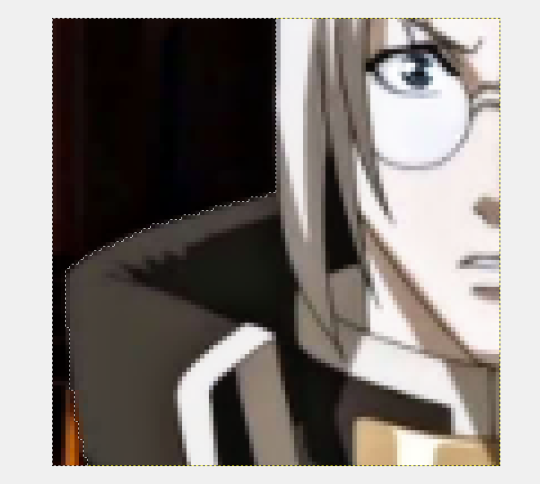
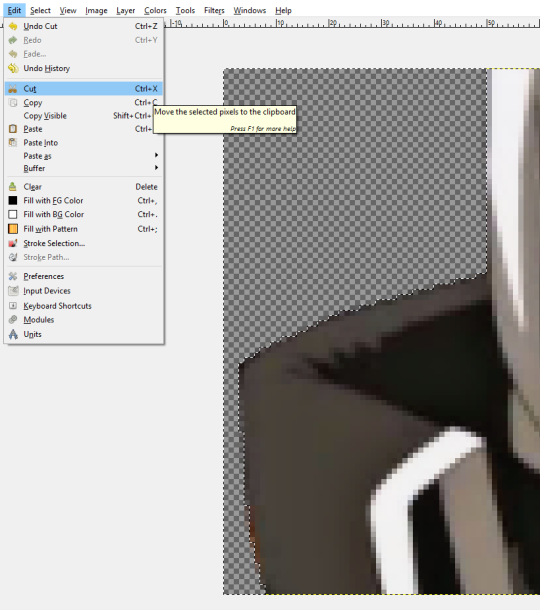
lasso tool: for sharp edges!
alpha lock: useful for painting within a pre-defined area (especially useful when painting characters)
x (hotkey) : toggle between foreground + background colors- let’s you easily blend between 2 colors
ctrl/cmd click : quickly change current active layer. Especially useful if you’re burdened with too many layers (or just very disorganized)
clipping mask: similar to alpha lock, but can add details without changing/ painting directly on the previous layer. I often use them to test out + apply gradients.
layer styles: I didn’t use any in this image, but the possibilities for layer styles endless, from simply adding a quick outline (useful for die cut demarcations when making stickers!) to creating more seemingly complex appearances. Here’s a gif of Nick Carver using layer styles (a combo of drop shadows + inner shadows) to quickly make the illusion of snow but with simple strokes.
Just a quick thing I put together. This blew my fucking MIND when my anatomy teacher pointed it out. My drawings instantly got better. You might know it (good for you, I wish I knew it before too T_T) or you might not and it might help you get better.