Anonymous said: I know you’ve shown how you draw faces from different angles very briefly before, but I was wondering if you’d ever go more in depth? For example, I always struggle with drawing the eyes at a ¾ angle…
Ok, I get this question so many times that I decided to do something about it. I’ve already made a tutorial about drawing eyes and tbh it should help with drawing eyes from any angle, the tricky part is to understand the human face, its anatomy. If you see the face/head as a three dimentional object you’ll be able to draw it, I can’t say it enough, 3D thinking is important. Also, references are important, drawing from life is important because then you have a 3D model of the head right in a front of you. All you need to do is observe and understand.
hello friends! an anon asked us how i did the text effects on this kate x yelena gifset right here and in the examples above, so here is my best attempt to show it was done. all you need is photoshop and basic knowledge in giffing + usage of timeline!
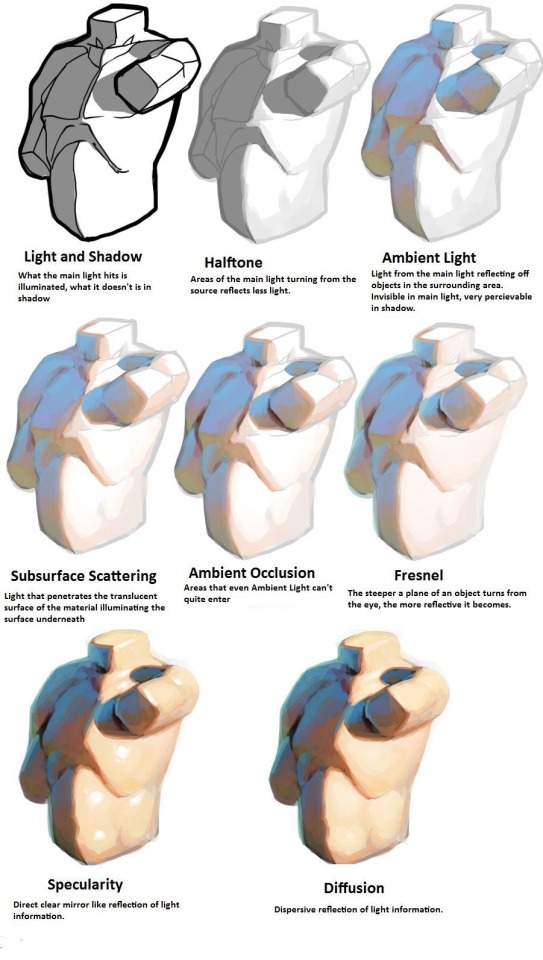
I am so serious when I say if you want to learn about light, you NEED to at least look at modeseven’s tutorials. even if you’re not pursuing a painterly style, this is all essential theory that can be easily adapted to different coloring styles. notice how none of these ever say ‘light with these colors and shade with these colors’? notice how this is teaching how light works on a mechanical level, and reminding the audience to adjust the actual colors they choose by context? THAT is good advice.
(if you’re thinking ‘wow I want to study more of this persons art!’ I encourage you to do so, but proceed with the knowledge that modeseven draws pretty much exclusively weird as hell kink art. sometimes wisdom comes from horny places)
Choosing the right kind of fabric and treating it right when sewing can greatly improve the finished look of your cosplay. Here are a few tips on how to decide what fabrics to buy and how to treat and work with it when making your cosplay.
Deciding what fabric to pick
So you have picked a character and decided to make the cosplay yourself and are now ready to buy fabric for it.
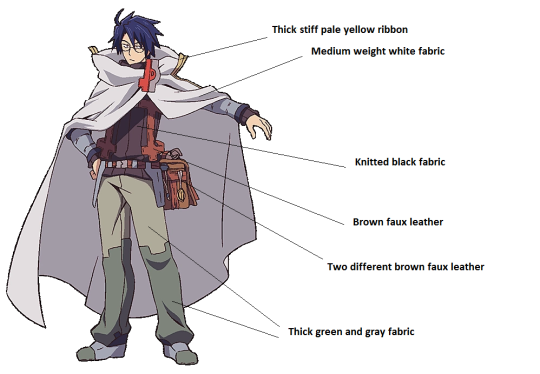
The first thing you need to do is to find a couple of good reference picture of your character from different angles and see how many different fabrics you will need.
The next step is to try to decide what kind of fabric you will need, this step can be really tricky if you don’t have any previous experience with fabrics.
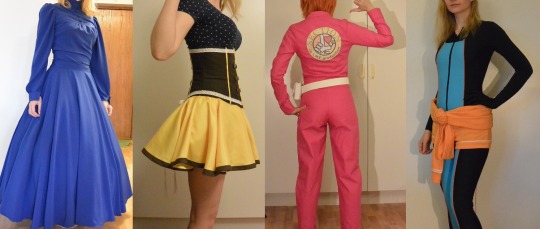
A good way to start figuring it out is to think about what qualities you want the fabric to have. Is the character wearing a formfit catsuit? Then the fabric should be stretchy like a four-way stretch spandex or a lycra. Is the character wearing a corset? Then the fabric should be stiff and a bit thicker. Is the character wearing a light and airy skirt? etc etc Write up the qualities you want the different fabrics in your cosplay to have and start doing some research.
Look at what kind of fabrics other people used in a similar garment or what recommendations the sewing patterns of the similar clothes say.
Another tip is to think what kind of person your character is. Is it a princess? Then maybe the fabric she would wear would be a bit more expensive looking and not just a simple cotton. Is it a hobbit? Then maybe the fabric should be natural and not synthetic.
Difference between Synthetic and Natural fabrics:
There is a lot of different kind of fabrics but they all fall under two main types; Synthetic and natural fabrics.
Natural fabrics are made from either the fibers of plants or animals (wool, hair etc). Examples are: Cotton, linen, silk, wool etc.
Synthetic fabrics are made from fibers made in scientific way and are produced from chemicals. Examples are: Polyester, Nylon, Spandex, acrylic etc.
Blend fabrics is as it sounds a mix of the both fibers to create a textile that has properties from both fibers.
Buying fabrics in store vs online:
If you have access to a fabric store that sells more than just curtain fabrics then it’s a great opportunity to get to know how different fabrics feels and works. Don’t be afraid to take help of the employees of the store and ask what kind of fabric would work for the garment. Bring a photo of your character so you can check how the color looks and if you already have a piece of your cosplay ready and you need a fabric in a similar color take a sample with you so you can check so it match.
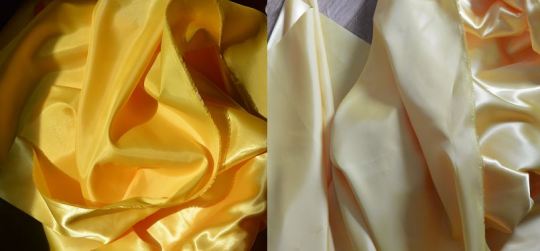
I highly recommend bringing a camera (or your phone) to the store and take photos of the fabric you are thinking of buying. Most fabric looks different with a flash and can get really shiny or change color. Since you probably want photos of your finished cosplay it is important to check so the fabric looks good both on and off camera.
This is for example photos of the same fabric taken in different lights:
If you don’t have a fabric store close to you or could not find the fabric you were looking for, buying fabrics online is a great second option. Buying fabrics online can be hard since you don’t have the opportunity to touch it, feel it and see how it flows, it can also be hard to see the exact color of it. I therefore recommend that you order some fabric samples of the fabric you are interested in before buying several yards of it. Fabric samples are often not very expensive and it is a great way to get to see how it looks and feel before deciding.
A tip is to save the fabric samples or cut out a piece of your fabric and write on a note what kind of fabric it is and where you bought it and then save it in a folder. This makes it really easy to later when you are going to make another cosplay to just check the folder and see if any of those fabrics would work for that cosplay.
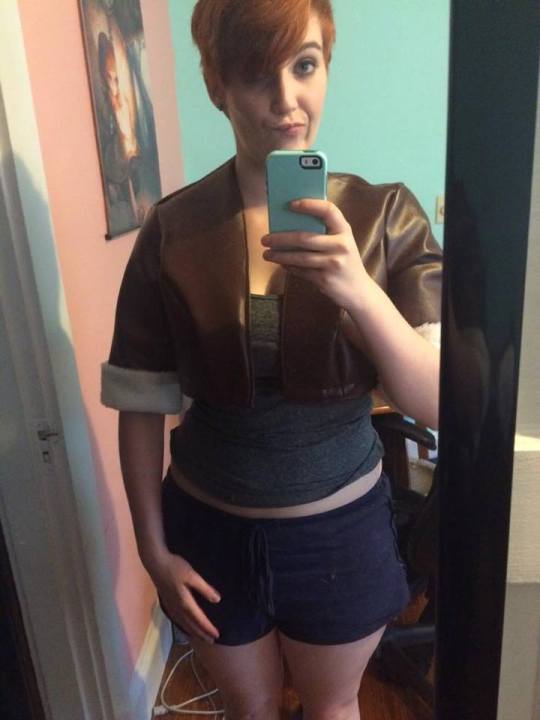
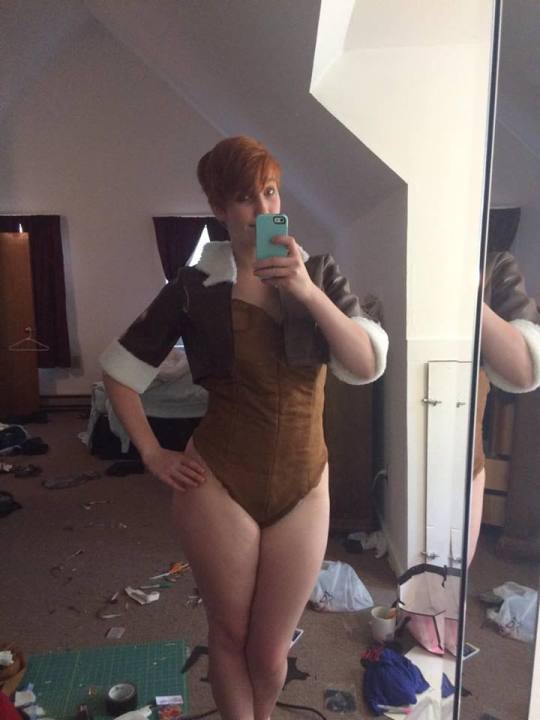
1 yard outer material (I chose brown vinyl, to look like a leather jacket)
1 yard cotton liner (I chose a cheap brown quilter’s fabric)
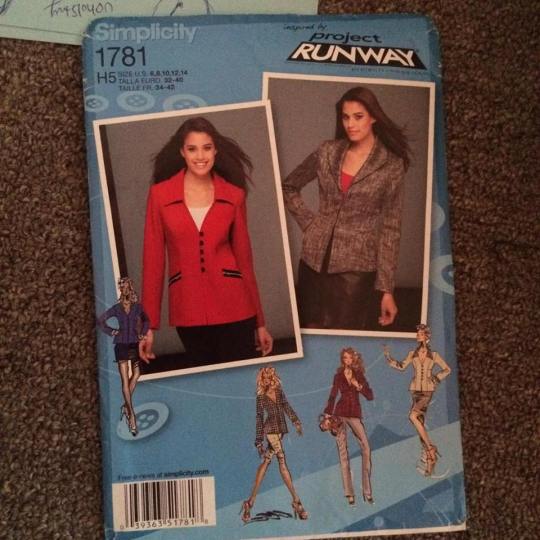
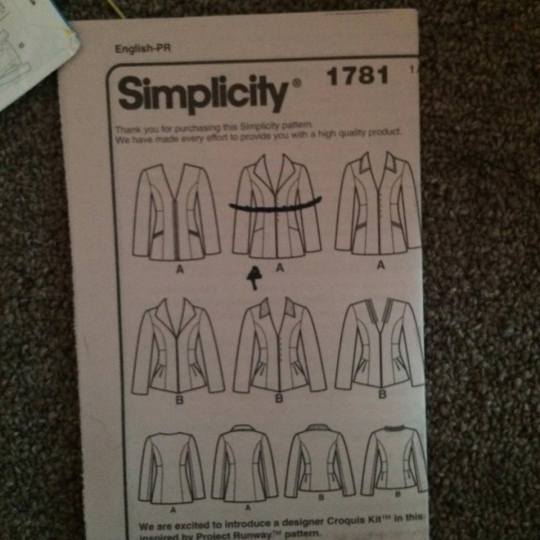
Simplicity pattern 1781 (you can also take apart a button down shirt that has a collar if you are being frugal!)
¼ a yard wool type material for the cuffs and collar of the jacket
For the “bunny suit”
1 yard denim
1 yard duck canvas (you will find this is the outdoor fabric section of joanns)
1 yard liner fabric (I always pick something FUNNN)
1 bunny suit pattern from Ruffle Butt (or any other suitable pattern I guess?)
bias tape.
boning of your choice (I used plastic, normally I use spiral)
eyelets
shoelace string or whatever it’s called for corsets.
using the “A” pattern” cut out anything that has to do with “A” you will not need the lower half of the jacket, as squirrel girl wears a cropped style bomber jacket (?) or whatever. I also personally did not cut out the collar from the pattern, I drafted my own (Which I’ll talk about later.)
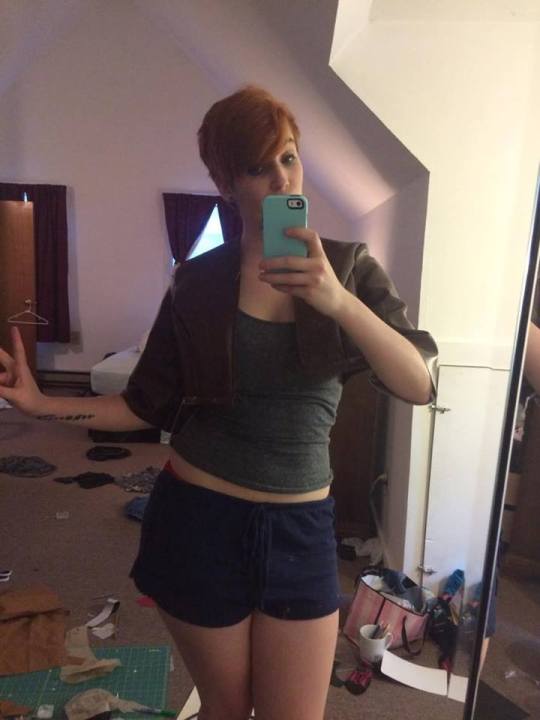
After you cut everything out and sew that shit up, it’ll look like this :
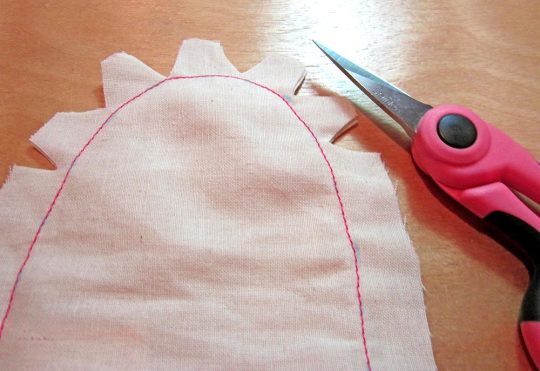
dopppeeeee. make any adjustments you have to before sewing the liner into the jacket. the vinyl I used had an impossible time with any U shape, so if you are using a material that is tough to work with, you’ll have to do a lot of altering to the pattern! MAKE SURE YOU DO THIS ON ANYYYYYY CURVED SEAM!! it’s increibly important with any type of fabric, but especially this crazy ass vinyl I chose.
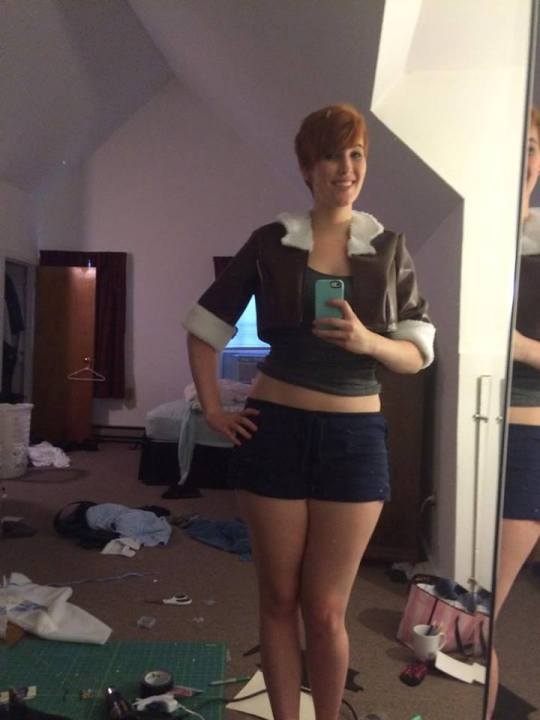
then attach some wooly type stuff to the sleeves to make the cuffs of the jacket
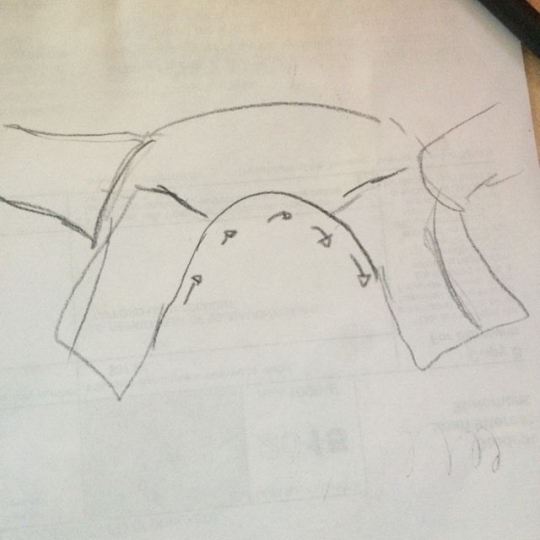
after you do that! you’ll have to draft a collar pattern! to do that, lay your jacket down as flattt as you can on the material you used for your jacket like this:
trace along where you want the collar to go and then draw the design you want for the collar. cut that shit out and then cut out the same shape in the wool material you used for the cuffs
look at that beautiful jacket. if I could write an ode to jackets, it would be based off of this one.
Bunny suit
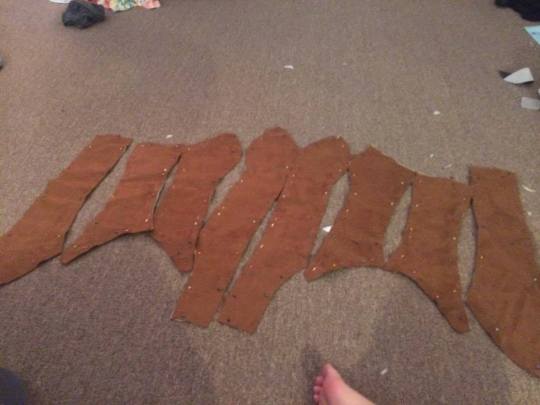
okay. so…. the bunny suit is a crazy fucking thing. I had to go to my homie Lucky Grim for some help with this bullshit. I bought a bunny suit pattern from Ruffle Butt, and cut it out in DENIM. this is recommended instead of muslin because it stands up a little better than muslin! make any adjustments you need on the denim mock up. For me, I had to add an entire 2 inches to the pattern because I’m a fucking Amazon.
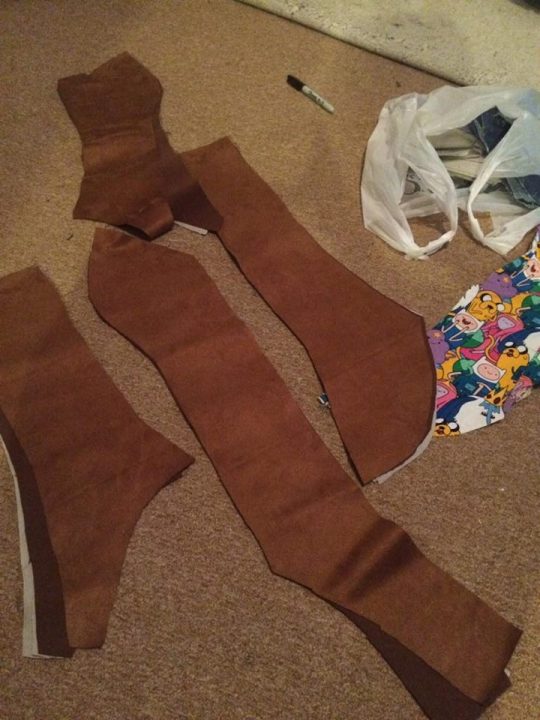
transfer the pattern 3 times! 1 for your liner, one for the duck canvas, and 1 for the outer material, in my case it’s suede.
sew the outer material to the duck canvas; piece by fucking piece.
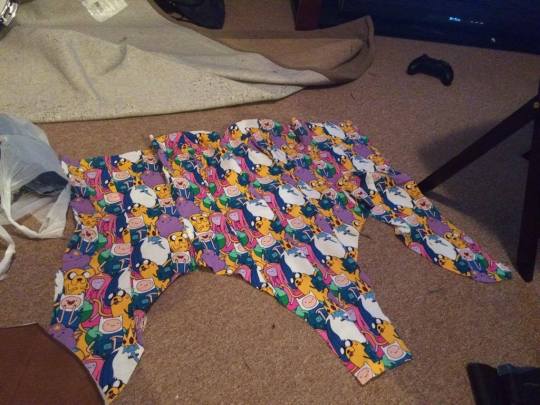
sew the liner together completely except for the crotch and the booottyyyy
damn. look at that shit. that’s a nice liner right there.
alright. focus Doreen.
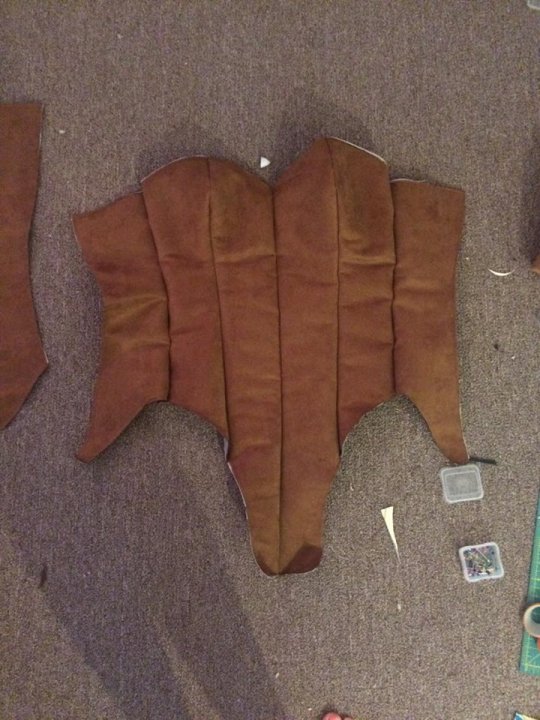
sew your outer layer/duck cloth pieces together
flip. that. shit. over.
you’re going to sew boning channels. it’s going to suck the entire time you do it.
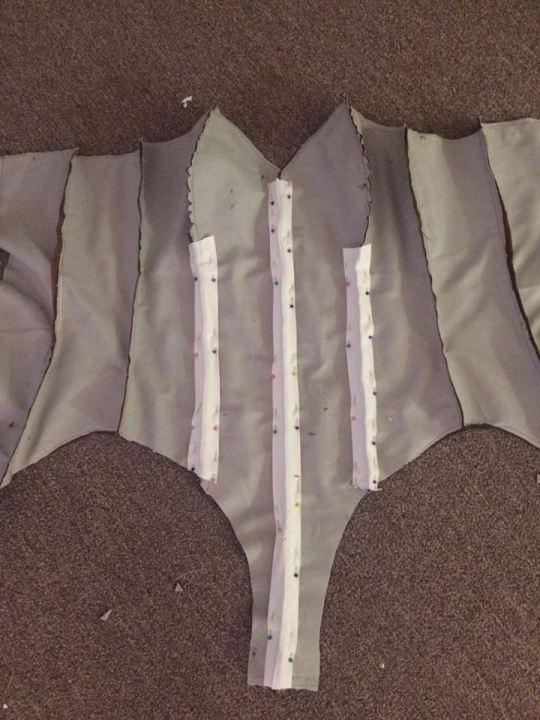
it’s excellent. for squirrel girl, I used version A, but I also cheated and only boned the front (yes. I boned the front. laugh accordingly)
I used double fold bias tape from jo’s and sewed it over the seams on each side. I put TWO pieces of plastic boning in each channel because the boning I got was really shitty, when you try it on, you’ll be able to kind of figure out if you need another boning piece in there.
sew your liner to the duck canvas/outer layer and do a LOOOOSEEEEE stich on the butt and crotch to try it on.
is your fit good? it should be if you made the adjustments you needed to to your god damn denim mock up.
if you are like me, and fucked up a little here, open that shit up again and fix it.
sew bias tape around the raw edges of your suit.
oh right. EYELETS. sorry. ya…. you’ll need to do that. I’m really sorry, but I completely forgot to take photos of putting eyelets in! you can uhhh… google it….?
I put the eyelets in before the bias tape because I make poor choices.
DO NOT USE SNAPS for the crotch. omg. huge mistake!!! I asked my friend, Lucky grim, what she suggested and she told me to use elastic. great choice. unless you are really back-bendy, you’ll have a hard time snapping your vagina flap to your ass flap. you. read. that. right.
I haven’t made the tail yet, I’m working on it! I’ll do another post for the tail and utility belt!
Natural Black Hair Tutorial! Usually Black hair is excluded in the hair tutorials which I have seen so I have gone through it in depth because it’s really not enough to tell someone simply, “Black hair is really curly, draw it really curly.”
The next part of Black Hair In Depth will feature styles and ideas for designing characters and I will release it around February. If you would like to see certain styles, please shoot me a message!
YES! BOOSTINGGGG FOR MY FOLKS WHO WANNA/NEED TO KNOW HOW
This time I go over a hishi chest harness (those diamond-pattern ones you probably see all over). Beginner and intermediate versions available, with a more advanced version coming later this week!
This post is some top tips for colouring gifs that I’ve learned from colouring my own gifs over the last year or so.
It’s for people that already know how to gif and have perhaps been using other people’s PSDs or have been trying to colour themselves but haven’t quite got the hang of it yet or have been colouring themselves but don’t like the results.
For reference you can find all of my giffing tutorials here.
Don’t use PSD’s - If you learn how to colour your own gifs and then attempt to create a couple of PSDs to use across all of your gifs, you’re most likely going to have crappy results. Every gif (even if they’re from the same scene) will need different layers and settings to make it work. In the time it’ll take you to adjust your PSD’s to suit your gifs, it would be faster to just colour it from scratch. Some people like to have a “signature” look with their colourings, which I understand, but it’s tricky to pull off, particularly if you’re a beginner and you’re giffing multiple fandoms. Which brings me nicely to the next tip.
Take each gif individually-The best approach to take, in my opinion, is to colour each gif individually. Sometimes if you’re giffing just one scene it is feasible to use the same PSD on every gif, but even then the lighting can be different because the scene has actually been filmed in two or more different takes.
Make use of your drafts - Drafts serve a purpose - so we can draft things, duh! But until recently, I didn’t realise how useful they could be in making gifs. When you’re in the process of making a gifset, create a post and save it to your drafts. As you make each gif and save it, add it to the post and that way you can see what your gifset is going to look like as it unfolds. It enables you to make sure the colourings of your gifset match because you can see all of the gifs together. And it also means you can simply pop over to PS and add a little brightness or adjust colour balance to make sure the gifs all look similar.
Don’t get too overwhelmed with it - Easier said than done, I know, but I found that the biggest hindrance to me colouring was thinking it was a lot harder than it actually is. Tutorials can seem long and overwhelming, but when you break it down and put it into practice a few times, you’ll realise it’s not as tricky as you think it is. Some gifs can be a lot harder to colour than others, but 9 times out of 10 when I’m making gifs it takes about 5 minutes. A lot of the time I sharpen it, add curves and the gif already looks great, so it’s really not as hard as it seems.
Practice, practice, practice - Colouring like anything else in life is not something that you’ll be able to do overnight. I’m still learning new things and better methods all the time even after a year of doing it. Experiment, read as many tutorials as you can and just get used to it. When I switched from PS CS5 to CC there were quite a few changes to the methods of giffing and for about 3 weeks I barely giffed because I couldn’t get over the hurdle of having to learn a new process, but now I’m completely used to it. So persevere and set aside a couple of times a week to practice. You don’t even have to post what you make, just practice for yourself.
Get an eye for colours/what looks good - Like I’ve said time and time again in all of my tutorials, it’s all about judgement when it comes to colouring. Some people may look at my gifs and think I coloured them badly (hell, I do most of the time lmao) or that they would have coloured it differently but that’s the point - everyone has their preferences. Don’t try to replicate somebody else’s colouring exactly, because that’ll never happen (even if you follow every tutorial they have) create colourings thatyou like. Figure out whether you like pale gifs, vibrant gifs or black and white gifs. Do you like high contrast or low contrast? Bright gifs or not-so-bright gifs? Once you feel confident with the process of colouring gifs, the best thing to do is step away from tutorials and practice colouring by yourself, and eventually you’ll develop your own colouring techniques and preferences without even realising.
Learn the function of each layer - It’s easy to follow tutorials without fully understanding what the hell you’re doing or what any of it means (I did exactly the same in the beginning), but understanding what each layer does yourself will really help you to colour. The basics are that curves, levels and brightness/contrast change the brightness and colour balance and selective colours change the colour. But there’s more to it than that and each layer serves different purposes. For example, if a gif is particularly red, if you try to go to colour balance and reduce the red right down the gif is going to end up looking awful and most likely green/yellow. The best approach to take in this case would be to apply a little colour balance to reduce the redness and then go in with selective colours and increase the cyan in Reds. You’ll learn the best way to tackle these things by going back to the above tip - practice, practice, practice!
Everything in moderation - Before I started colouring my own gifs I used PSD’s and a lot of them had 20+ layers. Since I didn’t colour myself, I assumed that was normal, but personally, I rarely exceed 6 layers. It’s not necessary to colour the crap out of a gif with multiple layers of contrast, selective colours etc. Depending on your tastes you may want to do that and that’s fine, but it’s very easy to create good gifs without adding lots of layers and making lots of changes.
Hopefully some of these tips were helpful. Feel free to ask if you have anything else I can help with related to giffing or colouring and I’ll do my best.
Making my way through various CAS files, I found something that I thought might be interesting to at least someone?
You know, how when you go into CAS, one of EAs sims shows up as the starting sim? You can replace these sims with your own sims. Or, in case you have a certain sim style, you can make it so that only a certain sim, that you want to use as a base, shows up.
Below I show how to do it and share files that you can use as a base (as well as some examples with my own sims).
This is how it works:
There are 20 Sim Preset files with female sims and 20 Sim Preset files with male sims that the game picks from when you go into CAS.
Each Sim Preset file references a Sim Info file which, basically, has the information about how the sim looks.
And you can replace the referenced Sim Info files with Sim Info files of your own sim(s).
Here is how to do it (it’s basically a little trick I learned from @mizoreyukii ’s tutorial for Custom Styled Looks). I realize this looks like a lot but those are just a few simple steps :D:
Save the sim(s) you want to use to your Library. If you use different sims, make sure the sims have distinct names, since the ID of your Sim Info files is derived from your sims name and you don’t want the file names to overlap.
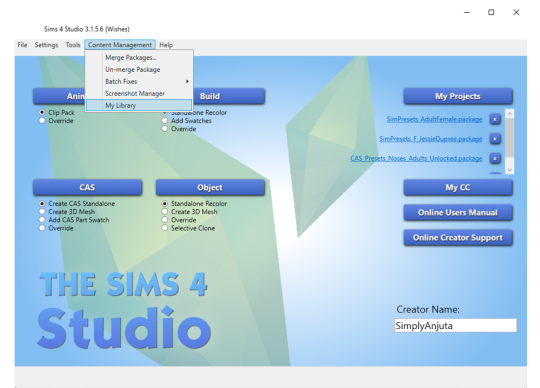
Next, open up Sims 4 Studio, go to the Tab “Content Management” and select “My Library”:
A window will pop up that shows the sims that are saved in your Library. [Note: There’s a little bug in S4S, when in case you changed your game language settings at some point (as I did), S4S will still navigate to the old Tray folder (even though the path to “Sims 4 Documents” is set correctly in the S4S settings). As a workaround, you can copy paste the files from your current Tray folder to the old one.]
From the overview select the household with your sim. Then, select the sim on the right panel, right click the sim and select “Export .SimInfo”. Save the file to a location of your choice.
Download the zip file I linked below and open the included package file with EAs sims (either male or female, depending on which sims you want to replace) in Sims 4 Studio. (If you set Sims 4 Studio as the standard program to open package files, you can just double click the package file to open it.)
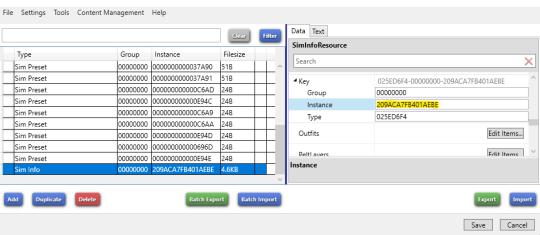
Inside each file there’s a list with 20 sim presets. Each Sim Preset references a “SimInfoInstanceID”, as shown in the example below, that you will need to replace in the next step:
Hit “Batch Import” in order to add the Sim Info file that you previously exported from your Library.
Copy the Instance ID from the Sim Info file. You can copy it from here:
Paste this ID as the “SimInfoFileInstanceID” to the Sim Preset (replace the existing entry). If you want to use the same sim for all files, copy the same Sim Info ID as reference to all Sim Presets, otherwise add the other Sim Info files you wanna use the same way as described above and copy the different IDs to the different Sim Presets.
Save the package file and put it into your Mods folder.
The download above is a zip file (you need to unzip it with a free program like WinRAR or 7-Zip) and includes the following package files (each for male and female sims):
Original Files with EAs sims (*)
Example with 1 male sim and 1 female sim
Example with 4 male sims and 4 female sims
Following basegame sims are included in my example files:
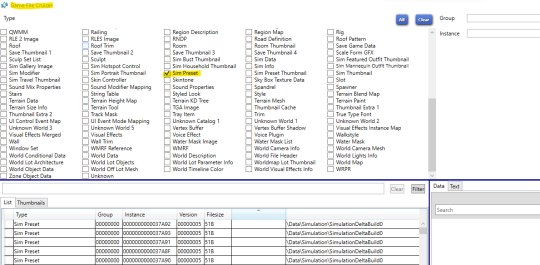
(*) Sidenote: In case other CAS sims are added to the game, you can also export the original files yourself via the S4S Game File Cruiser:
Creating Poses in Blender 2.8/2.9/3.0 - Rigs & Compatibility Tips for S4S
In our Pose Makers server I notice more and more questions about working in newer Blender versions and how to make poses/animations created in the newer Blender versions compatible for S4S, which until now, only supports the 2.7 series.
Some people would like to use the new features and the more modern & convenient interface. Some people are struggling to get the old 2.7 series to work on their computers.
And since I am sort of in the process of moving to Blender 3.0 (from 2.7) myself, I decided to write down what I understand to be the options, hoping that this will be helpful to someone out there and so that I can refer to this post in the future. Feedback is also welcome, and I will add more info if I learn more.
For convenience, I also re-enabled the textures on the S4S rigs for Blender 2.8/2.9/3.0 and share the prepared rigs below.
Making Poses/Animations Compatible
What S4S can do: According to the S4S download page, only the Blender versions 2.70a and 2.76a (for Windows)/2.70a and 2.78a (for Mac) can be used with S4S. Blender 2.79b, which is the last version from the 2.7 series, is not officially mentioned/linked, but also seems to work (note that earlier iterations of 2.79 can cause issues).
What S4S cannot do: Blender 2.8 and higher versions are not supported by S4S. Thus, poses/animations saved in Blender 2.8 and above are not read correctly when you import the blend file in S4S and will therefore not work in-game when saved that way.
Besides, you also cannot open blend files saved in Blender 2.8 and above in Blender 2.7 to resave them there.
However, there are the following options for a workaround:
1. Copy-Pasting: For transferring poses, the easiest way still, in my opinion, is simply copy-pasting a pose from Blender 2.8/2.9/3.0 to a rig in Blender 2.79, then resaving there:
Press „A“ in order to select all points on the posed rig in Blender 2.8/2.9/3.0
Press “Ctrl” + “C” to copy the pose and press “Ctrl” + “V” to paste the pose on the target rig in Blender 2.79. (This only works with 2.79, not with earlier Blender versions.)
Loc rot the pose and save the blend file in 2.79, then import the blend file in S4S.
2. Appending: In a similar way, you can also use the append function in Blender, which is the more accurate option, in case you need to transfer not only a pose, but constraints and other additional features that are used mainly for animations. However, this option only works when appending blend files saved in Blender 2.8 and 2.9. Blend files saved in 3.0 are no longer recognized by any of the previous Blender versions.
3. Animation tools for Blender 3.0 by thepancake1: The tools let you export clip files directly from Blender which you can then batch import to a package file in S4S – thus bypassing the import function for blend files in S4S! That way the tools also make it possible to transfer scaling to game which is not possible otherwise. Pancake shared an introductory tutorial along with the tools that explains how to create a working pose using the tools. I wrote down some extra tips for poses here. (According to Pancake, the tools will probably also work for Blender 2.93 and maybe even earlier 2.9/2.8 versions. However, the tools are made and tested primarly for 3.0.)
PreparedRigs
Another (cosmetic) issue, when working in Blender 2.8 and above, is that the texture of the S4S rigs is no longer recognized.
You can, however, re-enable the texture with a workaround, which I did now for my own purposes. I’m sharing the rigs below to spare you the same trouble. However, if you’re curious, you can read how to do it here.
I also made some minor practical adjustments to the rigs, mainly:
Added IK constraints on hands and feet.
The mesh parts are merged for easier appending (also, otherwise lines would appear on the re-enabled textures wherever the mesh parts intersect).
Added a version where I combined the 4 adult rigs into one file (Adult Female, Adult Male, Mermaid and Merman – since they all use the same rig). You can switch inbetween them by clicking the eye symbol on the right panel beside the main window.
The rigs are compatible with Blender 2.8, 2.9 and 3.0:
Minimalist nails for Valentine’s Day. I was planning to add some matte top coat but I totally forgot then ♀️
The base color is Between the Sheets from @heroinenyc . . . . . #sensationails4u #nudenails #nudenails #nudepolish #nudenailpolish #nudenail #nailsvideos #nailsvideo #nailsvids #nailsartvideos #nailsartvids #nailsclip #nailsartclips #nailstutorial #nailstutorials #nailsarttut #tutorials #tutorialsvideos #tutorial #heroinenyc https://www.instagram.com/p/CLFdQnkH-mG/?igshid=llzjbd698sr4
Hiiiii welcome to my icon-making tutorial!! I really enjoy making icons, and I thought I’d share how I do it <3
This tutorial is not for beginners!! I don’t explain every step in detail. However, if you have a question about any concept within this tutorial, please don’t hesitate to send me an ask or a dm!! I am happy to help <3 /gen
For this tutorial, we’re going to be making the icon you see in the header.
i’ve been getting a lot of asks about my colouring process and requests for colouring tutorials, so i finally decided to make one! using a few gifs as examples, i’ll show you how i turn backgrounds into a vibrant colour. this tutorial assumes that you already know how to gif; we’re jumping right into the colouring!
(disclaimer: just keep in mind that this is what works for me, experimenting is the best way to learn what works for you ahshdgjg anyways, here we go, under the cut!)
hello guys! since im doing followers celebration and i think “why not make a gif tutorial too?” i started making gifs around this time this year, and here’s my giffing tutorial!
this tutorial will have basic giffing + coloring tutorials!
hello guys! since im doing followers celebration and i think “why not make a gif tutorial too?” i started making gifs around this time this year, and here’s my giffing tutorial!
this tutorial will have basic giffing + coloring tutorials!
Animation smears lecture from Chapter 3 or FULL VERSION of my Complete Introduction to 2D Animation which you can find on https://gumroad.com/stringbing
“Roast carrots, butternut squash, red onion & fresh garlic in olive oil, salt, smoked paprika and dried herbs for 20-25 minutes
Bring 500ml veggie stock and around 250ml coconut cream to a boil. reduce to a simmer and add the roasted vegetables. add more smoked paprika, dash of salt & a splash of tamari
Remove from the heat, blend until smooth and creamy & enjoy.”
The tutorial is over 6min long and goes over the basic steps I take to make a large tentacle necklace. I’m really excited to start sharing all I’ve learned about clay, paint and copics with everyone as well as experiment with some new mediums!
The video is only available in the $10 tier, but there will be some behind the scenes photos with descriptions in the $4 tier as well. Enjoy!


 up on Patreon!This time I go over a hishi chest harness (those diamond-pattern ones")
 up on Patreon!This time I go over a hishi chest harness (those diamond-pattern ones")
 up on Patreon!This time I go over a hishi chest harness (those diamond-pattern ones")
 up on Patreon!This time I go over a hishi chest harness (those diamond-pattern ones")
Making my way through various CAS files, I found so")