Back for the dyeing course in Dals Långed. The first day we went for a trip to Örtagården in Dals Rostock. Lovely garden with many medicinal plants that can also be used for dyeing.
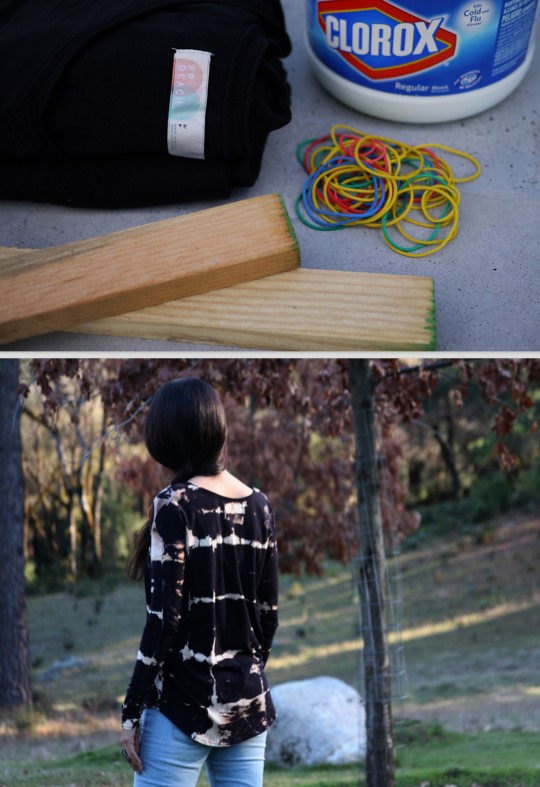
Honestly WTF posted this Tissue Paper Dyeing Fabric DIY a few days ago, and I haven’t been this excited to try a new dyeing technique in months.
Some Things to Know:
You have to use spectra tissue paper because it will bleed onto your fabric.
Honestly WTF experiments with silk and synthetic fabrics. Natural fabrics work better, and I’d like to experiment using old 100% cotton to see what happens.
All you need is fabric, spectra tissue paper (cheap on Amazon), white vinegar to set the dye, and a spray bottle.
You could also try dyeing silk and making it into wall art - I think that would look beautiful.
“Learn dyeing techniques and create traditional kimono patterns, animal patterns, etc., on items such as handkerchieves and pouches. You can also add your own signature to your created item, so that you can further enjoy its originality.”
This sounds super fun, especially if you love traditional Japanese crafts! Learn the technique of starch resist fabric dying to create crisp lines and delicate designs in this Kyoto workshop. Click the title above for info on price/location/etc. Someone try this for me!! - artofjapan
Finished up two new Mara Jade cowls, the more comic accurate version with out tails. I’m in love with these vintage hinged army motorcycle goggles I found on Etsy! Both fabrics are from @cosplayfabrics the white I dyed to match my beige gloves per the #501stlegion CRL guidelines. #cosplay #marajade #goggles #vintage #costume #dyeing #cosplayfabrics #ardawigs #geekgirl #starwars #ineedanap
HEY! If you want to support communities of colour and are a sewer, cosplayer, quilter, knitter or DIY lover, then I have fantastic news! I just found an amazing master list of businesses owned by POC, women, and allies that sell sewing and crafting supplies. It’s got a full breakdown of what they carry, who runs it, where they’re based, etc.
This list is the baby of Seattle-based designer Jacinta Green. The sellers are all vetted by Jacinda or by followers she trusts. It’s already at 236 and is still growing! You can find her on instagram @pinkmimosabyjacinta.
Honestly WTF posted this Tissue Paper Dyeing Fabric DIY a few days ago, and I haven’t been this excited to try a new dyeing technique in months.
Some Things to Know:
You have to use spectra tissue paper because it will bleed onto your fabric.
Honestly WTF experiments with silk and synthetic fabrics. Natural fabrics work better, and I’d like to experiment using old 100% cotton to see what happens.
All you need is fabric, spectra tissue paper (cheap on Amazon), white vinegar to set the dye, and a spray bottle.
You could also try dyeing silk and making it into wall art - I think that would look beautiful.
If you read Honestly WTF’s post, you will see how easy it is to tissue paper dye fabric. I wonder if you could tissue paper dye water color paper and make cards or miniature art works.
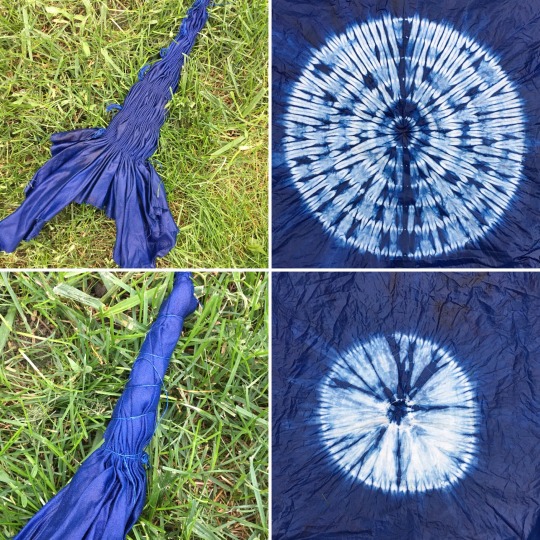
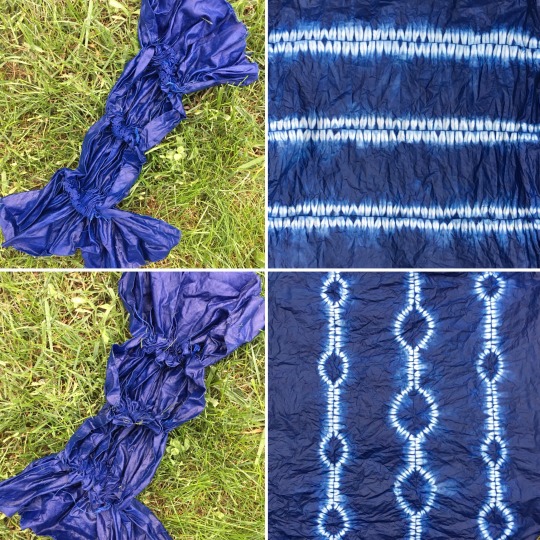
A couple weeks ago, I tried indigo dyeing for the first time! I thought I’d share some of the process.
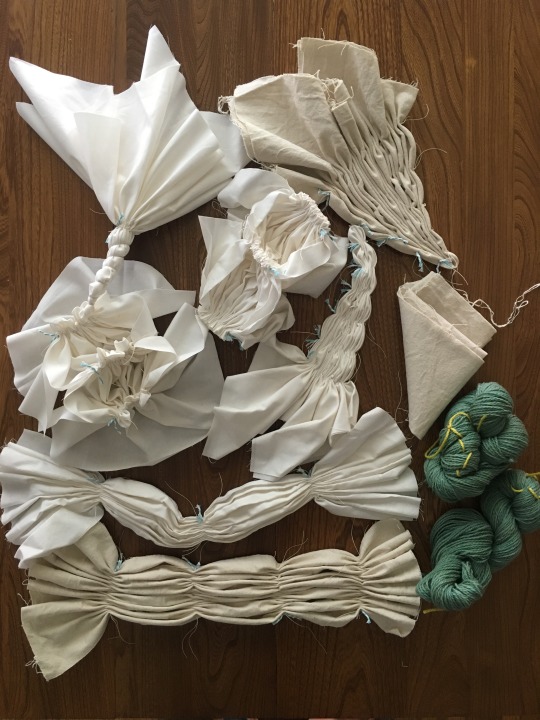
I had already prepared several pieces of fabric for dyeing, by stitching them up with various shibori stitch patterns. I used Kona PFD Bleach, and some painters canvas that I had pre-washed before stitching. I also had yarn that I wound into skeins.
I collected other supplies over the last month from various stores (mostly Giant Tiger and IKEA, and white buckets from Canadian Tire). I was careful to get only stainless steel, glass or plastic because other materials could react with the dye or alter the process.
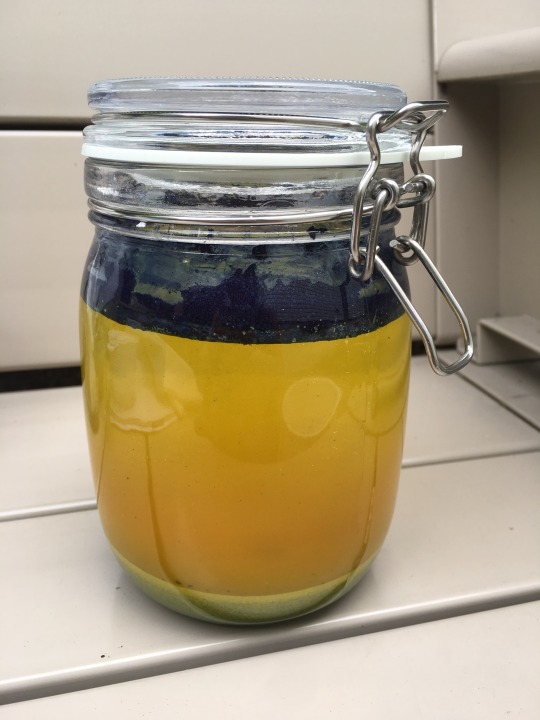
I first made the indigo stock solution. It started out pale blue but soon turned bright yellow! (See below). When I added it to the bucket, it turned a pale yellow-green, with a coppery sheen on top – which is apparently how it’s supposed to look.
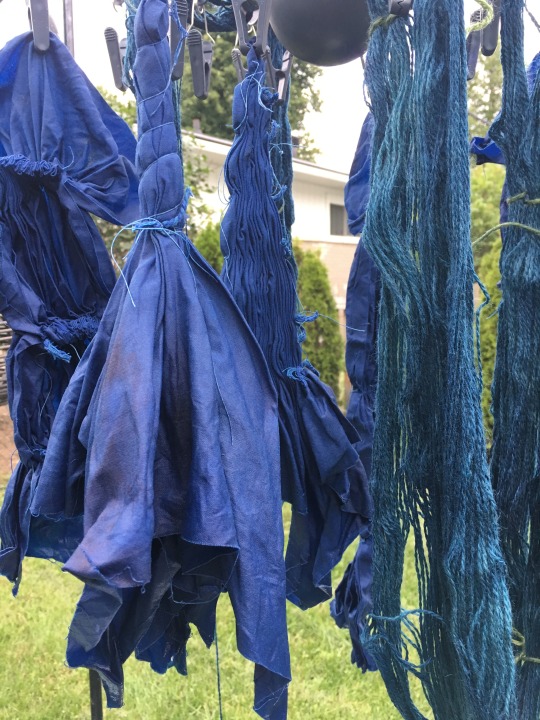
When I put my first few items in the vat, I wasn’t sure if it would work! I left the items in for about 15 minutes then slowly took them out. They were bright chartreuse coming out, but quickly started turning green, then aqua, then blue. It was amazing!
I did several “dips” in the vat for each piece -letting them sit in the vat for 10 minutes or so, then taking out to let oxidize in between dips. For my canvas, I did 3 dips each, and for the cotton squares I did 4 or 5. I also overdyed some yarn (more on that in another post!)
Then, it was the moment of truth - to see the final results! After the last dips, I rinsed the pieces in water, took out the stitching, and rinsed again. I was so pleased with the results and how the shibori stitching turned out! Here are the results from stitched piece to final design!
Now that I have all the supplies, I will do indigo dyeing again for sure! This time was definitely a learning process and I know next time I’ll tweak a few things. It’s so fun trying something new!


")