As a follow up to our Making Worbla Smooth Experiment, here is the detailed write-up regarding the methods used in that experiment.
Making Worbla Smooth
There are many methods for making Worbla smooth so I decided to do a test run myself based on the primary methods others have used. The three main ways of covering Worbla have been using Gesso, Plasti-Dip, or Wood Glue. This experiment only covers Gesso with Mod Podge acrylic sealerorGesso with Plasti-dip. I didn’t have Wood Glue available during the time of conducting the test so there will be another part to this series that will include a comparison using Wood Glue.
Method
I used 8 layers of Golden Sandable Hard Gesso and 150 Grit Sandpaper. I prefer this Gesso over any clear Gesso as you can actually see the streaks so that when you sand it, you can see the Worbla getting smoother (pictures 3 & 4). In addition, the sandable Gesso has additives that makes it thicker so that you don’t have to do as many layers or as much sanding to make it look good. Yay for that!
You’ll notice I didn’t do a good enough job of sanding so you can still see some streaks in the forth image. If I were to do this again, I would do 6 layers, sand with 150 grit, and then add another 4 layers, then sand again with 150 grit to get a smoother finish (instead of just 8 layers straight). I tried sanding only 4 layers in and unfortunately, I exposed the Worbla, so 6 layers of Gesso is the very minimum in guarding against Worbla exposure. Also, it’s very important that each layer of Gesso dries completely before you put on the next. Otherwise, if you start sanding, the Gesso will chip and take, along with it, all the layers underneath. In picture 4, you will notice this happened on the edges of the Gesso which is why the Worbla is exposed there.
Results
Picture one (left) shows the top piece which is Worbla painted without any additional work. The bottom piece is 8 layers of Gesso, sandpaper, one layer of Mod Podge acrylic sealant, and then one layer of Gold Metallic Paint.
Picture two (right) shows the top piece which is Worbla painted without any additional work. The bottom piece shows Worbla with 8 layers of Gesso, sandpaper, 2 layers of Plasti-Dip, and one layer of Gold Metallic Paint (Rustoleum brand).
Conclusion: I was surprised that the piece with the Mod Podge sealant looks smoother than the one with the Plasti-dip! I think the Plasti-dip made the items look more foam-like than I anticipated. It seems as though the Plasti-dip reacts oddly to Worbla.
Stay tuned when I try this experiment with Wood Glue.
Michele Carragher, the head embroider on Game of Thrones, made this awesome tutorial to show how she created the dragonscale fabric that appears on several of Daenarys’ costumes in S3 and S4.
Ms. Carragher says that the dragonscale fabric was created because “In season 3 the Costume Designer Michele Clapton wanted a Dragonscale like textured embroidery that starts to emerge on three of Daenery’s costumes, which becomes heavier and more pronounced, growing and evolving as the season progresses” (Carragher).
In stages 9-11 of the tutorial we see how the textile evolves from lightly to heavily embellished. This progression is meant to illustrate Daenarys’ personal growth and the growth of her dragons (source).
@p0isi0n-apple mini tutorial since you asked! >made an illustrator file of rows and rows of scales >cut them out of 2mm EVA foam (craft foam or fun foam at ur local craft store) using a laser cutter. You can do it by hand but I love myself and love having in tact wrist joints >just cut off however many scales wide I needed for each column and hot glued them into place on a piece of heavy fabric (in this case cotton duck). Repeat this step like 300 times >hit them REALLY QUICK with a heat gun after the whole thing was assembled, you can see the foam get a glossy texture for a second. This kinda helps make it less porous so you don’t have to seal it as much in the next step >sealed them by painting on mod podge. Used several coats, until they start to look glossy (using gloss rather than matte finish probably helps you be able to tell) >Then sprayed them with plasti-dip, let dry 30 min. Do a couple coats. Wait at least 4 hours once you finish >painted them with a metallic pewter paint, I can’t remember if I did more than one coat. >then dry brushed with a lighter silver metallic paint with a really stiff bristly brush to get that streaky metallic texture. Kinda fiddled with it to get it to look more 3D. I’m pretty sure I also dabbed on some black where they overlap to make a shadow effect >sealed that shit with some clear coat spray, we used liquitex satin finish >now we are the flashiest grey wardens B)
@illyanasmagiks heres the write up! here’s some process photos that hopefully help visualize what im talking about.
the scales in a chain before i cut them into smaller segments:
and the base fabric with the scales hot glued down onto it:
Then once you have it all painted you kinda sandwich this between the back blue fabric and the outer stripes, iirc we just glued the stripes down in place once they were sewn LOL
IT DONE. I probs went through a dozen or more paper patterns changing angles and curves by fractions of degrees to get the fit exactly how I wanted it because I’m a perfectionist ass hole but the payoff was pretty good. The patterning technique I used can be adjusted and scaled pretty easily, as shown in the pic with andreas Tol breastplate next to my Smol one.
@tartecosplay made our griffon emblems so we could be all matchy matchy. Also as you may have noticed the only place in my house with bright lighting is in my bathroom directly in front of the toilet, I’d say I’m sorry but I’m really not.
And now for something completely different: arrow-making. The arrows I had were too modern for costume photography, so I looked up how to do DIY fletching and made some that were more photogenic. Legit construction technique, non-legit materials, so they’re not actually functional.
These are cool, I just got out of archery so this is neat. I would love to make my own arrows some day. How long did this take
…I’d rather not say. And call it a “learning experience.” XD
I mean, part of it was that these were a photography prop that I was doing on a budget, so I was weighing the cost of my time less than the cost of my money. I bought a bunch of cheap 1/4″ pine dowels instead of actual arrow shafts, and then dyed/glossed them, which took time, and bought the cheapest packages of feathers I could find, turkey quills that were also pretty bleh until I cut them down to shape and dyed them, which also took time, and neither makes for functional arrows. The pinewood dowels would snap in half if I tried to put them under the stress of a bowstring.
But now I know how to do it in theory, so in the event of the apocalypse, I am now marginallybetter-equipped to survive.
Anyway, the site I learned it from was here, and that guy does actually make arrows that are intended to be functional, so if you don’t cheap out on materials like I did, you should be able to make your own shootable arrows. :)
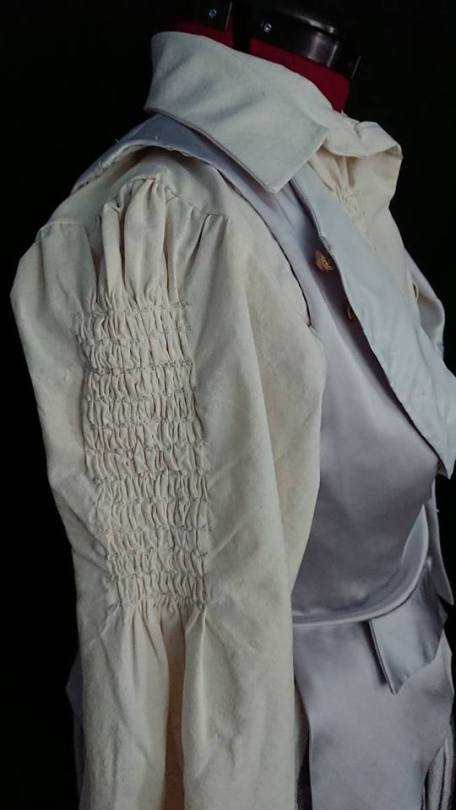
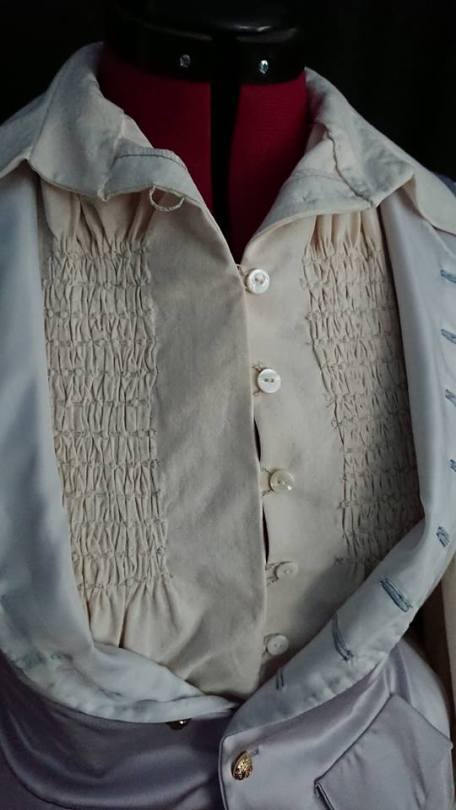
While working on my Eleanor Guthrie cosplay, I researched how to do smocking with a sewing machine (rather than by hand) I’m quite pleased how it turned out, and I thought I’d share a little tutorial. If you have any questions, do not hesitate to reach out!
What you’ll need:
Sewing machine with decorative stitches
Embroidery thread (I used Gütermann Sulky Cotton Multicolor in grey/beige tones)
A ruler or measuring tape
Chalk or disappearing marker
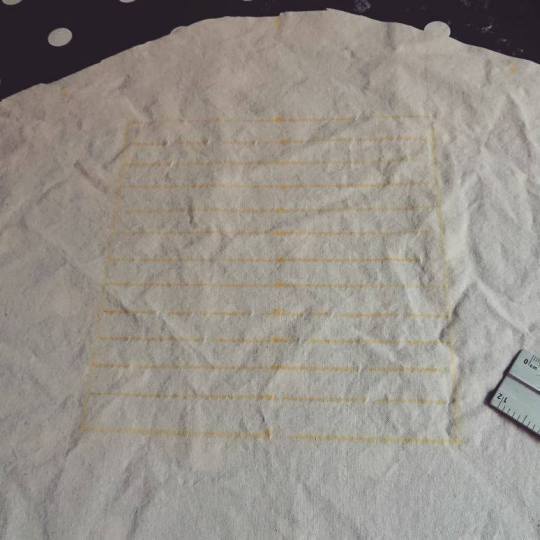
1. First, you must decide on your ratio (how much fabric you will gather), and mark your gathering stitches lines. I went for a 1:3 ratio and marked lines 18cm long. My desired final gathered length is 6cm. My lines are 1.5cm apart, but you can experiment with lines closer or wider apart for a different effect.
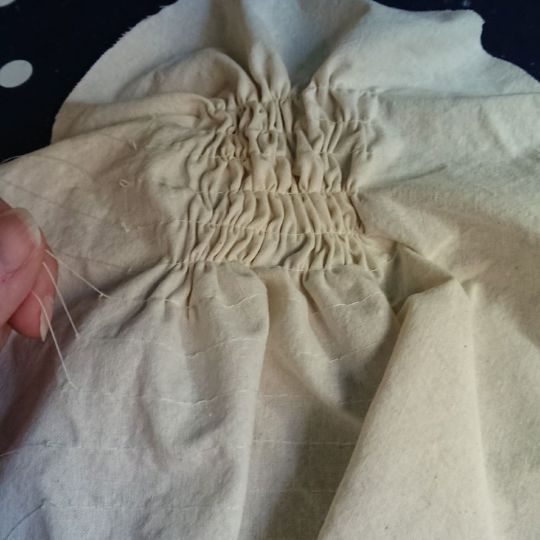
2. After sewing a long gathering stitch on each line that you marked in step 1, gather your fabric down to the length you decided in the first step (in my case, 6cm). Press your fabric to set the pleats.
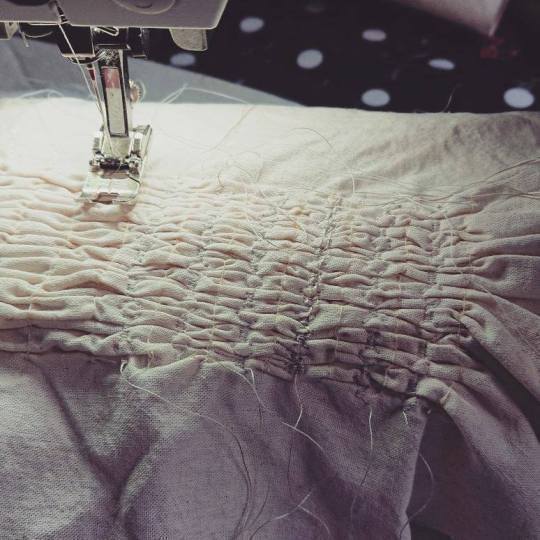
3. Go back to your sewing machine and sew decorative stitches _between _each gathering line. This will permanently set the pleats. Note: smocking isn’t elastic like shirring is, don’t confuse them! They kinda look the same and they both reduce the width of your garment by gathering fabric, but they have very different in behavior: shirring keeps its elasticity by using elastic thread as the bobbin thread, while smocking is permanent. I see smocking as something more decorative rather than functional, like shirring is.
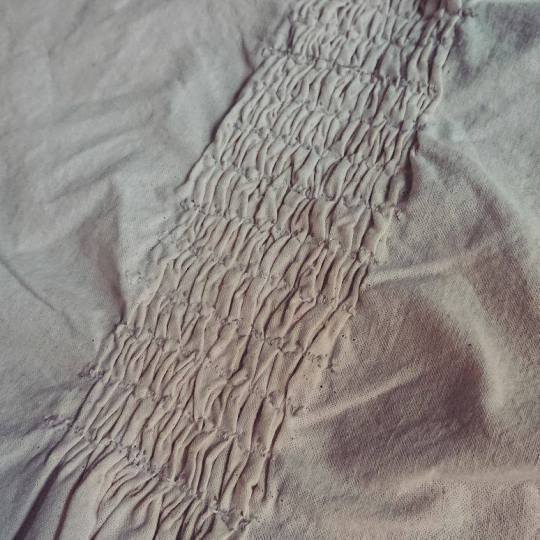
4. Remove all your gathering stitches (the most tedious task of them all!), give your fabric another good press with steam, and there you go! Admire your beautiful smocked piece!
And done!
There are many other methods, including smocking by hand, but I hope this short tutorial will have inspired you to give it a try! Smocking is not difficult and the final result is sure to make a statement on your costume!
Liked this tutorial? Don’t hesitate to share it! Sharing is caring! ♥
How to make custom lace appliques – the “Frankenlace” method
A lot of people asked for more info on how I made the appliques that decorate the bottom of Zelda’s gown. Here’s my tutorial for the whole process! This method can be used to make all kinds of applique shapes and designs if you get creative with it.
These lace appliques are made out of other lace – hence the nickname. To get started, you’ll need to collect a few lace trims to use as raw material. Look for styles that are similar or complement each other, because you’ll be combining them. This is some, but not all, of the trims I used. I bought these in the LA fabric district, but most are available at trimexpoonline.com.
Cut your lace down into smaller pieces that are more modular. Don’t cut up ALL your lace – this is just an experimentation stage, to practice rearranging the design.
Using a template of your desired shape (I made mine digitally, but you can hand draw one too) practice arranging your pieces until you find a design that suits your needs. This is not my final design in the picture – I went through several versions before I was totally happy with how it looked. You might discover that you need more lace, which is why planning and experimentation are so important. When you’re satisfied with how it looks, it’s time to start putting it all together.
You’ll need an embroidery hoop large enough to cover your whole template, plus some netting that is as close to transparent as you can find. Most generic tulle is NOT fine enough to do well with this technique – the holes are too large and the tulle stretches too much when handled. Look for netting that does not stretch or fray, if possible. Put some netting in your embroidery hoop, tightening the surface like a drum. I taped my template to a small sheet of masonite to give myself a portable work surface. I also ended up using clamps to hold the embroidery hoop to the masonite, but forgot to get a picture. This is optional, but really helps the design from shifting too much as you work.
Tools for the next step: fabric glue (other brands work too), a small paintbrush, and a water cup. I watered my glue down a little to make it easier to spread with the paintbrush. Be careful not to add TOO much water, or your glue will be too thin, not grip well, and take a long time to dry.
Working in small sections, begin gluing your lace pieces onto the netting. Start at the center and work outward, if possible. Continue until all your lace pieces are glued onto the netting.
Here’s what mine looked like with all the lace attached! At this point, I flipped the embroidery hoop over and applied a second coat of glue over the entire back of the work. The netting is so thin that you can continue to apply more glue from the backside to get a more secure grip.
Optional: add rhinestones to taste. I used E6000 for this step. Not every applique requires rhinestones, but in this case I wanted Zelda to sparkle as much as possible.
Repeat to create as many appliques as you need! Zelda has 8 along the bottom of her dress. Here’s part of my assembly line.
When you’re ready to attach the applique to your fashion fabric, trim away some of the netting along the outside, but leave any “interior” portions that help stabilize the design. I simply glued my appliques onto the silk, but I later went back and hand-stitched them down for a more secure hold. After they are properly attached to your fabric, you can VERY CAREFULLY trim away the “interior” pockets of plain netting using small scissors.
The final look of my gown, after all the appliques and trim were attached.
This method is very time consuming and requires a lot of patience and concentration – but I just love the results! I wanted to achieve the look of professionally-made applique, but without access to industrial equipment, this was the next best thing I could come up with.
The white-on-white effect is subtle, but matches the look I was going for. Photo by Vontography.
I hope this is helpful to some of you in your own costume projects. Let me know if you have any questions, and good luck!
Since, I’m currently working on a cosplay of Sebastian Vael in Chantry robes, I had to break down the confusing layers of this costume. I thought, I might as well share with you all, in case someone else planned a similar costume. Especially since part of the chantry robes are similar with the templar uniforms in Kirkwall.
I simplified certain parts for the sake of saving Material and also, because I’m going to wear this in June, when it will be friggin hot in those layers. I also used my own bodytype for this reference-sheet. So it isn’t quite as broad-shouldered, as Sebastian himself looks in those robes. Under the cut, I put the pictures of each layer over another and explain a little bit something.
I hope it can be useful for some of you!
Likeif you found it useful. Reblog, if you want to share it with friends. ;)
What It Is: NYX Jumbo Eye Pencils are creamy, super pigmented eyeshadow sticks that can be used anywhere on the eye. "Milk" is a creamy matte bright white that is opaque and very smooth.
Why It’s Awesome: Apply this all over your eyelid and then apply your eyeshadow over top for SUPER bright color. White bases help your eyeshadow really pop, no matter what color. You could also apply this to your waterline (it shows up really well and lasts a long time) to make your eyes look bigger and more awake. Apply a small amount just under the arch of your eyebrow and blend with your finger to create the perfect matte highlight.
Splurge: NYX Jumbo Eye Pencils cost $5 and are dupes of Stila Smudge Crayons
——————————————————–
2. Maybelline Lasting Drama Gel Eyeliner
What It Is: Gel eyeliner is easy to apply, like a pencil, but has the same look and texture of a liquid. Maybelline Lasting Drama is inexpensive, soft and dark, and doesn’t smudge or budge all over your eyelid.
Why It’s Awesome: You can use gel eyeliner to create any eye look… wing it out thick or thin, add an extra wing, apply it to your waterline, or create intricate designs. You can also blend it easily to get the perfect, easy sultry smoky eye! Apply it as a base on your eyelid underneath dark eyeshadows to make them look extra lush.
Splurge: Maybelline Lasting Drama Gel Liner costs $6 and is a dupe of MAC Fluidline and Bobbi Brown Longwear Gel Eyeliner
——————————————————
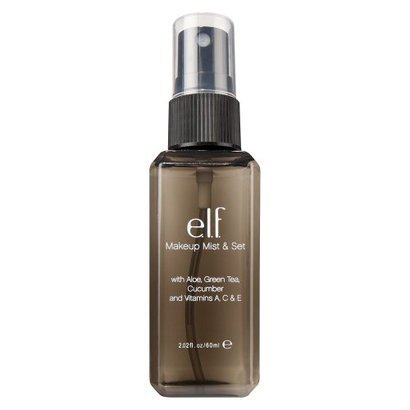
3. ELF Makeup Mist & Set
What It Is: Setting sprays are spritzed on your face lightly before or after makeup application.
Why It’s Awesome: ELF Mist & Set contains skin refreshing ingredients like aloe, green tea, and vitamin C. Apply it before your makeup to help foundation blend easier, or spray it on after you’ve applied your makeup to set it and remove any powdery or cakey texture. Mist & Set is also a great pick-me-up throughout the day if your makeup starts to look dull. Keep it in your fridge during hot days and use it whenever you’re feeling steamy!
Splurge: ELF Makeup Mist & Set costs $3 and is a dupe of MAC Fix+ and Model In A Bottle Original Spray
—————————————————-
4. Milk of Magnesia
What It Is: Milk of Magnesia is a liquid saline-based medical supplement that can also be used as a primer for people with oily skin.
Why It’s Awesome: If you have skin that gets severely greasy throughout the day, applying milk of magnesia underneath your makeup can help control oil all day. This creates a perfectly matte finish and lasts for the whole day. Just apply it with a cotton pad to the areas on your skin where you get shiny, and then do your usual makeup routine. It has even helped some people with acne.
Splurge: Milk of Magnesia costs about $3 and could be a replacement for Smashbox Anti-Shine
——————————————————–
5. Hard Candy Baked Bronzer in Tiki
What It Is: This baked bronzer is shimmery and easy to blend. It can be used anywhere on the face or body.
Why It’s Awesome: Although it looks a bit dark in this picture, Tiki actually is a very light golden color that makes the perfect highlight for any skin tone. It blends flawlessly onto the skin and isn’t glittery or sparkly… it just catches light effortlessly and gives your whole face a flattering glow. Use it on your cheekbones, browbones, forehead, cupids bow, chin and the bridge of your nose to get the perfect highlight.
Splurge: Hard Candy So Baked Bronzer costs $9 and is a dupe of MAC MSF in Soft & Gentle
——————————————————–
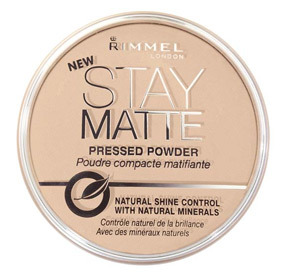
6. Rimmel Stay Matte Pressed Powder in Translucent
What It Is: This pressed powder helps control shine without looking powdery. It gives a gorgeous satin matte finish that flatters your skin. The translucent shade is colorless and works for most skin tones.
Why It’s Awesome: Pressed powder isn’t specifically for your oily nose - you can use it for so many things. Apply a bit with a concealer brush over your lipstick to help it last longer and give it a sexy matte finish; use it to set your concealer; gently pat it over your filled-in brows to keep the color in place.
Splurge: Rimmel Stay Matte Pressed Powder costs $4 and is a dupe of Laura Mercier Pressed Powder and Bobbi Brown Sheer Finish Pressed Powder
——————————————————
7. Wet n Wild Color Icon Lip Pencils
What It Is: An inexpensive pencil that provides a smudgeproof matte finish
Why It’s Awesome: Lip liner is SO not old school! Lip liner is normally used to create a perfect clean line on your lips and to keep your lipstick from feathering, but it has many uses. Apply it all over your lips as a base to create perfect, long lasting lips; use a contrasting color on the outer corners and blend it in with lipstick to partake in the super trendy ombre lip look. Using a slightly darker shade of liner around the outer part of your lips will make your lips look more full and plump.
Splurge: Wet n Wild Color Icon Lip Liner costs $1 and is a dupe of Illamasqua Medium Pencils
————————————————-
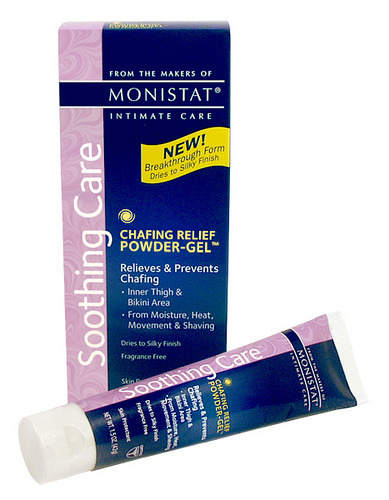
8. Monistat Soothing Care Powder Gel
What It Is: Monistat Gel is a silicone-based skin product that can be used as a makeup primer.
Why It’s Awesome: Much cheaper and more available than most primers, this can be used all over your face or on your T-Zone to create a smoother surface for makeup to adhere to. Because it’s silicone based, it will fill in fine lines and enlarged pores, smooth over dry skin patches and help your foundation give you more coverage. It dries to a powdery finish so it won’t make you greasy or shiny. It also contains fewer useless ingredients, fragrances and dyes than most makeup primers!
Splurge: Monistat Soothing Care Powder Gel costs $5 and could be used in place of Benefit PoreFessional
————————————————-
If you represent a company who would like to see your product reviewed by DrugstorePrincess, please visit our PR ContactPage!
I used cricut everyday iron-on vinyl with a cricut explore air 2, although I’m sure any other vinyl cutter would work. for scaling the images on the cutting mat, I think the anarchy symbol was about 4 inches and I based everything around of that. I couldn’t find any clear images of his right sleeve, so I just made it a battery shape to be more interesting. for the base I used a dickies short-sleeve coverall, which I find to have a bit of a higher waistband and is a darker blue than I would have liked, but gets the job done well. enjoy ❤️