#blender


Likeness study of Lady Gaga made in ZBrush and Blender. Based on her look in the video for ‘Marry the Night’. Happy 10th anniversary of Born This Way!
Post link


Coffeemakers, what is stopping you from looking like the Braun KF-20?
More prop models from the past week
Post link


I’m a basic Blender bitch.


Calorie Burn info @ Search the most effective & affordable workout programs on the web @ Free workout app with over 500 free workout videos like this one: iOs @ Android @ Find us on Facebook: FB on Instagram @ Google+ @ twitter @ Pinterest @ Note: All information provided by Fitness Blender is
Read more at http://www.reddit.com/r/gethealthguide/comments/4s5sa3/fat_burn_details_explore_one_of_the_most_cost/


I made another demo. This one adds some customization to the character, new animations, and slightly better proportions. Most of the controls are still the same. Press X and Z to scroll through animations.
http://www.mediafire.com/file/ci42l9ccvpdy7ap/release1-2.7z
Sorry about background audio. I’d record again but I bet my vimeo account gets banned again anyway.
Enjoy :)
PS:
I made a slight update with a 32 bit version that might work if you’re having crashing problems. Send me a pm or message me on reddit with more details on errors, what you’re seeing, or feedback https://www.reddit.com/user/happiest_tree_friend/
http://www.mediafire.com/file/wcnli94sco22x9f/release1-2_-2_32X.7z
http://www.mediafire.com/file/mpa2drzygedbw3y/release_1_-_2_-_2.7z
Since posting the 4T2 Curator’s Cabinet, which has a whole bunch of slots, I’ve had a few questions about how to know where to place the slots, so I thought I’d write up a blog post.
This is not a tutorial for how to add slots to an object in SimPE. For that, I’d recommend @hugelunatic‘sAdding Slots tutorial. This is to help you decide what coordinates to use when adjusting the position of slots in the CRES.
For this tutorial, I’m going to use Blender.
1. Open the object you’d like to add slots to in Blender. You can open a .obj file by creating a new ‘general’ project, then going to File > Import > Wavefront (.obj).
2. Open the Modelling tab at the top of the screen.
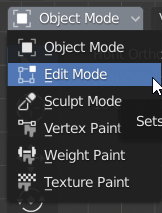
3. Click on the object in the main viewport to select it. In the top left corner, switch from Object Mode to Edit Mode.
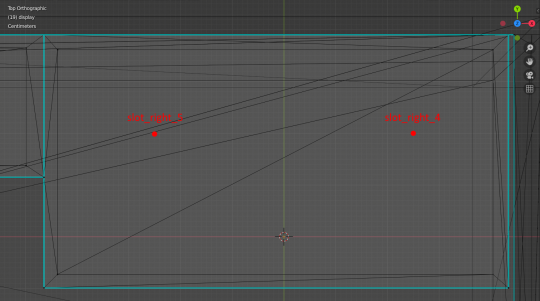
4. In the top right corner of the viewport, click the ‘Z’ marker on the gizmo to put you in top-down orthographic view. Turn on X-ray (the two overlaid squares) and wireframe shading (the sphere with grid lines). You should have something that looks like this when you’re done:
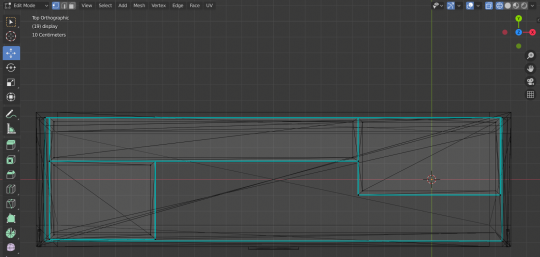
5. From here, you can determine the x and y coordinates of your slots.
In the top left corner of the screenshot above, you can see that at the current level of zoom, each square on the grid is 10cm. You can zoom in closer and single centimetre squares will appear, so you can be more precise.
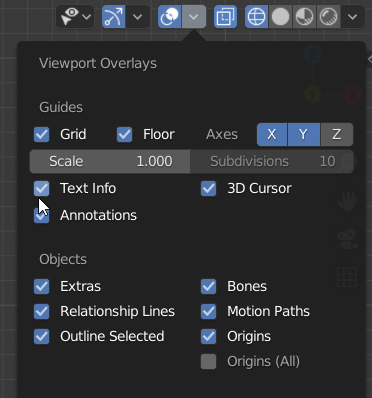
If you can’t see the text in the top left that tells you the scale, then in the top right hand corner, click the arrow on the overlays button (the one with two overlapping circles) and make sure that text info is ticked.
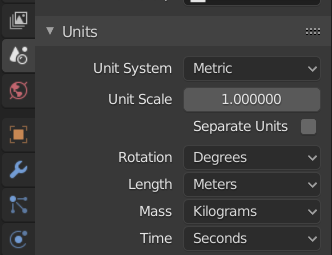
If you have text info on but there are no measurements, then in the sidebar on the right, click the Scene Settings tab (the white one with the cone and the sphere). Open up the Units section and select metric from the drop-down menu.
To decide where to place the slots, I found it helpful to take a screenshot and put a dot where I wanted the centre of each slot to go.
The origin point is (0,0,0). By default, this is the centre of the lead tile, on the ground.
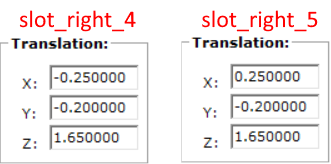
In SimPE, the coordinates are set in metres and the axes are backwards. If you are facing the object:
- X axis - Left is positive. Right is negative.
- Y axis - Towards the camera (or down in this top-down view) is positive. Backwards (or up in this top-down view) is negative.
For example, here are two of the slots in the cabinet, shown on the grid and in the CRES in SimPE.
6. To get the Z axis, click the bottom yellow circle of the gizmo to bring you into front orthographic view. Again, you can zoom in closer to get a more precise grid. For the Z axis, positive is up and negative is down (nice and simple).
I hope this was helpful!


")
")
")
")