Fabric balls make for great toysand can be used for stimming, too. You can make them in any size and out of pretty much any fabric you’ve got lying around.
Check out this tutorial by Heather Handmade to see how to sew your own ball.
(Image source) [ID: a hand holding a ball made out of green fabric and white fabric with an apricot print.]
I’ve got this ramie dress that doesn’t really suit me. It fits, but the shouldersare too wide and the skirtpart looks weird on me. I usually wear skirts with a lot of volume because skirts without it look wonky because of my scoliosis.
The fabric’s lovely though, so I decided to rework it into a shirt.
The project:
The dress is made out of a woven fabric. It has no closures and is meant to slip over your head. The short sleevesand rounded collarhave been shaped with pleats. It came with a sashto be worn around the hips, which I forgot to photograph.
[ID: a light brown ramie dress hanging from a wooden hanger in front of a white background. The dress has short sleeves and a round pleated collar.]
I indicated my waistandhipson the dress with a chalk line, then drew a third line about 5cm below the hips to serve as seam allowance.
Icut off the bottom of the dress at the third line.
[ID: a light brown dress lying on a black and white chequered floor. Three horizontal pink lines have been drawn on it with chalk: one at the waist, one at the hips, and one 5cm below the hips.]
Theshoulderswere slightly too wide for me, so I used a small pleatsimilar to the ones used at the neckline and sleeves to make them smaller. This made the top much more flattering on me. I also hemmed the bottom edge.
[ID: a light brown dress lying on a black and white chequered floor. The skirt part has been cut off right below the hips.]
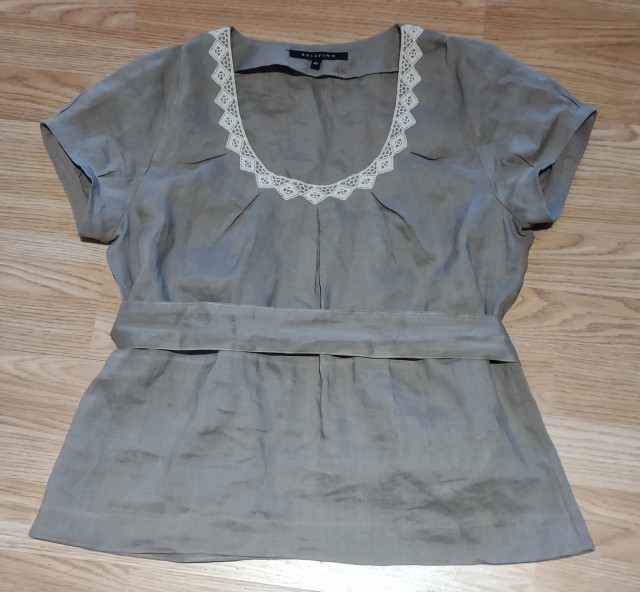
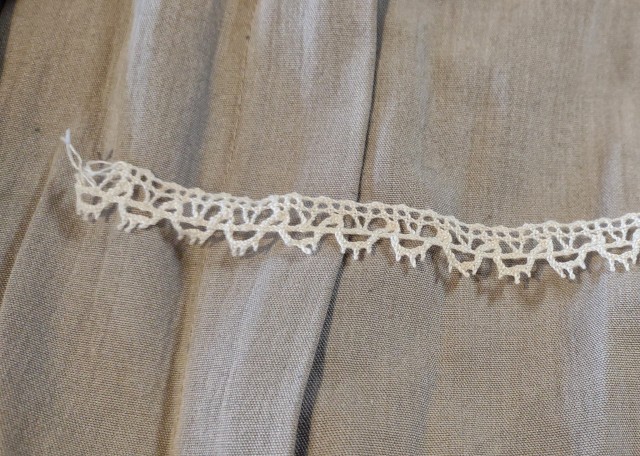
I put the project aside for a while to think about embellishmentsas the top was rather plain, and ended up settling for a lace trim at the neckline.
I recently received a parcel of leftover lace from a fellow sewist who was clearing out their stash, and found the perfect beige lace trim. The colourwas lighter than the original fabric, but complimentedit well. I had just the right amount for this project.
If you’re looking for cheap/free notions, do as I do and look around in buy-nothing groups and on second-hand sites. You’d be surprised what you’d find. This particular parcel cost me €15 and contained almost a kilo of high quality lace. It’s a win-win situation: the seller got some of their money back, I have enough lace to last me ages, and these trims actually get used instead of thrown away.
[ID: a light brown shirt lying on a wooden floor. The bottom edge has been hemmed, and beige pointy lace has been sewn around the rounded collar.]
I still had the original sash from the dress. I was considering sewing it onto the top at fist, but I decided to keep it separate. That way, I can both cinch the top at the waist or keep it loose and tuck it into high-waisted pants or a skirt.
[ID: a light brown shirt lying on a wooden floor. The bottom edge has been hemmed, and beige pointy lace has been sewn around the rounded collar. A sash lies on top of the waist of the top and has been tucked underneath the top.]
All done! All it needs now is a good washto get rid of the chalk lines.
Theexcess fabric is now in my sewing stash: it’s great quality, so I’m sure I’ll find some use for it.
Conclusion:
There was nothing wrong with the original dress, but I just didn’t wear it because I didn’t like how it looked on me. Instead, I now have a topthat flatters me and goes well with the rest of my wardrobe. It’ll get much more use this way.
Looking for a nice way to hem sheer,slippery fabrics like silk or chiffon? A rolled hem makes for a neat finish. It looks neatand is surprisingly easyto do!
(Image source) [ID: close-up of a white thin fabric. The raw upper edge is in progress of being hemmed with a rolled hem, sewn by hand. Text: “Sewing. Rolled Hem Tutorial. Retro Claude.”]
Fibre crafts are very labour-intensive. This is why crocheted/hand-knitted items by indie designers are priced the way they are: you’re notjust paying forthe materials. You’re also paying for the hours that were needed to design and make the item. Even if the designer were to price those hours at minimum wage, they still add up.
Fast fashion strives to manufacture items as cheaply as possible. A lot of different things make up the final priceyou pay at a shop, such as design, materials, shipping, packaging, marketing,… Labouris only a fraction of that price, and garment workers rarely get paid a living wage as to keep the prices down.
Take this seven part TikTok breakdown of a crocheted Target bikini top by Drea’s Hook, for example. After replicating part of the top, she estimates it would take about 3 hours to crochet the full item by hand (and it was crocheted by hand). That doesn’t even account for the materials, the labour needed to sew the lining and the tag, the design, shipping, stock photos,… Yet it only costs $22. If the person who crocheted the top was paidat all, it can hardly have been more than a few cents.
Stolen designs:
On top of labour exploitation, there’s been multiple scandals regarding fast fashion brands stealing designs by independent crochet artists such as Knots & VibesorLoupystudio, among others.
Design theft not only profits off the work done by the original designer withoutany form of compensation in return, it also devaluesthe work needed to make an item.
Theaverage person doesn’t know how much work goes into making clothes. When fast fashion brands knock off original designs and sell them for a fraction of the price, it propagates the idea that the original item was priced unfairly. After all, why would someone charge €250 for a sweater when you can buy a similar one for €15 at H&M? This way, the industrykeeps getting away with exploitingits workers while indie designers struggle to get by.
Caneveryoneafford to pay that €250? No, of course not. Even that €15 sweater can be a big financial hit if you’re on a budget, and we all need clothes to keep us warm in winter. But practical issues aside, I think we can all agree that everyone deserves fair compensation for their work.
Conclusion:
People often assumetheir clothes have been made by machines. This is a logical assumption given the average fast fashion price tag, but unfortunately it’s a wrongone.
Sure, we’ve got sewing and knitting machines and all other kinds of mechanical helps, but someone still has to work those machines. When an item has to be made by hand, like crochet, it will take longer. If the price tag doesn’t reflect this extra labour, then neither will the worker’s wage.
This blog will never shame anyone for buying fast fashion. Even if you’re aware of the problems within the industry, there’s plenty of valid reasons why quitting just isn’t an option for most of us. We’re stuck in a broken system that we cannot change overnight, and not everyone has access to alternatives.
That doesn’t mean we can’t chip away at it.Educating yourself about these issues is a big first step. It makes us more conscious about the clothes we wear and the labour and resources that went into making them, which in turn motivates us to take action. If more people were aware of these problems, the industry would be much less likely to get away with them.
Remember when I asked for good crochet resources for beginners a while ago? You’ve all been amazing! I found a lot of good tutorials thanks to all of your replies.
I’ve been slowly working my way through the basic crochet stitches. I had a hard time turning off my knitter’s brain at first, but I think I’ve finally gotten around to how crochet works and am now making steady progress.
Neurodiversity and new skills:
Neurodiversitycan make picking up skills like these a difficultprogress for me. I’ll get hyperfixated on learning something new thanks to my ADHD, but when my dyspraxiamakes things difficult I’ll drop it like a brick. I’ll then feel like a failure for having dropped it, but can’t get myself to try again because my executive functioning regarding the skill I was trying to learn just gets worse the longer I wait.
I wanted to share these difficulties because I know how isolatingit can be when you’re trying to learn something new and your experiences don’t match up with those of others. This can be a huge barrier to picking up new skills, and deserves more attention. If any of this sounds familiar, know that you’re not alone.
After years of repeating this cycle, I know how to recognise it and how to deal with it when it happens. I take things slow and put my project asidewhen it gets frustrating, but make sure to pick it up again later once I’ve calmed down. I try to learn from my mistakes, but also celebrate my successesno matter how small. I switch learning methods when something doesn’t work for me, make sure to use sensory-friendly materials, and keep remindersaround of how far I’ve come for when I feel down about my progress. I also constantly remind myself of the fact that being able to see the mistakes I’ve made is not a sign of failure but one of progress. Spotting mistakes used to drain my motivation but has become something that makes me feel good about myself over time, because being able to identify them means my skills have improved.
Most of my practice samples up until recently were tangled messes. I froggedthem so I could reuse the yarn to try again. I’ve now gotten to a point where I can take some pride in the fact that I’ve got the bare basics of crochet down. I’ve kept my most recent samples instead of frogging them: they’re far from perfect, but that’s exactly why I want to keep them. I will store them in a box so I can look at them in the future, cringe a little, feel pride over the fact that I stuck with it, and appreciate the progress I’ve made since.
[ID: seven wonky crochet samples made in red yarn. Four samples were made in single crochet, half double crochet, double crochet, and treble crochet. The other samples are a flower, a granny square, and a square consisting of filet stitches.]
Here’s a fun little stash buster while you’re waiting for your next Dracula Daily mail: a crocheted bat appliqué, designed by Damnit Janet, let’s crochet.
Smallappliqués like these are a neat way to cover holes in knitwear, to make accessories, or to decorate clotheswith.
(Image source) [ID: two small crocheted bats lying on a gray background. One bat is black and has black wings while the other bat is brown with black wings. Both have large, cartoony eyes made of white felt. Text: “Damn it Janet, let’s crochet! http://damnitjanetletscrochet.blogspot.com/”.]
I’ve had this old pair of high-waisted shorts for years. While I love them, I don’t nearly wear them as much as I’d like because they’re rather plaincompared to the rest of my wardrobe.
My closet has a lot of frilly lacy things these days, so I figured it was time to update these shorts to make them match the rest of my clothes better.
The project:
This project was simple: I just looked through my lace stash for a trim that would be a good match to my shorts, decided on the placement, and sewedit on.
[ID: a pair of beige high-waisted shorts lying on a wooden floor.]
[ID: an end of off-white cotton lace lying on top of beige fabric.]
[ID: a pair of beige high-waisted shorts lying on a wooden floor. Off-white lace has been sewn along the pockets, the edges of the legs, and the sides near the shirred parts of the waistband.]
Conclusion:
If you’ve got clothes you love but never wear, ask yourself why. Sometimes the solution can be as simple as embellishingthe item to fit your styleagain.
All I did was add some lace to these shorts to make them feel brand new and to make them easier to combine with the rest of my wardrobe.
Projects like these are why I never throw out lace. Aesthetically speaking, it’s not everyone’s cup of tea. But if you like it, it makes for a veryversatile tool to update clothesandhide imperfectionswith.
Knowing how to knit buttonholes always comes in handy.
This article by Lovecrafts will show you five different ways to knit a buttonhole, including the yarn-over buttonhole, the double yarn-over buttonhole, the single row buttonhole, the no-buttonhole buttonhole, and the afterthought buttonhole.
“I’ve got a tip for your readers! If you must purchase new fabric to mend something, a cheap way to get it is to look at the remnants bin in the local fabric store! Both chain and independent stores tend to have them. Remnants are the last bit of the bolt that’s left over after other fabric is cut. It’s usually not enough to make a whole garment, but plenty for patches and panels to add pizazz to your mending! (Just mind the fiber content, and always pre-wash new fabric before using.)”
I try to thrift my fabric whenever possible, but whenever I do buy new fabric I always check the remnants pile at my local fabric store. Remnants are usually sold at a discount, so they’re a great source of cheap fabric if you only need small amounts.
Visible mending is a decorativeway to fix up an item. Instead of trying to make your mend as invisible as possible, the idea is to make it part of the garment’s design.
Visual mending is not a single technique: it’s more of a mindset. If you’ve got an item you love, it deserves to be mended, and if you’re going to put that love into stitches, why not show them off?
That being said, there are some specific techniques that are popularwith visible menders. Let’s take a look!
Sashiko:
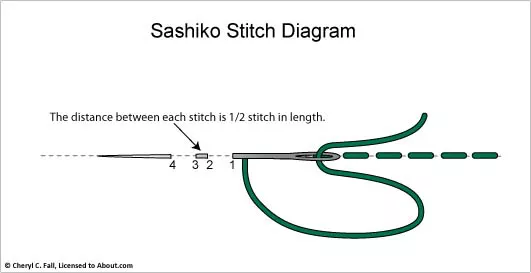
Sashiko is a type of traditional Japanese embroidery that is used to both decorateandreinforcefabric. In visible mending, sashiko is often used to cover up holes with patches or to reinforce thinning fabric. This technique uses a variation on the running stitch.
(Image source) [ID: sashiko stitch diagram: the distance between each stitch is ½ stitch in length.]
Someresourceson sashiko:
SashiCo on YouTube: sashiko livestreams and information on the cultural aspect of sashiko.
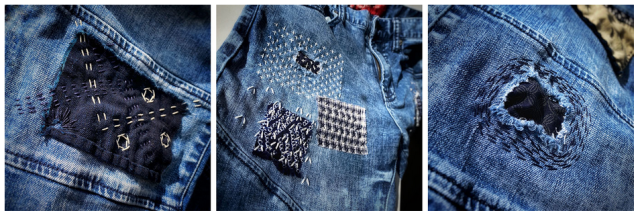
(Image source) [ID: three examples of sashiko embroidery on jeans fabric.]
(Image source) [ID: sashiko embroidery with white thread on blue jeans fabric.]
Embroidery:
Regularembroideryis also a popular technique to accentuateyour mends. Check out my embroidery 101 post to learn how to get started. You can embroider patches, or use embroidery to hide or accentuateany stitches you’ve made to fix holes. Embroidery’s also a great way to cover up stains.
(Image source) [ID: colourful embroidery floss covers a worn sleeve edge of a jeans jacket]
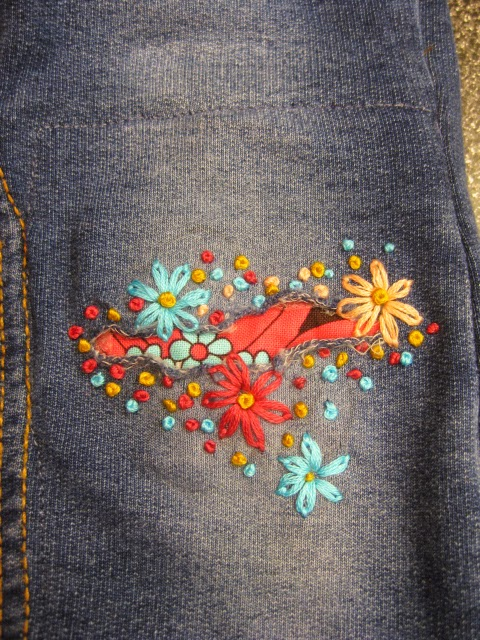
(Image source) [ID: colourful flower embroidery surrounds a hole in a pair of dark gray jeans. Fabric with a red and black flower print peaks out of the hole.]
Patches:
There are many ways to add patchesto a garment. My tutorial on patches is a good place to start if you want to make custom-shapedpatches to sew on top of your fabric. You can also sew your patch on the insideof your garment and have it peek out from beneath the hole you’re trying to fix. Fun ideas for this are laceorsuperheroes.
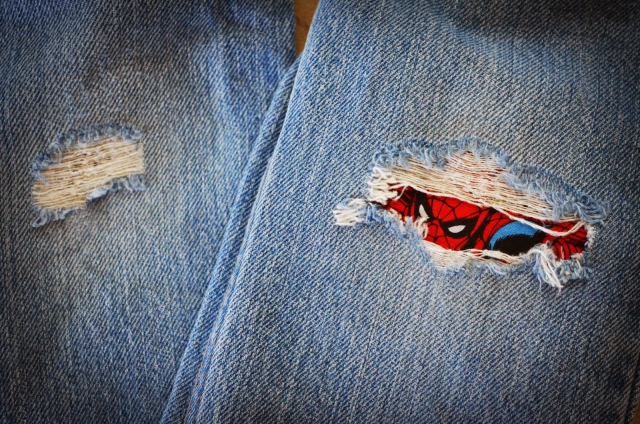
(Image source) [ID: Spiderman peaking out of a rip in a pair of blue jeans.]
(Source) [ID: a red flannel heart-shaped elbow patch on a gray knitted sweater.]
Darning:
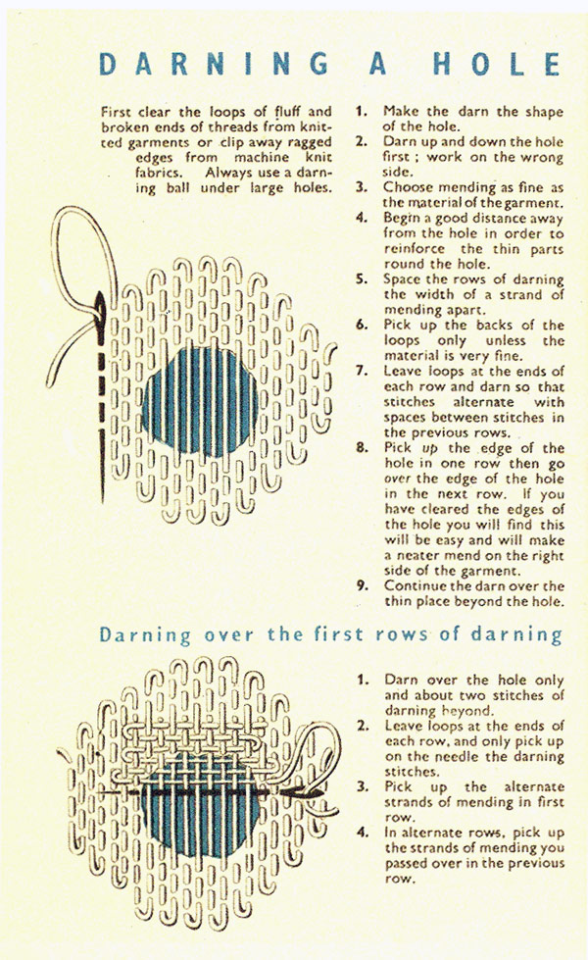
Darning is a technique used to repair holes in fabric by using running stitchestoweaveextra fabric over the hole as to fill it up again. While traditionally darning is done in an invisibleway by using the same colour of thread as your fabric, you can also use contrastingcolours to accentuate your fix. Check out this written tutorial on darning by TheSpruceCrafts.
(Image source) [ID: vintage instructions on how to darn a hole.]
(Image source) [ID: four examples of darning on blue fabric with colourful contrasting thread.]
Conclusion:
Visible mending is a creative way to fix up your clothes and give them some personality at the same time.
You should be proudof the fact that you took the time and learned the necessary skills needed to mend your clothes! Show off what you did!
A fun side effect of wearing these obvious mends is that people will notice them. They’ll remember your fixes the next time they’re faced with a hole in their wardrobe, and it will make them more likely to try it for themselves.
These are just a few ways to visibly mend your garments. Want more inspiration? Check out Pinterestorr/Visiblemending on Reddit.