#mechanical


This one was fun to build. It is an ultra-tiny robot workshop with a man hard at work building and repairing robots. It is made almost exclusively from tiny watch parts. Some of the features, such as the tools on the table, are a little hard to discern. I took most of the pictures without the glass but the final piece is closed with a piece of glass on the front. Enjoy!
Available at my Etsy shop:
www.etsy.com/shop/MicroJewellery
Post link
Well I’m sitting in hospital unexpectedly - nothing too serious. I was going to post this last night but I was in too much pain.
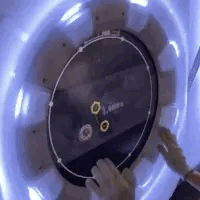
So this is a proof of concept. The word “magical” is used far too much but that was my ambition. Something of unknown use and unknown provenance.
Proof of concept is the build I make all the mistakes on - motor too fast, planets too large and high, LEDs wiring wrong and ugly battery packs. Internally this might not be saleable quality.
The video isn’t great, sorry. When I get home I will take some still photos of all the decorations and detail. It was inspired by those magnetic ballerina jewellery boxes from the 1960s. She would dance around a mirror when the box was opened.
I initially covered the neodymium magnets and attached the planet on a post. Wrong. They fell down, stuck to each other with such force they ended up broken. So I’ve gone for simple using the magnetic force to hold the metal spheres. I will include several spare magnets and planets.
I hope you like it!
Steampunk


Still playing with my little LED lights and tritium. I found these great paracord beads - expensive but totally worth the money. Beautifully turned brass with “windows” - three vertical holes interspersed with a long window around the whole bead. I sealed the holes and poured resin into the center and embedded the LED leaving the connector post exposed so the battery pack “clutch” can turn on the light.
The top photos are “BlueBot” with a domed cap making him look a little like a certain famous robot that I can’t mention because I don’t want a trademark strike. It can be worn without the battery pack and brass ring. Unfortunately the photos make the light seem much brighter than it is in reality. It just gives off a blue glow.
The middle photos are a design I wanted to revisit with a blue tritium stick in a glass vial and silver tone sleeve. Very cyberpunk. I combined it with a horizontal post hanger with mechanical bits and pieces.
Final piece is a little “Green rocket”. The top has a small silver tone stepped cap on top and serrated exhaust funnel over the battery pack. It can also be worn without the battery pack. Again, the photos don’t convey the light well. It gives off more of a green glow and isn’t that bright in reality.
The LED necklaces are on long chains to be worn mid length. The battery packs are very secure and the batteries can be replaced easily. I’ll list them in my Etsy shop. Etsy doesn’t let me sell tritium (I don’t agree with it but their sandpit - their rules) so if you are interested buying it - drop me a PM. It’s US$125 including shipping/tracking from Australia.
Post link


The Detector
I’ve been overdosing on documentaries about CERN, the Large Hadron Collider, quantum physics/mechanics and proof of the Higgs Boson. As a science illiterate it fascinates me. That massive tube full of magnets, cameras, detectors and liquid nitrogen is an incredible instrument. Simply awe inspiring. These docos play in the background in my studio and I would occasionally look up to see the massive size and complexity of the machine.
This started with simple flat brass rings with eight holes and some rescued snake chain I cut into eight lengths. This design wasn’t thought out - I just had to wing it. I vaguely wanted a “cage” to hold a glass vial with a Tritium vial in it. Etsy doesn’t like Tritium (their sandpit - their rules) so I sell those pieces off Etsy. It basically glows without the need for a charge - it glows constantly for 10 to 15 years. But I’ve been working with UV resin and recently purchased some tiny LEDS. So I set an orange LED into a gold tone cord cap with UV resin. Then I put a glass tube into the cap and slowly poured resin into the tube stirring it frantically to produce air bubbles. Normally I’m fighting against air bubbles in resin so trying to form and quickly cure them was surprisingly difficult. I didn’t even know if the LED and electronics was going to work after pouring resin on them. The light refracts and diffuses on the bubbles. I was thrilled when it all worked.
Once I had brass beads on the end of each chain length I threaded a range of beads, pinions, tubing and 5 brass rings to stabilize the tube. I still had no idea if the vial would fit through the middle and how I was going to attach it to the structure. This is where the magic often happens - it fit like it was designed with precision. To fasten it within the tube all I had to do was slide another cap on the top of the glass vial and seal it with a screw.
As you can see - when unlit there is a small silver tube, slightly hidden by the brass tassel. To turn the light on - insert that tube into the battery pack - a tiny silver tone tube with a central hole (3/8 x ¼ inch). Once inserted it turns the LED on. Batteries can be replaced easily by unscrewing the cap.
During the day - it’s an unusual mecha deco design - at night with the light - the wow factor.
It sort of looks like a little mechanical cephalopod with those 8 tassel “legs”. I’ve designed this to be worn low on the body - Gatsby length with a long chain. It’s hitched high on the display bust just to show scale and fit it into the photo. If you want it to be higher - I’m happy to alter the chain length.
Post link

I can now post another commission “Heart” 8x10 inches, acrylic on panel. Maybe I should patent a fish firing food gun.
Post link


")
")
")
")


What better way to celebrate the launch of Quinn the Fox’s new website than to release a print series dedicated to starting again.
The series contains 3 prints, “How to Rebuild a Heart”, “How to See with New Eyes” and “How to Open your Ears”. Each print is illustrated as a mechanical drawing and in a typically oddball, Quinn the Fox manner, the prints attempt to explain how certain idioms relating to the heart, eyes and ears came to be.
Available to purchase from quinnthefox.com
Post link
 guide in my “Rema")
Hope you’re ALL EARS for this announcement! Here is the third (and probably final) guide in my “Remake You and Me” series: “How to Open Your Ears”. Head on over to instagram to check out all of the idioms hidden in this illustration:
https://www.instagram.com/p/B_QFQBxB6cV/?utm_source=ig_web_button_share_sheet
Post link


 Stimboard ️")
 Stimboard ️")
 Stimboard ️")
 Stimboard ️")
 Stimboard ️")
 Stimboard ️")
 Stimboard ️")
 Stimboard ️")
 Stimboard ️")
 Stimboard ⚙️")
 Stimboard ⚙️")
 Stimboard ⚙️")
 Stimboard ⚙️")
 Stimboard ⚙️")
 Stimboard ⚙️")
 Stimboard ⚙️")
 Stimboard ⚙️")
 Stimboard ⚙️")


