if you’re planning on picking up any of my THREE 600 page sketchbooks in time for Christmas, you need to place your order IN THE NEXT 48 HOURS to guarantee delivery for the holidays! You can buy individual volumes, or THE ENTIRE TRILOGYRIGHT HERE!
fucked up how cooking and baking from scratch is viewed as a luxury…..like baking a loaf of bread or whatever is seen as something that only people with money/time can do. I’m not sure why capitalism decided to sell us the idea that we can’t make our own damn food bc it’s a special expensive thing that’s exclusive to wealthy retirees but it’s stupid as hell and it makes me angry
bread takes like max 4 ingredients counting water and sure it takes a couple hours but 80% of that is just waiting around while it does the thing and you can do other things while it’s rising/baking plus im not gonna say baking cured my depression bc it didn’t but man is it hard to feel down when you’re eating slices of fresh bread you just made yourself. feels like everything’s gonna be a little more ok than you thought. it’s good.
bread is amazing and it’s also been sold to us as something really hard to make? Every time I tell someone I made a loaf of bread I get reactions like “you made it yourself???” and “do you have a bread machine then?” I haven’t touched a bread machine in probably 10 years. You CAN make your own bread, folks, and it’s actually pretty cheap to do so. I believe the most expensive thing I needed for it was the jar of yeast. It was about $6 at the grocery store and lasted me MONTHS (just keep it in the fridge.) The packets are even cheaper. destroy capitalism. bake your own bread.
You can also make your own yeast by making a sourdough starter, so that cuts cost even more.
But you have to feed the starter daily/weekly and that means it grows quickly, but there are tons of recipes online for what to do with your excess starter. Cookies, pretzels, crackers, pancakes, waffles, you name it!!
Make it even easier - “No-Knead Bread”. All YOU do is mix the ingredients together and wait until it’s time to heat the oven. The yeast does all the rest.
Here’s@dduane’sfirst take on itand the finished product. We’ve made even more photogenic batches since.
Kneading is easy as well; either let your machine do it, or if you don’t want to or don’t have one, get hands-on. It’s like mixing two colours of Plasticine to make a third. Flatten, stretch, fold, half-turn, repeat - it takes about 10 minutes - until the gloopy conglomeration of flour, yeast, salt and water that clings to your hands at the beginning, becomes a compact ball that doesn’t stick to things and feels silky-smooth.
Here’s what before and after look like.
My Mum used to say that if you were feeling out of sorts with someone, it was good to make bread because you could transfer your annoyance into kneading the dough REALLY WELL, and both you and the bread would be better for it.
Then you put it into a bowl, cover it with cling-film and let it rise until it doubles in size, turn it out and “knock it back” (more kneading, until it’s getting back to the size it started, this means there won’t be huge “is something living in here?” holes in the bread), put it into your loaf-tin or whatever - we’ve used a regular oblong tin, a rectangular Pullman tin with a lid, a small glass casserole, an earthenware chicken roaster…
You can even use a clean terracotta flowerpot.
Let the dough rise again until it’s high enough to look like an unbaked but otherwise real loaf, then pop it in the preheated oven. On average we give ours 180°C / 355°F for 45-50 minutes. YM (and oven) MV.
Here’s some of our bread…
Here’sour default bread recipe - it takes about 3-4 hours from flour jar to cutting board depending on climate (warmer is faster) most of which is rise time and baking; hands-on mixing, kneading and knocking-back is about 20 minutes, tops, and less if using a mixer.
Here ( or indeed any of the other pics) is the finished product. This one was given an egg-wash to make it look glossy and keep the poppy-seeds in place; mostly we don’t bother with that or the slash down the middle, but all the extras were intentional as a “ready for my close-up” glamour shot.
I think any shop would be happy to have something this good-looking on their shelf. We’re happy to have it on our table.
Even if your first attempts don’t work out quite as well as you hope, you can always make something like this…
can we have more posts like this in future please? this is really useful and could help those who are struggling
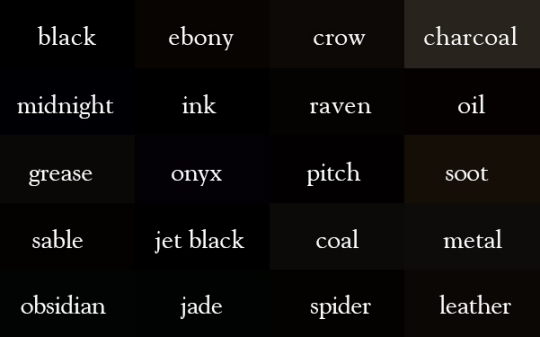
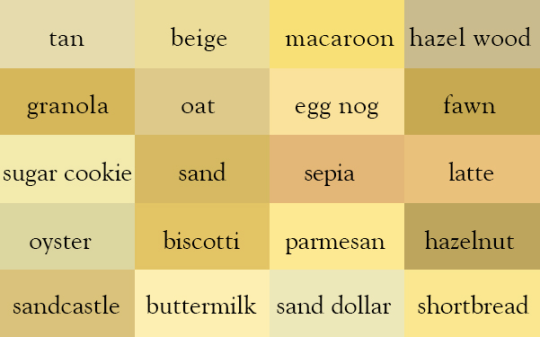
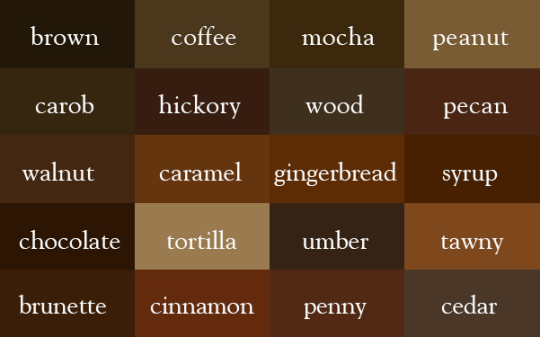
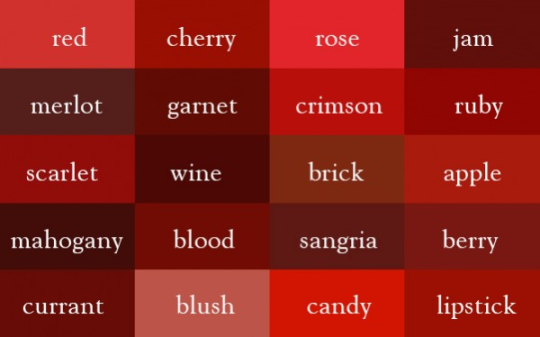
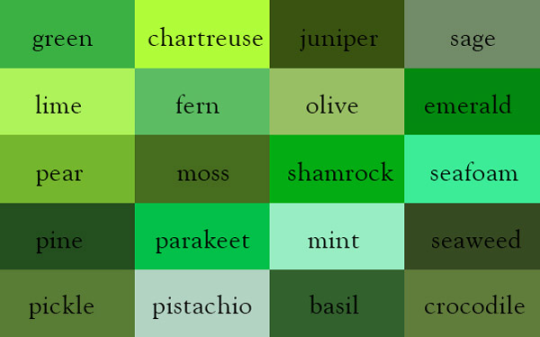
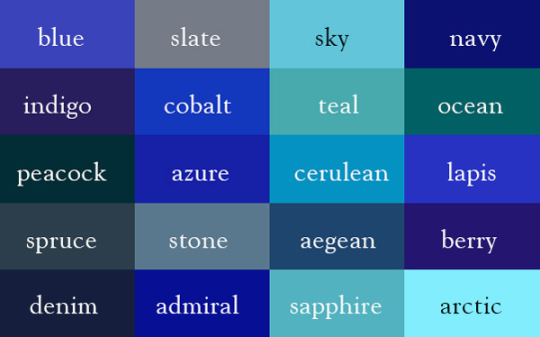
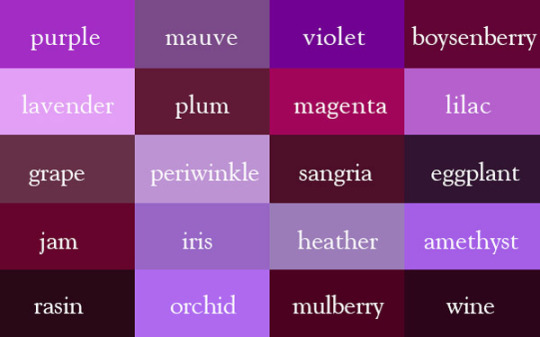
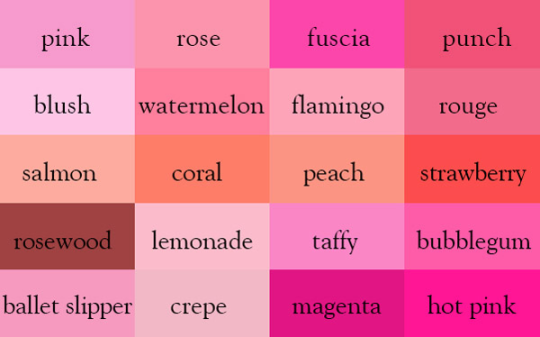
Said is NOT a bad word. ~75% of the time, it’s all you need. But here’s some alternative when you really need to spice up that dialogue!
Use sparingly for more impact - especiallythe more dramatic verbs.
Emotion and intent are complex! I tried to reduce redundancy as much as I could, but some words are simply going to be in multiple categories. i.e. “anger” and “loud” share a lot of words
This is a living document and will be updated whenever I think of new words.
Neutral
Acknowledged
Added
Announced
Answered
Articulated
Asserted
Assured / Reassured
Began
Breathed
Claimed
Commented
Continued
Decided
Declared
Delivered
Disclosed
Emphasized
Enunciated
Exaggerated
Exclaimed
Expressed
Guess
Implied
Mentioned
Offered
Proclaimed
Promised
Proposed
Read
Recalled
Remarked
Repeated
Responded
Retorted
Shared
Suggested
Told
Vowed
Happiness
Beamed
Cajoled
Cheered
Chimed
Chirped
Chuckled
Cooed
Enthused
Flirted
Giggled
Gushed
Hummed
Joked
Laughed
Marveled
Purred
Sang
Anger
Barked
Bellowed
Bit
Cackled
Chastised
Cursed
Fumed
Grated
Growled
Hissed
Howled
Huffed
Roared
Scolded
Snapped
Sneered
Spat
Taunted
Threatened
Fear / Sadness / Desperation
Begged
Choked (out)
Cried (out)
Croaked
Fretted
Gasped
Howled
Pleaded
Prayed
Sniffled
Sobbed
Wailed
Wept
Whimpered
Worried
Surprise / Embarrassment
Attempted
Babbled
Choked
Coughed
Croaked
Faltered
Shrieked
Sputtered
Squawked
Squeaked
Squealed
Stammered
Struggled
Stumbled
Stuttered
Disgust
Bit
Bitched
Complained
Condemned
Decried
Jeered
Mocked
Scoffed
Scoffed
Sneered
Snorted
Spat
Admiration / Awe
Praised
Admired
Marveled
Adored
Worshiped
Wondered
Agreement
Admitted
Agreed
Allowed
Approved
Conceded
Concurred
Concurred
Confirmed
Verified
Disagreement
Argued
Challenged
Contended
Denied
Differed
Dissented
Grumbled
Objected
Opposed
Protested
Protested
Revolted
Directive
Commanded
Demanded
Directed
Ordered
Pointed
Lying
Beguiled
Conned
Deceived
Duped
Evaded
Fibbed
Lied
Misinformed
Misled
Explanation
Clarified
Described
Elucidated
Explained
Expounded
Informed
Interpreted
Recounted
Simplified
Spelled (out)
Translated
Questioning
Asked
Demanded
Interrogated
Questioned
Queried
Requested
Quizzed
Investigated
Pressed (furtherorforas in for answers or for more)
Hiiiii welcome to my icon-making tutorial!! I really enjoy making icons, and I thought I’d share how I do it <3
This tutorial is not for beginners!! I don’t explain every step in detail. However, if you have a question about any concept within this tutorial, please don’t hesitate to send me an ask or a dm!! I am happy to help <3 /gen
For this tutorial, we’re going to be making the icon you see in the header.
i’ve been getting a lot of asks about my colouring process and requests for colouring tutorials, so i finally decided to make one! using a few gifs as examples, i’ll show you how i turn backgrounds into a vibrant colour. this tutorial assumes that you already know how to gif; we’re jumping right into the colouring!
(disclaimer: just keep in mind that this is what works for me, experimenting is the best way to learn what works for you ahshdgjg anyways, here we go, under the cut!)
Aside from extra art, streams, shop discounts, and early access to things like mini-comics, there’s a whole lot of downloadable content and art resources available.
For all Patrons ($1+) –
Wallpaper Library - full color art sized for various desktop and phone bg aspect ratios
Tutorials and Guides - the Hat tutorial, the Clothing Wrinkles tutorial and some notes about drawing with Rhythm and Flow
Emoji Set - a big pile of emojis and stickers sized for use with Discord, Slack and other platforms.
Character Designs Pack - Each and every character sheet from the animated film, including turnarounds, with expressions guide and height chart
For $2+ Patrons –
The Pitch Packet - the original illustrated pitch Fable Siegel, Ashley Green and I put together, and which ultimately lead to funding and producing the animated short film
Animation Previews - ongoing looks at progress on the animated film. Lots of stuff we haven’t shared publicly!
(There’s more, but this is getting absurdly long. Sorry for the extra tall post!)
When people ask “what do blind people see,” I often hear things like “literally nothing, they don’t see black because they literally can’t see.” And that’s true…for some blind people.
However, many legally blind people do have varying degrees of remaining vision. What that looks like depends a lot on why they are blind. For example, when asked to describe her vision in 2012, Christine Hà said it was “like if you take a really hot shower and then you look into the foggy bathroom mirror, where you only see vague shapes and shadows.” Christine was not born with this level of vision; she has Neuromyelitis Optica Spectrum Disorder, so she progressively lost vision later in life.
There is a wide range of answers to “what do blind people see,” so I wanted to provide just a few resources for people who are curious or want to write a blind character with some remaining vision. While looking up various conditions on medical sites is a good starting point, nothing beats first-hand experience.
Fashioneyestadiscusses some of her experiences with legal blindness related to a combination of Optic Nerve Hypoplasia, Septo-optic dysplasia, and nystagmus.
I have expanded the traditional 4 types; Highspeed, Elliptical, Low Aspect and High Aspect ratio, because they were very narrow and vague categories for the most part, adding High Energy, Thermal Soaring, Night Glider, and Passerine wings. I feel that these extra types make it easier to understand and visualize the differences and similarities between wing shapes.
I’ve renamed Low Aspect to Powered Soaring, and High Aspect to Dynamic Soaring for the purposes of the fact that names made it hard to understand purpose and were easily confusable.
A lot of these wing types are also affected by tailfeather shape and size, and that will change their agility and energy expenditure as the tail also generates lift.
Disclaimer: This is in no way intended to be an academic dissertation or proposal, do not treat it as such. It is purely for art and writing references for others, to aid description and inspiration.
Over 100 images from trailers, clips and featurettes, as well as her pages from the official art book! Be aware there are spoilers, obviously. Click the header above to see it all!
Alright, I had a post on Instagram displaying my treasure trove of Japanese language learning books. I wanted to show off a few of them and talk about all of them. The first photo displays them all (tumblr limited me to 10 photos only, so I’ll discuss some of them without photos, sorry!). Starting from the bottom of the pile:
1. Kanji Power by Tuttle. It’s what you think it is, a kanji workbook. It has a kanji, a mnemonic, some space to practice writing, on'yomi, kun'yomi, stroke order, and some vocabulary/phrases. It has some kanji not covered in my other kanji books.
2. If You Teach Me Japanese, I’ll Teach You English. It’s a strange little book and it’s taking me a while to get the hang of it, but this book was written specifically for language exchanges. Each lesson is done first in Japanese, then again in English. You and your partner serve as the “teacher” in your native language, while you practice that language. So I would read through as the instructor in the English lesson and guide my partner with the scripted dialogues, helping them along the way so that they learn English. They would do vice versa for me with the Japanese. I got this one specifically to aid me in exchanging my language with my partners. They do great with the Japanese and I needed guidance on how to help them with English. So this one isn’t really to learn Japanese, it’s to help me exchange with my Japanese friends.
3. Japanese Step by Step. This is one of the few books that focuses on teaching you SPEAKING Japanese. Most of my books help in reading, writing and I’m having to supplement with Memrise and YouTube for listening and speaking. This book has very easy to understand lessons, starting with syllables not syllabaries. Shows you in English what they’re trying to teach you in Japanese. So it’s almost like learning in parallel, I’m not explaining it well. It’s a really good book, you should just check it out.
4. Beginning Japanese by Yale University Press. This was originally my Dad’s book that he used to teach himself Japanese since he was being stationed there (way back in ye olden days). He very kindly gave it to me. This book also focuses on SPEAKING Japanese, not reading or writing in it. As such, it’s entirely in romaji! Not ideal, but if you just want to focus on speaking the language, this is a good place to start. Very thorough.
5. Reading Japanese by Yale University Press. Same authors as book #4, but not originally my Dad’s. Since this one is focused on READING (hence the title of the book), it is not in entirely in romaji. Whew! What a relief. I just got it today, so I have no feedback other than, I wanted both of these books together. It’s kind of like an entire course at your fingertips.
6. Japanese Kanji for Beginners by Tuttle. Covers JLPT N5 & N4. This is my primary Kanji workbook. I LOVE it. It’s set up pretty much the same as Kanji Power, it has exercises after each lesson so you can practice what you learned. The Kanji Power has the same things, but after a certain number of kanji have been introduced, instead of after each individual lesson. So they differ that way and in that they have different kanji. This book is specifically for JLPT N5/4 whereas Kanji Power is about expanding your kanji.
7. A Japanese Reader by Tuttle (notice the theme?). Pictures 2-4 are about this book. I cannot say enough nice things about this book! The book is split in two; open it like we open all books in the Western Hemisphere and it’s lessons starting with hiragana, open the book the other way and it’s all the reading lessons: from top to bottom and right to left! It’s so cool! The first few elementary readings aren’t actual sentences. They’re just to get you accustomed to the style of reading and the syllabaries (this is where I’m at). The readings get way more advanced though and are excerpts from Japanese literature, some fictional and some non-fictional.
8. A History of Japan. This is another one of Dad’s book that he is lending to me (sadly I don’t get to keep it). I haven’t read it yet but I’m looking forward to it. Granted, it has nothing to do with the language itself, but who here has learned a language without learning anything about the culture, history, and society of the country that speaks the language? Half the point of learning a language is to learn the history and culture of the target language’s country. So I have a book on Japan’s history to supplement the language learning.
9. A Dictionary of Japanese Food by Tuttle. Pictures 5 & 6 are of this book. Just as I stated in the above book, it’s important to know the culture and history of the place whose language you are learning. The “Japanese Kanji for Beginners” book had an exercise in the first lesson involving food. One of the dishes stood out to me because I had no clue what it was “shabu-shabu.” I still don’t know what it is, but now I have a dictionary so I can look it up! If ever I learn how to cook Japanese food, shabu-shabu will be very near the top of the list of things to make and try. The back of the book has some appendices on chopsticks, some ingredients of Japanese food, and food etiquette.
10. The Handbook of Japanese Verbs (picture 7). Verbs seem to be the guts of a sentence in Japanese so I figured it’d be important to learn them a little more in depth than my grammar book goes into. Besides explaining verbs, it has exercises to practice!
11. All About Particles (picture 8). Much like the verb book above, this is all about particles (another very important part of the Japanese language) and also has exercises to help you grasp the concepts. Goes in depth about the particles and actually has sentences in Japanese, literal translations, and English translations. It’s very thorough.
12. Japanese Coursebook by Living Language. Akin to the Yale University Press books that I covered earlier, this book is a complete course for learning how to SPEAK Japanese. As such, it is entirely in romaji but is set up different than the Yale books and has different vocabulary. I use them in conjunction with each other, so that I get the most vocabulary overall.
13. Japanese Grammar by Barron. Pictures 9 & 10 are of this book. This is my absolute favorite book out of them all. Besides being pocket-sized so I can take it just about anywhere with me, it’s a grammar book. I’m not a Grammar Nazi, I’m a Grammarian (one who studies grammar [on purpose]). I read grammar books for my native English and I greatly enjoy grammar for Ancient Greek too (my first foreign language and first true love). All the other books focus on a particular portion of grammar, or the writing system, or speaking. I wanted a book that focused entirely on grammar since I’ve heard it’s so vastly different from English (it’s not THAT different guys). As you can see in the very last picture, the book is printed in two colors. I cannot begin to express how wonderful this is for me. I have Scotopic Sensitivity Syndrome (SSS or 3S) and basically what that means is, my eyes don’t work right (duh). They don’t pick up all the wavelengths of light that they’re supposed to. So some colors (and light sources) are harder for me to see and make me very sick trying to look at them. It seems like I have dyslexia but it’s not my brain, it’s just my eyes suck. The added color is much easier on my eyes than all black print on white pages (college was nightmare, in case you wondered).
Last book,
14. Kanji Starter 1. Not a lesson book at all! It has 200 kanji and is essentially a book of mnemonics for them. I use it as a catalog and mark the kanji I’ve mastered from other sources in this book. I also use it as a quick reference when I get suddenly forget a kanji I’ve already learned. That way I don’t have to find the right lesson book and track it down. I got this kanji book before any of the others and it served as the introduction to what i was getting myself into. It made the kanji seem so not scary that by the time I picked up a workbook, kanji was beautiful, logical, and fun. No fear!
Sorry this was so long. I’m on a mobile device so I can’t do the nice “keep reading” breaks or formatting. So it’s just a really long, darn post. But now you know of 14 books you can use for Japanese learning! Also, quick note, all of the books with bar code stickers on them were all purchased form the same site.
ThriftBooks.com has so many books, including rare ones, old, ones, and textbooks, for a fraction of the price. I looked up some of my Tuttle books, one of them was like $19.95 normally (without shipping and tax). On ThriftBooks I got it for $3.50! If your total purchase is over $10 shipping is entirely free too. So if you’re looking for language resources, a new novel, or you’re in college and need textbooks, check the site out because it might save you a boat-load of money.
Something that I don’t think enough people cover when it comes to The Craft, is how to keep yourself protected when doing spells and rituals, or communicating with spirits. This is a very basic aspect of witchcraft, so I’d like to take a moment to go in depth on the topic to make sure that as many people as possible, can find something that will work for them! Of course though, there will be some methods that I either don’t have experience with or may have simply forgot to mention. Find what works best for you and your practice, and look at some other articles or books as well!
Centering
First off, what is centering? This is basically you preparing yourself and getting in the mindset of doing a spell/ritual. This is taking a moment to yourself to make sure you’re intentions are in the right place, and everything is set up and ready to go. Centering isn’t too difficult to do, so there’s honestly not too much to say on the topic.
Method I like to begin centering with meditation. Relax yourself and get into the “witch headspace”, if you will. Cleanse yourself, and maybe even take a shower or a bath. Next thing is to gather your thoughts, write some questions down on a piece of paper or on your computer and answer them. Things like “What is my motivation?” “What outcome do I want” “How do I want to do this?” If you really take a moment to understand what you’re doing and where your heart lies, your spell will be at it’s most effective.
Grounding
Grounding is an important thing to do after any spell you perform. While it doesn’t necessarily hurt to do before a spell, it can limit your meta-physical performance. Grounding is connecting you back to the earth and bringing you back to your physical body, getting your head out of the clouds if you will, and sometimes when performing a spell that’s where you want your head to be. If you’re working with any earth based magick though, this can greatly help, so just figure out what works best for the kind of spell you’re doing.
Methods
Roots - This is my covens favorite method to ground. This is basically where you have a meditative moment, plant your feet on the ground, and “sink your roots in”. First thing you wanna do is get in some kind of contact with the ground or floor, just anything that is a solid foundation. Plant your hands or feet flat and start by breathing deeply. You wanna really take in the energy from the earth, pay attention to all of your surroundings and take in the moment. Next close your eyes and start focusing your energy at your hands or feet. (You may feel your hands start to tingle or even go mildly numb) Lastly, release that energy and push it into the earth. Let it soak in deep, and if visualization helps, imagine your roots growing down.
Going outside is another very good method to reconnect with the Earth. If at all possible, I like to go outside barefoot and feel the grass on my feet. Really connect to the earth, take in your surroundings and walk around as much as you feel comfortable.
A Dump Stone - Just about any stone will work, but generally stone that come from bodies of water, have holes, or are green or black tend to work the best. Basically just hold the stone in your hand and let any and all negative energy flow out from you into the stone. Stones can handle quite a bit of negative energy so don’t be afraid to let it all come out. After you’re done though, you’re immediately going to want to cleanse your crystal with whichever method works best for you. I prefer to let mine sit in salt overnight, or until the feel done.
Drinking a cold glass of water, splashing cold water on your face, or even taking a really quick cold shower is also a really good way to ground yourself. It’s all about being present in your body, and nothing can bring you back into the now like some cold water can.
Shielding and Wards
Shielding yourself is important when it comes to any kind of magick, because there truly are negative entities and energies out there that like to take advantage of people. It’s a sad truth, but this is why we learn to protect ourselves spiritually. Putting up a shield or ward isn’t difficult, and sometimes you do it without even realizing!
Shielding Methods
Visualization - This is my favorite method to teach beginners because it doesn’t require any tools just you, and yourself. The begin, start by getting into a calm relaxed state, maybe even meditate before hand. Next, imagine a ring of light around yourself starting at your feet. This light can look like anything, be any color, and be any shape so the only limit is your imagination. Once you have the ring of light, imagine it slowly coming up around your body, let it fill your heart with warmth and let it remind you that you are safe spiritually and no negative entity can harm you. Once it has made a complete bubble around yourself, say some affirmations and remind yourself that you’re strong and can handle anything. The more you believe in yourself, then the stronger this shield will become.
Smoky Quartz or any other black stone, when kept on the person or placed at the feet can create a ward as well. For those less imaginative, this is a very good alternative because you have the crystal to support you as well.
Magick Circle - There are many ways to open a magick circle, but heres a really simple method. Hold one of your hands out, palm up and focus your energy in your hand. (You may get that warm, tingly, or numb feeling, if not though thats okay!) Really let it bubble up into your fingertips, and once there, point a finger out and draw a circle around yourself and say some simple affirmations of safety and peace. Just like the visualization method, this works best the more you have faith and believe in yourself.
Simply stating that you are, or feel safe is another way to shield yourself spiritually. You remember how when you were little and alone in your room at night and you thought you heard something scary? You covered your head up with a blanket right? Do you remember how safe you felt after doing that, like how nothing could get you? That was quite literally you putting up a shield. Remember your intentions and feelings are the most important thing in magick, always keep that in mind!
Warding Methods Wards are another variation of shields, but these are things you put on the physical plane rather than a spiritual one.
Runes/Sigils - A really good way to set up a ward is to carve or draw some runes either into the side of a doorframe, a candle, or even on a piece of paper to burn later! If you’re going to carve them into wood or draw them, charge the tool you’re going to be doing it with. If your going to use a candle, burn the candle whenever you feel like you need it most! And as for burning paper, keep the ashed around and maybe even sprinkle them into every corner of the room.
Salt - Put lines of salt on the top of your door and window frames, and sprinkle some in every corner of the room.
Stones - Certain stones are said to be warning stones and will break if danger is near by. Malachite is one of these stones, and is fairly easy to get your hands on. Place this stone above door and window frames as well.
Holy/Blessed Water - A drop placed in every corner of the room creates a barrier around the room.
Brooms/Staffs - Place in the corners of rooms, and said to fall over if danger is near by.
Black Candles - Burning a black candle is said to bring protection and keep a room hidden from spirits.
RG @okiroi_s.a: Δυναμική εκπρόσωπος του άλλωτε «ασθενούς» φύλου αναλύει δημιουργικά μέσα απ’ τη γραφή της, την ψυχοσύνθεσή, τις αντιδράσεις και τη συμπεριφορά των σύγχρονων γυναικών. Απέκτησε φανατικούς αναγνώστες και έχει χαρακτηριστεί από το “συνάφι” ως μια ιδιαίτερη «φωνή» μέσα από σύγχρονη θεματολογία. Επιχειρώντας να τη γνωρίσουμε καλύτερα και να εντοπίσουμε κοινές αναφορές, αναγνωρίσαμε στο πρόσωπο της Εύης Τσανάκα @evis_beauty_lab και αξιώσεις που συμπλέουν και εξελίσσονται αρμονικά. Την ευχαριστούμε θερμά και προτρέπουμε να την ακολουθήσετε. Dynamic representative of the former so called “weak” sex, she creatively analyzes through her writing, the mentality, #reactions and #behavior of modern #women. She has acquired fanatic readers and has been characterized by those “related” as a special “voice” through #contemporary themes. In an attempt to get to know her and to identify common #references, we recognized on the face of Evi Tsanaka @evis_beauty_lab and claims which coexist and evolve in #harmony. We kindly thank her and encourage you to #follow her. #regramapp
British artist Jason Anderson creates colorful abstract paintings composed of pixelated swatches of pastel-toned oil paint. Up-close, the artist’s paintings look like blocky layers of shapes and color; but, from afar, his scenes—featuring cityscapes, roads, trains, and marinas—are revealed.
Anderson began his career as a stained glass apprentice, where he worked on restoring the windows of cathedrals. He soon progressed onto designing the glass murals himself, where he learned how to break down subject matter into “jigsaws” of colored sections. This approach still shines through in his paintings today—complex scenes are brought to life with simple shapes and careful consideration to hue and tone.


![scribbly-blue-hearts:Blue’s Feathers and Wings Compendium: Standard Wing ShapesPart 1 [Standard ]|](https://64.media.tumblr.com/b49085c00fbf66d6b0a156026a03fd2f/c874ba2d740a6e91-38/s1280x1920/4912648630ee7d96a65b53614fcf7f0f35dbe528.png "scribbly-blue-hearts:Blue’s Feathers and Wings Compendium: Standard Wing ShapesPart 1 [Standard ]|")
![scribbly-blue-hearts:Blue’s Feathers and Wings Compendium: Standard Wing ShapesPart 1 [Standard ]|](https://64.media.tumblr.com/e168712ae90fa03dcc0bed92ba700e66/c874ba2d740a6e91-44/s1280x1920/c440f07e846f75408a00857bc3110d261da586b5.png "scribbly-blue-hearts:Blue’s Feathers and Wings Compendium: Standard Wing ShapesPart 1 [Standard ]|")
![scribbly-blue-hearts:Blue’s Feathers and Wings Compendium: Standard Wing ShapesPart 1 [Standard ]|](https://64.media.tumblr.com/51ca2049419954c849e0097ab43f13fe/c874ba2d740a6e91-12/s1280x1920/57cbb768b36e62d39a56e8988a087f065ce10a57.png "scribbly-blue-hearts:Blue’s Feathers and Wings Compendium: Standard Wing ShapesPart 1 [Standard ]|")
![scribbly-blue-hearts:Blue’s Feathers and Wings Compendium: Standard Wing ShapesPart 1 [Standard ]|](https://64.media.tumblr.com/2adc024f371e7333f371ce33b7d63e7e/c874ba2d740a6e91-c6/s1280x1920/67c446b7115eb7c36f49e9bf4025a23185189ffe.png "scribbly-blue-hearts:Blue’s Feathers and Wings Compendium: Standard Wing ShapesPart 1 [Standard ]|")
 copyrigh")
 copyrigh")
 copyrigh")
 copyrigh")
 copyrigh")

 designs book, which can be found/downloaded on the National Archives of")
 designs book, which can be found/downloaded on the National Archives of")
 designs book, which can be found/downloaded on the National Archives of")


 & To Cat")
 & To Cat")
 & To Cat")
 & To Cat")


 Come Home With me by Zolita (2")
 Come Home With me by Zolita (2")


