#tutorial

Quick little video tutorial! This is a method I use to block in shapes when I’m fighting the urge to polish my lineart at an early stage, especially in rough concept art that doesn’t actually need polished lineart.
I group two layers in photoshop—a rough sketch, and a flat color—and then carve out the negative space by painting into a mask on the group, instead of filling in the positive shapes. From there I can start painting and adding shading into that group, knowing that I’ve already locked down a good initial silhouette for the object/character:
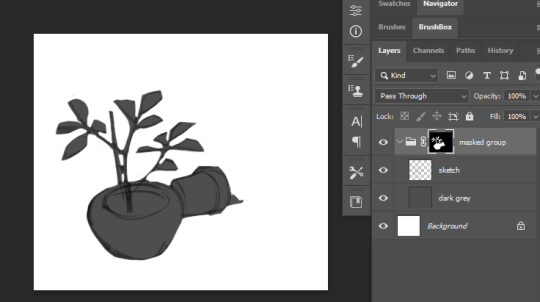
It feels like oil painting, and I end up finding silhouettes/shapes in a way I wouldn’t if I was obsessively cleaning up the linework first. Digital art has a tendency to veer towards cleanliness/polish, so I love finding little opportunities for happy accidents and a bit of mess!
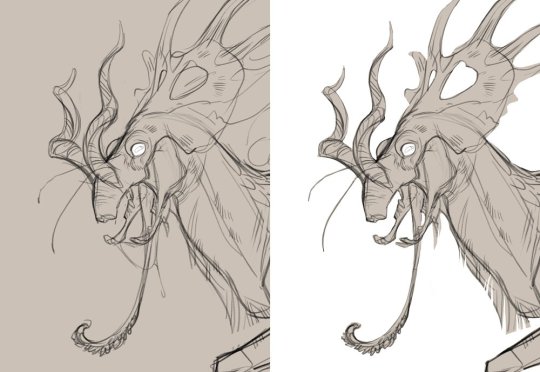
I used it on my unicorn piece last month, for instance, which I think would have lost a lot of its dynamism and charm if I had worried too much about doing a full ink pass:
Hope this is at all helpful! It’s not a method I use 100% of the time, but it really helps move my process along when I do need it

HOW did I make this #guzfurbished sweater? NEW Step by Step video TUTORIAL is now on my Patreon! (patreon.com/lilguz • direct link in story)
New tutorials will be added monthly! So comment what other tutorials you’d like to see.
AND this sweater is also now available for purchase in the #guzfurbished section of my online store // size XL • guzdesigns.com
… .
#guzdesigns #handbleached #tutorial #howto #diy #wearableart #art #artnerd #fashion #streetwear #simplefits #diamondsupplyco #vans
Post link

IT’S THAT POSITION IN EARTH’S ORBIT RELATIVE TO ITS AXIAL TILT AGAIN, STARTORIALISTS!!!
—Emily
Post link
Someone recently asked me a question about other various styles of chest harnesses, particularly something like reverse prayer/ high hands. I haven’t seen many tutorials online, but if there is an interest, I can always make some with Moco.
Please let me know if there’s interest and in what. We plan on eventually making several tutorials and videos, for both tops and bottoms.


Improv
Note: This isn’t a specific pattern. Rather, it is a helpful reference on how to make a seamless top down sweater!
Anti-Whitewashing Tutorial ft OFMD
For anonymous, my beloved
When making edits of characters of color, its imperative that the original skin tones be left as they are. In characters with brown skin tones, it can be all too easy to unintentionally lighten the skin and whitewash them or over saturate the skin and make it look orange or red.
In this tutorial, I will show you how to keep the original skin tone. This is not a tutorial on how to make a gif, but I will link mine at the bottom. This tutorial primarily focuses on Taika Waititi and his skin, but I do have a tutorial that focuses on black skin with the BBC Merlin fandom that will also be linked at the bottom. However, the process is pretty much the same.
This tutorial will work for Photoshop andPhotopea.
Step 1: Make your gif. Crop it, sharpen it, etc.
This is my gif, which has only been sharpened.

Step 2: Basic recolor
Here I’ve added Curves, Selective Color, Hue/Sat, and Vibrance. When setting your Curves layer, keep an eye on the character of color. Make sure you’re not overlightening the gif and washing the character out completely. It can be helpful to do your Curves layer last or edit it after you finish.
In this one compared to the first, you can see how red and oversaturated he is and that’s not at all what we want. He can look better.

Step 3: Reduce redness
To reduce the redness of his skin, we’re going to add another Hue/Saturation Layer. Set the Range to Red. Set the Saturation Bar to -30 and the Lightness to -5.
This isn’t the hard and true way of reducing redness. There are other methods, but this is the one that I think looks best. Alternatively, you can play around with the amounts and duplicate as needed.


Step 4: Bring back warmth
He no longer looks abrasively red, but he does look washed out and crusty. To fix this, we’re going to add a Vibrance Layer at 30. I oftentimes duplicate this layer once to make the colors richer, but use your best judgement.

This is what your gif should look like. Taika looks normal again, he doesn’t look washed out or red. From here you could add in whatever extra stuff you’d like to or post it as is.
Here’s another side by side of the original (left) and the edited version (right).


More tutorials:
How To Make A Gif
Anti-Whitewashing ft Elyan (BBC Merlin)
Overlays
I knew from the start that this was gonna be one of my hardest costumes to make but I learned so much from it and I feel it really upped my construction game.

Black Dress:
I started with the dress because honestly it was the least intimidating part of the costume. I patterned the dress from scratch by tracing the outline of a stretchy dress onto some spare wrapping paper. I then added lines where the seams should go with masking tape while the dress was on my body and traced those lines onto my paper pattern. I then sewed up all the seams hemmed the top and bottom of the dress and it was done, super simple.
I made the dress out of a thick black stretch suiting for 3 reasons. 1) I had tons left over from another cosplay. 2) It was thick enough so I didn’t need to line it. 3) It had enough stretch that I didn’t need to add a zipper to my dress.
Magican’s Cape:
Next was the real challenge: the cape. The whole thing was made of basic broadcloth. I made a huge rectangle that would sit well around my shoulders and measured where I wanted the cape to fall. I then cut out two large rectangles from the blue fabric. On both rectangles I did some math in order to get exactly 9 dimonds to fit because I wanted to be SUPER accurate.
It took a few trials and paper patterns but eventually I got the right diamond size and I attached them to the bottom of the rectnagles using wonder under:

I carefully sewed up the two sides like a pillow and turned it right-side out, and proceeded to iron the heck out of it to get it flat. I then freehanded the colored suits that go on her diamonds and used wonder under to attach those as well.

Buttons/Brooch:
The buttons and brooch were actually 3D printed! It was my first time working with 3D printing ever! I was really lucky in the fact that my college has a 3D printing lab open to all studnets. I got help making the files from my friend who is an art major.

In order to smooth them out I painted 2-3 layers of wood glue on them and let them dry. I then painted the gold parts with spray paint and the silver and green parts with normal acrylic paints.
Top Hat:
The top hat gave me the BIGGEST issues. I originally tried to make one from scratch using a simpicity pattern but I couldn’t attach the two pieces and sewing through the interfacing broke 2 of my machine needles.
I was super discouraged when I found this tutorial on how to cover a top hat in fabric!
I bought a black top hat off ebay that came too short so I was super frustrated but my friend suggest I make it bigger by adding to the exsisting hat.
I added height to it with craft foam and covered the entire thing in blue cotton, that matched my cape by following the tutorial and carefully glueing it down with tackly glue.
Purse:
The very last thing I worked on, I made the parts from thick fuseable interfacing and cotton. The basic shapes were 2 thin rectangles where the zipper could be sewn into, another rectangle for the bottom, a strip to fit around my waist and two hearts. everything was hand sewn together, it took a rather long time but I love the result and my bag is 100% fuctional. The strip closes with industrial strength velcro.
Small Details:
I made the scarf from scrap cotton I had laying around, I made a leaf like shapes and sewed two of them right sides together, flipped and ironed.
I had the gloves and wig from a previous cosplay but they were originally from ebay. I attached bells to the cape by hand. The thigh high white boots were found on amazon.

Feel free to send me any questions! Happy cosplay ♥
So I’m fairly new to prop making and Ryuko’s scissor blade is one of my favorite props that I have made. So here’s how I made it!

I started with a huge sheet of insulation foam which you can pick up at Lowe’s or home depot.
I then scaled and patterned the scissor to my height and traced it onto the foam using a Sharpie.
I proceeded to hack the scissor blade out with a kitchen knife just because it worked better than my box cutter and exacto blade.

After that I took some sand paper and sanded the heck out of it including all of the finger grips and indents in the blade.
To make it stronger and prime it for color, I painted on 3 layers of wood glue. This also makes the foam not porous so it won’t absorb the paint like a sponge.
To color it I coated it in layers of red plasti dip which is a rubber coating and won’t melt your foam! (Spray paint might melt your foam please do a test on a scrap!)

Finally I added a clear sealant to make sure there was no color chipping.
….and voila! Its done!

Sorry for the lack of progress photos, I made half of this prop while in my dorm up at school also it was the week before Katsu so I was in crunch mode not thinking of documenting the steps.
If you have any questions or anything is unclear feel free to ask!
As I understand it, the hard lines on some of EA TS4 objects are not an autosmooth problem at all. Checking or unchecking autosmooth will do nothing, as more than one creator has reported. Instead of guessing at the problem and the solution, I’ll try to show what can be done. I’m willing to hear other opinions on this issue too.


Just finished a big tutorial on intimate/active poses between characters!
If you’ve ever found drawing PDA/organic interactions exhausting and hard, then I’ve done what I can here to give some tips/advice on making it easier! It’s available now for our patrons ❤


Nope. Even though the workshop’s in the shade for most of the day, it’s officially TOO HOT to even sit quietly and edit photos. (No sewing today - I can’t imagine having the iron on in this heat!) Here’s a sneaky peek at Miss Mouse, who’s just finished demonstrating a tutorial. I’ll put together the instructions another day.
#missmouseandfriends #tutorial #behindthescenes #sneakypeek #heatwave #englishsummer #toohot #toohottowork #scorchio!
Post link


Matrimonio Nicola e Luisa: libretto di nozze
Come realizzare un libretto completamente diy e renderlo così bello che perfino il sacerdote (che ne ha visti fino alla nausea) ed i musicisti hanno chiesto di averne alcune copie in regalo.
Innanzitutto tre rapidi consigli:
- Chiedete l’approvazione del sacerdote prima di impaginare il testo, o per poche modifiche rischiate di dover mettere mano all’intero programma!
- Non…

