#appetizer


Creature of habit that I am, I usually order the same thing whenever I visit The Palm Steakhouse in NYC… the rib-eye or the prime rib, if available. But I decided to change things up last week and go for one of their seasonal specials, the Veal Chop Valdostana…

Although you can’t see it in this image, the chop is stuffed with prosciutto, Boursin cheese and basil, and topped with, as you can see, a Barolo wine reduction. Just wonderful!
Also had the pleasure of trying another of the Palm’s menu items I’d never had before, their New York Steak “al la Stone”…

A perfectly grilled piece of beef, sliced and served over fried onions and roasted red peppers. A lovely preparation.
And even though I changed up my main course selection, I just could not alter my choice of appetizer, the Shrimp Bruno…
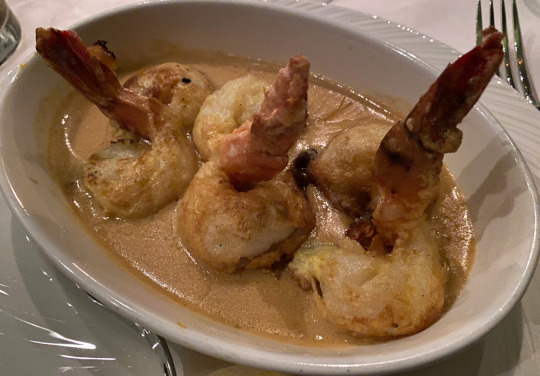
Three jumbo shrimp française sautéed in a dijon mustard sauce. Always a winner!
The biggest surprise of the evening was discovering that the painting of the Marvel characters Joe Quesada did for The Palm’s 80th Anniversary in 2005 was now on display in one of their private dining rooms here…

This piece was originally painted on the wall of their original East Side location and we thought it was lost forever when that building was sold and destroyed recently. But the manager explained they actually cut the sheet rock wall around the original art to preserve it and had it framed to display here. Joe, who was with us at dinner, was stunned and touched by their efforts!
The Palm West Side… go for the great food, stay for the amazing art.
THE PALM WEST SIDE
250 W 50th St.
NY, NY 10019
212-333-7256
https://www.thepalm.com/restaurants/new-york-city-west-side/

(From AWL)https://sweetphi.com/summer-melon-salad/Ingredients:&fr")
SUMMER MELON SALAD (Tomamelo Salad)
(From AWL)
https://sweetphi.com/summer-melon-salad/
Ingredients:
- ½ cup thinly sliced cucumber
- ½ cup cherry or grape tomatoes, sliced in half
- ¼ cup thinly sliced red onion
- 1 tbsp olive oil
- 2 tsp apple cider vinegar
- sea salt and black pepper to taste
- 3 cups cantaloupe, cubed or scooped with melon baller
- 2 tbsp fresh mint, lightly chopped
- 3 oz. feta cheese
For the dressing:
- 3 tbsp lime juice
- 1 tbsp maple syrup
- ½ tsp salt
- 1 tbsp olive oil
Directions:
- Add cucumber, tomato, red onion, olive oil, apple cider vinegar, salt and pepper to a bowl and toss to combine. Set aside.
- Prepare the dressing by adding lime juice maple syrup and salt to a bowl and whisk to combine.
- Slowly add olive oil while constantly whisking to create an emulsion.
- Add cantaloup to a large serving bowl and top with dressing. Gently toss to combine.
- Incorporate the cucumber-tomato mixture (leaving excess liquid behind) and fresh mint by folding gently. Top with crumbled feta cheese and enjoy!
Post link
https://www.justonecookbook.com/yaki-onigiri-grilled-rice-ball/Ingredi")
TOASTED RICE BALL
(From M/FoMT)
https://www.justonecookbook.com/yaki-onigiri-grilled-rice-ball/
Ingredients:
- 2 rice cooker cups uncooked Japanese short-grain rice (360ml; 1 rice cooker cup (180ml) of uncooked rice will make 3 rice balls.)
- Water
- kosher/sea salt
- neutral-flavored oil (vegetable, canola, etc)
- soy sauce
Directions:
- Gather all the ingredients. Cook the rice in the rice cooker, pot over the stove top or pressure cooker.
- Let the cooked rice cool a little bit until you can hold rice without burning your hands. Do not let the rice completely cool down.
- Make Onigiri into triangle shapes. First wet both of your hands with water so rice won’t stick.
- Then put some salt in your hands and rub to spread all around.
- Scoop about a half cup of rice onto your palm.
- Cover the rice with the other hand and gently form the rice into a triangle.
- Make sure covering hand (my right hand) should be forming a triangle shape. When forming the onigiri shape, your hands should be just firm enough so the onigiri doesn’t fall apart. You don’t want to squeeze the rice too tight.
- I use three fingers (thumb, index finger, middle finger) to cover the area to make a nice triangle shape. Then rotate onigiri to make a perfect triangle.
- While you squeeze onigiri firmly with both hands, one of your hand (my left hand) has to press onigiri to keep a nice form.
- Gently squeeze the center of triangle on both sides so there is a slight indentation (for grilling onigiri). Now onigiri is ready!
- Lightly oil a cast iron skillet and put it on medium heat.
- Grill onigiri until all sides are crispy and lightly browned. Don’t turn it around. Just work on one side at a time and avoid turning over frequently.
- Lower heat to medium low and brush all sides with soy sauce. Rotate to make sure all sides become crispy. Be careful not to burn onigiri after you brush it with the sauce.
Post link
(From M/FoMT)https://www.bio-oz.com.au/blogs/news/bio-oz-buckwhe")
BUCKWHEAT CHIPS (Buckwheat crackers)
(From M/FoMT)
https://www.bio-oz.com.au/blogs/news/bio-oz-buckwheat-flour-crackers-recipe-gluten-free
Ingredients:
- ¾ cup of Buckwheat Flour
- ¼ cup of filtered water
- ¼ cup of Light, Extra Virgin Olive Oil
- ¼ teaspoon good quality rock salt
- ¼ teaspoon poppy seeds or sesame seeds (optional)
- extra olive oil for brushing
- extra salt for seasoning
Directions:
- Preheat oven to 175 degrees cel (arrange so the middle rack is in position)
- In a high powered blender or Thermomix combine buckwheat flour, water, oil and mix until smooth
- Add salt and sprinkle with poppy seeds and mix again
- Turn buckwheat mixture out onto silicone rolling mat greased with a little olive oil. The mixture should not be too sticky.
- Roll out dough into a large rectangle so it is about 2mm thick. You may need to halve the dough in order to get it this thin. The thinner the better as they are nice and crunchy that way.
- Turn the mat over (with the dough still stuck to it) and gently ease the rolled out dough onto your oven tray lined with baking paper.
- Brush with extra olive oil lightly so as not to mark the cracker and sprinkle with a little extra rock salt
- Score the dough into whichever shape you would like the cracker to end up. Sometimes I use a round cookie cutter for a biscuit the size of a rice cracker.
- Bake for 15 minutes and then take them out and break them up along the score lines. Turn crackers over to bake on other side.
- Bake on other side for another 15 minutes (if you have made them thicker you will need more cooking time) or until dark golden brown.
Post link
https://www.seriouseats.com/recipes/2010/12/roasted-rice-cake-recipe.")
ROASTED RICE CAKES
(From M/FoMT)
https://www.seriouseats.com/recipes/2010/12/roasted-rice-cake-recipe.html
Ingredients:
For the roasted onions:
- 1 teaspoon canola oil
- 1 medium white onion, thinly sliced
- Kosher salt
For the roasted rice cakes:
- ¼ cup mirin
- ¼ cup chicken broth
- 2 tablespoons canola oil
- 1 pound rice cake sticks
- 1 tablespoon sesame seeds
- 2 scallions, ends trimmed, green parts thinly sliced
For the Korean Red Dragon Sauce:
- ¼ cup water
- ¼ cup sugar
- ⅓ cup ssamjang (fermented bean and chile sauce)
- 1 tablespoon light soy sauce
- ½ teaspoon sherry vinegar
- ½ teaspoon sesame oil
Directions:
- Heat oil in 12-inch cast-ion skillet over medium-high heat until lightly smoking. Add onions and cook, stirring occasionally until onions begin to brown, about 10 minutes. Season with salt and reduce heat to medium-low. Continue cooking, stirring occasionally until richly caramelized, about 30 minutes longer. Adjust heat as needed to prevent burning. Transfer cooked onions to bowl.
- Meanwhile, make the dragon sauce. Combine water and sugar in medium saucepan and bring to a boil over high heat. Stir constantly until sugar is dissolved then remove from heat. Let cool for one minute, then stir in ssamjang until dissolved. Add soy, sherry vinegar, and sesame oil.
- For the rice cakes, pour mirin and broth into a large heavy-bottomed saucepan and bring to a boil over high heat. Reduce to medium-high and cook until lightly thickened, about two minutes. Add red dragon sauce, reduce heat to medium, and cook until glossy and thick, about six minutes. Add roasted onions and stir well.
- Meanwhile, clean out iron skillet, and return to stove. Add two tablespoons canola oil and heat over medium-high heat until just starting to smoke. Add rice cakes and reduce heat to medium. Cook until light brown on all sides, about 3 minutes per side.
- Toss rice cakes with sauce. Garnish with sesame seeds and scallions.
Post link
https://www.tasteofhome.com/recipes/quick-garlic-toast/Ingredients:1/3 cup butter,")
TOAST
(From M/FoMT)
https://www.tasteofhome.com/recipes/quick-garlic-toast/
Ingredients:
- 1/3 cup butter, softened
- 12 slices bread
- ½ teaspoon garlic salt
- 3 tablespoons grated Parmesan cheese
Directions:
- Spread butter on one side of each slice of bread. Cut each slice in half; place plain side down on a baking sheet. Sprinkle with garlic salt and Parmesan cheese. Broil 4 in. from the heat until lightly browned, 1-2 minutes.
Post link


This tasty Greek 7 layer dip makes the perfect appetizer or snack. Quick and easy to make and full of flavour, it’s also healthier then most dips!
https://bake-eat-repeat.com/greek-7-layer-dip-recipe/
Post link

This easy focaccia with strawberries and feta is topped with balsamic glaze and makes the perfect side dish or light lunch. And the kids went crazy for it!
https://bake-eat-repeat.com/easy-focaccia-strawberries-feta-recipe/
Post link