#easy recipes


It’s not that hard to choose healthier options, guys try these vegan muffins.
Post link


Fluffy Vegan Cinnamon Rolls
1. Warm up the water until it is between 100°-115° F and add 1 teaspoon of sugar, and all the yeast. Stir and let sit for a few minutes. Yeast should activate.
2. Add the coconut oil, salt, 2 cups of flour, remaining coconut sugar, and stir until the mixture comes together. Add additional flour in ½ cup increments until mixture pulls away from the sides of the bowl. Turn dough out onto floured surface and knead a few times until you form a smooth ball.
3. Combine the cinnamon + coconut sugar mixture. Dust the counter with more flour, and turn the dough ball out onto the floured surface.
4. Make dough rectangle about 12x16 inches. Spread melted coconut oil over the rolled out dough.
5. Sprinkle oil with cinnamon and coconut sugar mixture.
6. Starting at the long end closes to you, begin to (gently but tightly) roll the dough up into a log. You should get around 12 rolls.
7. Set somewhere warm for about 40 minutes. After 40 min, put in preheat oven to 350°F. Rolls should puff up and double in size. Bake them for about 15 minutes.
Post link
Ok, so let’s be clear here. I’m bad at cookies. I’ve never had the talent, before I went vegan I couldn’t make them work, after I went vegan I still couldn’t. My sister on the other hand; She’s like a cookie sorcerer. I don’t know what she puts in them, but her cookies are amazing, perfect, every time. She probably has a stock of cookie monsters on hand to sacrifice to dark powers for each batch or something.
So anyway, recently I found this recipe (which is awesome in it’s own right and you should totally try it) and I’ve basically been on a cookie binge ever since. I’ve made some healthy-ish modifications though, so I can justify eating them as much as I do. I have some weird health stuff that means I can’t eat a lot, so what I DO eat needs to have some extra nutritional punch.
Spell components
Essential
- 2 and a ¼ cups of wholemeal flour
- ¾ to 1 cup brown sugar (raw or white is fine too, but soft brown sugar makes them chewier)
- ¾ to 1 cup of vegan chocolate chips (I quite like chocolate buttons as well, or you could sub in sultanas)
- ½ teaspoon of salt
- 2 teaspoons of baking powder
- 2/3 cup of vegetable oil (or vegan friendly margaraine/butter, melted slightly)
- ½ cup of non dairy milk
- 1 teaspoon of vanilla essence
Optional
- ½ to 2 teaspoons of cinnamon, to suit your tastes
- ½ a cup of vegan friendly protein powder (I find soy, rice, and pea protein all work fine in this recipe) AND bump the oil and non dairy milk up to a cup each, AND bump up the sugar by a ¼ cup AND add 2 tablespoons of ground linseed.
- You could also sub half a cup of flour for half a cup of rolled oats too :).
Brewing the potion
- Pre heat the oven to 175 degrees C (350 F). Have a baking tray away from the oven, you don’t want it getting hot.
- Mix all the dry ingredients together except the sugar.
- Mix all the wet ingredients together with the sugar ( you can just throw everything in a bowl, but doing it this way means fewer lumps in the sugar and less work mixing)
- Add the wet ingredients to the dry, and stir. The dough will be oily and seem a bit hard to work with, I find just mixing it with my hands is easiest at the last stage.
- Once it’s all combined, throw spoonfuls on the ungreased baking tray (there’s enough oil in the mix already, but if you’re lazy like me baking paper makes clean up easier). You can flatten them if you want, depends on your personal preference. The cookies don’t spread out much but they do rise quite a bit.
- Bake for ten minutes, then start checking them every few minutes. To check, just press the top of one lightly, if it’s just a bit softer than you like your cookies, then they’re done. They’ll harden up quite a bit once they’re cool.
- Let them cool for a few minutes, then use a spatula or fish slice to take them off the baking tray and put them on a wooden board or wire rack etc. If they stay on the baking tray they’ll keep cooking and go hard on the bottom. If you’re lazy like me, just take them out of the oven a few minutes earlier than normal and let the heat of the tray finish the job. It’s not a perfect result, but who cares? They’re cookies.
- Prepare to defend your cookies against marauders.
I remember when I was a kid, we would have those powdered ‘instant’ puddings in a packet. They were never instant, of course. You mixed the powder with water and put it in the fridge for half an hour or so and THEN you had a sort of cross between mousse and jelly.
I have no idea if those were vegan friendly or not, but they weren’t exactly a culinary delight, they had sugar, so as kids, we liked them. I haven’t had one of those puddings in a long time. We’re talking maybe more than two decades (damn… now I feel old).
Anyway, this is a base that I usually use to make chocolate pudding, but it could be flavoured in a bunch of other ways too. The texture depends a lot on what you use out of the options. A blender is very helpful for this recipe but it isn’t critical.
Automatically dairy, gelatine, and egg free. Can be nut free, soy free, sugar free, low fodmap, or just about anything else depending on your choices. The recipe is raw too, for those interested in that.
It stores fine overnight in the fridge. It’s never made it past that point without being devoured so I don’t know about storing it any longer than that.
This much should be two decent sized bowlfuls. If you serve it with fruit or nuts, or whatever it would make desssert for four easily.
Ingredients
- 2 bananas or 2 ripe avocadoes - You can do without these if you want, but you’ll need to use a lot more of something else to thicken it and the texture will be a lot less smooth and silky.
- Chia seeds, Ground linseed (flaxseed) - I find chia seeds work really well (and fast) for this, but they create quite a lumpy texture. They’re also expensive. I typically add four tablespoons of chia seeds and four of ground linseed. Alternatively, you could use agar (a quarter teaspoon). Other thickeners might work too but I haven’t tried them uncooked, so you’d need to experiment.
- Non dairy milk - I usually use almond milk, but any non dairy milk will do, you could even use water, just add a little more of whatever flavourings you choose. I usually use about half a cup of almond milk and add another half cup of water.
- Sugar - Not essential. I usually add two tablespoons.
- Flavourings - What you add here really depends on your tastes. My usual preference is two tablespoons of cocoa, and a splash of vanilla essence. You could skip the cocoa and have vanilla, or skip the vanilla and have a strong banana flavour, or have mint chocolate, or blueberry. Whatever you want.
Method
Put everything except half the liquid in the blender (or bowl if you’re mixing and mashing by hand). Blend it all up.
Leave it for a few minutes to thicken (if you’re using agar it’ll take a bit longer), add more liquid to get to your desired consistency.
Eat.
Before you get too excited, these do not have any special ‘herbs’ in them. I’m sure the internet has plenty of those recipes already though, if you’re that way inclined.
The thing about this recipe is it isn’t really a recipe so much as a big list of stuff you can pick and choose from to make brownies, most of it isn’t essential, but you’ll need at least some of it.
It can be made gluten free pretty easily, but it might be better if I just do a separate post for that.
What I like most about these brownies is how easy it is to pack all kinds of goodies into them. A while back my dr had me try a diet that was so restrictive I had about three protein sources in total. To make up enough protein, I started adding rice protein powder, ground linseed, and chia seeds to brownies, so I ended up with a rich, chocolatey treat that had 15% of my daily protein needs per serve. I ate a lot of brownies during that time. For protein *nod*.
Essentials
- Flour- Depending on your tastes you can switch out some of this for other stuff, but if you start out with two cups, you can swap out a maximum of a cup for other stuff.
- Cocoa- I find ¼ - ½ a cup is about what I like, but you can adjust according to your tastes
- Sugar- I like soft brown sugar, but white or raw will do fine too. I add ¼ - ½ a cup, but I don’t like my brownies too sweet, add more if you want.
- Oil or vegan friendly butter/margaraine - You’ll want about half a cup for this. If you’re not using peanut butter, you’ll want a bit more, and marg is better in that case.
- Salt- just a half teaspoon
- Baking powder - a teaspoon is about right
- Non dairy milk - A cup should do fine, but have more around for mixing. You can swap this out for water but I personally don’t like the taste quite as much.
Optionals
- Peanut butter - I much prefer the end result with peanut butter. It adds a richness to the brownies that is super nommy. It isn’t essential though. I usually add a couple of big tablespoonfuls to the mix.
- Vanilla essence - Personally I consider this to be essential, but you can do without it. A teaspoon is about right.
- Ground linseed - Often known as flaxseed, this serves a variety of purposes. It’s very high in protein and fibre, and it acts as a binding agent. Standard wheat flour should hold together ok on it’s own, but ground linseed can be very helpful. Add anywhere from a couple of tablespoons to a quarter of a cup. Add at least that much water as well.
- Chia seeds - Much like ground linseed but higher in protein. Expensive though, so I tend not to use much. I also notice if you do add a lot there’s a slightly crunchy texture in the finished product.
- Nut meal/flour - Almond flour and coconut flour or any ground nut type flours are really nice in this recipe. They have a really nice taste and texture. You can swap them out for the plain flour. I wouldn’t swap out more than half a cup of this type of stuff or it will get a bit grainy. If you do add something along these lines, add a little extra liquid and fat to help balance them out.
- Spices- I find cinnamon and nutmeg go really nicely in this. Just a tablespoon of cinnamon and a pinch of nutmeg is all that’s needed.
- Oats, Nuts, and Seeds - These are great sprinkled on top after cooking or added to the batter. They will affect the texture though, so just be aware :). Shredded coconut is nice in the same way. Walnuts go great with brownies, but anything along those lines will do nicely. You can swap these out for the flour.
- Pureed fruit and vegetables - I tend to tread carefully when adding fruit to this recipe. It tends to alter the flavour quite a lot, especially banana. But if you wanna give it a go, try a few tablespoons of applesauce, or mashed pumpkin and see how it goes.
Put it together
Grease a baking dish, or if you’re lazy like me, line it with parchment paper - make sure it’s oven safe, and preferably bio degradable. Set the oven to 180 Celsius (350 Fahrenheit).
Mix all the dry ingredients together. Try to get rid of any lumps.
Add the wet ingredients, mix everything together. I usually add peanut butter and marg last.
You want the batter to be a little bit thin. Think pancake batter, but a little thicker.
Taste test, it should taste good in batter form, when it bakes it’ll be a stronger, richer flavour, but you should be able to adjust according to your tastes.
Pour into the tray. Pop it in the oven.
Bake for 15 minutes, then check by stabbing with a knife or toothpick. If the toothpick/knife comes out clean, it’s ready. Depending on your oven you might need more time, so check regularly.
When it’s ready, pull the tray out, let it cool a look, use the parchment paper to lift the whole thing out of the tray, then slice (before or after cooling) and consume.
Can be topped with chocolate peanut butter icing.
Home made gravy is awesome. It’s winter here, so I’m slathering it all over roast veggies like it’s going out of style.
Important Ingredients
Oil - I like canola, any vegetable oil is fine though. I usually use leftover oil from roasting or frying something else.
Flour of some kind. Wheat, or corn flour will do fine. The only stuff I wouldn’t recommend is some of the really grainy gluten free flours.
Veggie stock - liquid is fine, just swap out the water for the liquid stock.
Soy sauce, marmite/vegemite, or brewers yeast. Or a combination thereof.
Salt
Optional ingredients
Herbs - I like thyme, oregano can be nice. Some people like pepper. Experiment to see what you prefer.
Garlic - remember that crushed garlic will be stronger in taste, so use less, and add it a little later than chopped.
Onion
Leek, spring onion, etc
Liquid smoke
Barbecue sauce
Non dairy milk
Quinoa, lentils, etc (these should be cooked beforehand)
Proceed thusly
- Chop up any onions, etc you’re planning to use. Half a onion would be plenty for a recipe this size. If you’re not using onions, skip this step and the next one.
- Fry the onions etc at the bottom of a pot, with a couple of tablespoons of oil (use this oil for the next step). Leave them in the pot with the oil once they’re going a little soft.
- In a small pot (or microwave safe bowl - this isn’t ideal if you’re using onions etc) mix a couple of tablespoons of oil with a couple of tablespoons of flour to make a thick paste. Don’t add too much flour, it will thicken up a LOT later otherwise and you’ll end up with way more than you need (gets me every time).
- Put the pot over medium heat (skip this bit if you’re using a microwave). Add a bit of water (or veggie stock), and stir it into the paste. Do this a couple of times until it’s thin enough for you to basically dump a cup of water in there and stir it in easily.
- Add a teaspoon of whatever herbs you want to use, add a teaspoon of stock power (if you’re not using the liquid stock). If you’re using soy sauce, add a teaspoon (soy sauces vary in strength, so experiment with the flavour), if you’re using marmite/vegemite, add half a teaspoon, it’ll take a bit to dissolve. Brewers yeast - a tablespoon. Add a pinch of salt and a dash of whatever other sauces you’d like to add. Go sparingly at first, the flavour will intensify as it thickens.
- If you’re using a microwave, now is the time to put the bowl in, and heat it on medium power for a few minutes.
- Keep stirring and heating for a few minutes till the gravy thickens. Adjust the flavour as you like. If you’re using herbs you might want to give it a little longer for the flavour to intensify.
- Add more water (or liquid stock) if you need to to get the thickness or volume you want.
- Pour over something delicious and consume.
Leftovers
The gravy will continue to thicken as it cools. I’ve found it stores fine for a few days in a jar in the fridge, and when I want itI just take it out, mix in some water and heat it up.
You can also add it to soups, casseroles, etc. The flavour tends to compliment any kind of hearty, winter warmer type dishes.
If I’m in a really lazy mood I’ll have it on toast (don’t judge me).
Nutritionally, baked beans are actually pretty awesome. They tend to have a fair bit of sugar in the sauce, but baked beans and wholegrain toast are a fantastic quick/easy/cheap/nutritious meal for anyone. But if you’re like me and keep a bunch of 60 cent cans in the cupboard for when you’re skint, having them more than a few days in a row can start to get old.
So here’s how to jazz things up:
Garlic
Add garlic marg (dairy free) or garlic infused oil (add chopped, crushed or powdered garlic to a vegetable oil and leave it for a while before using) to toast.
Or mix it right in with the beans (if it’s crushed or chopped garlic you’ll need to let it simmer for a few minutes to let the garlic cook)
Spice it up
If you like it spicy, but can’t afford chilli beans (they’re three or four times the price of baked beans over here) you have some options.
Add some straight chilli powder or sauce and sweat it out.
Make something a little more complex, with garlic, onions, chilli powder, maybe even some capsicum. I quite like to add a touch of paprika, a splash of soy sauce, a little lemon juice/apple cider vinegar, some chopped celery, and some cumin, but that’s me. Mix and match to suit your tastes.
Creamy/Cheesey
If you’ve got a bit of almond milk or whatever non dairy milk you like, you can make baked beans really creamy with a couple of tablespoons to the can. You’ll want to simmer it a little bit longer so it thickens.
If you want a cheesier flavour, add a teaspoon of brewers/nutritional yeast. It has a very strong flavour, so add small amounts first until you know how much you like.
Add a squeeze of lemon juice or a splash of apple cider vinegar if you want a sharp cheese taste.
Veggie stock
I find half a cube of veggie stock can add a nice flavour. For liquid stock I’d add about a quarter of a cup. Stir it in while heating, let it thicken, eat.
Herbs
Rosemary, Thyme, Sage, Oregano, Basil and parsley are all really nice in baked beans. Add a little bit at a time and adjust according to your tastes. Dried herbs need a little more cooking before their flavour comes out.
Make a soup/stew
Depending on what you’ve got going spare in the kitchen, baked beans can be a great way to use up leftover vegetables, and with some grains and legumes you can make it go a long way. If you don’t want big chunks of vegetables you can run them through the blender, most of the broccoli/cauliflower stalk we usually throw out can be used up this way).
I like to add some soy sauce, a cube (or cup if it’s liquid) of veggie stock, some garlic and onion, and then whatever else is around, plus enough water for it to cook in. For a more tomato based flavour I might add in a can of tomatoes. You could go in a totally different direction if you wanted though, non dairy milk goes well in soups and stews, you might find you end up with something more lentil based. Anything goes.
If the veggies or grains etc need to be cooked for a while you can simmer them in a pot, or add them to the crockpot, or even in the microwave.
Here’s the deal. I like pizza. A lot. Like, if I had to live on pizza alone, I’d probably be pretty ok with that. I’d build a fort out of the pizza boxes and hoard olives like a vengeful olive hoarding dragon.
Sadly, I have yet to work out how to replicate the amazing basil sauce the local pizza place does, and I’m too broke to afford even cheap pizza on a regular basis.
So sometimes I make pizza at home.
Some ready made dairy free cheeses are available here in New Zealand - and they’re pretty good, but they’re not super cheap. Hummus isn’t always super cheap either (unless you’re making it from scratch, then it’s definitely super cheap), but by weight, hummus is usually cheaper than dairy cheese anyway and it goes further. So here is my lazy cheese sauce for pizza, dips, toasties, sandwiches, etc.
THINGS THOU SHALT REQUIRE:
- Hummus (plain or garlic)
- Vegetable oil
THINGS THOU MAYST LIKE TO ADD:
- Lemon juice
- Brewers yeast (add slowly, it has a strong flavour, so taste test as you go)
- Salt
- Thyme
- Mustard (I like wholegrain but go with whatever you like)
- Coconut cream (seriously, it’s weird but it does some kind of sorcery to smooth out all the flavours)
HOW THOU SHALT PROCEED:
- Half hummus, half oil, stir until combined (it’ll be kinda globby at first).
- Add any extra stuff you like. Personally I like a splash of lemon juice, a tablespoon of mustard, a pinch of thyme, a pinch of salt, and a tablespoon of coconut cream (the fatty part). I like quite a sharp taste with this sauce, if you’d rather something creamier or more subtle, go for more oil, and more coconut cream.
- Glob it on pizzas (it gets thicker when cooked), sandwiches, whatever you want.
- Omnomnomnom


Chicken breasts stuffed with mushrooms, spinach and chorizo in a black bean tomato sauce.
I sautéed some diced mushrooms in olive oil with diced (cooked) chorizo sausage, crushed garlic , finely diced onion, chilli and flat leaf parsley .
Once the mushrooms had softened, I added in a few handfuls of spinach and let them cook down, too.
I butterflied the chicken breasts, added the filling to the middle and rolled them up before placing in a baking dish and pouring over some tinned tomatoes which I’d mixed with some cooked black beans and the leftover stuffing mixture. Seasoned with salt and pepper. Drizzled with olive oil.
Baked for 40 minutes at 190 Celsius.
Enjoy!


Cottage Pie
1 very large parsley root or 4 medium, or 3 large yukon gold potatoes, peeled and cut into uniform 1/2″ chunks
8 tablespoons butter, divided
1 ½ pounds ground beef
1 ½ red onions, diced
4 – 5 carrots, peeled and cut into half moons
5 stalks celery, sliced
2 teaspoons sea salt, divided
2 teaspoons Worcestershire sauce
1 teaspoon yellow mustard seed
4 bay leaves
fresh ground black pepper to taste
6 large leaves kale, cut into thin ribbons
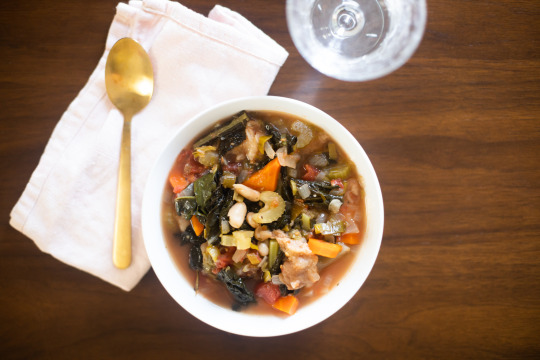
http://www.brooklynsupper.net/2013/01/looking-back-moving-on-cottage-pie/#.U5S5yssU_IU
Post link
I buy a lot of roast beef and provolone slices with the expectation of making sandwiches for lunch. The problem is, I just end up taking some roast beef, rolling it in a slice of provolone, and snackin’. The bread is just sadly sitting in our kitchen going stale, because no one else in my house loves deli meat as much as I do.
Ribolita, a hearty Tuscan vegetable soup, is usually made from nice [stale, old] bread that’s not sliced for sandwiches. But you know what? If you buy whole grain or seeded bread, they’re just as good when it gets too dry or stale. Waste not! Make soup!

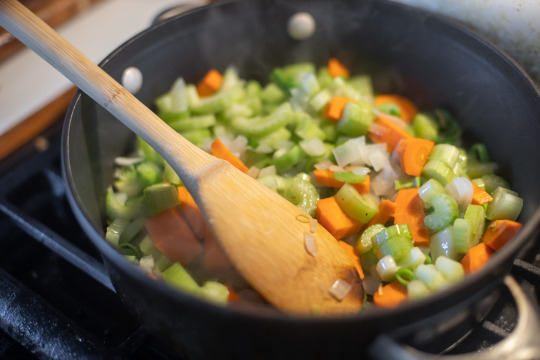
- 2 tablespoons olive oil
- 1 yellow onion, chopped
- 3 stalks celery, sliced
- 2 carrots, chopped
- 6 garlic cloves, smashed
- 1 teaspoon kosher salt
- ¼ teaspoon ground black pepper
- Two 15-ounce cans cannellini beans, rinsed and drained
- 6 cups chicken or vegetable broth
- 28-ounce can crushed fire roasted tomatoes
- 15-ounce can diced tomatoes
- 1 Parmesan cheese rind
- 2 teaspoon dried oregano
- 1 bay leaf
- 1 teaspoon thyme leaves
- ½ teaspoon red chili pepper flakes
- 6 cups chopped kale
- 4 cups cubed sourdough bread
- ½ cup grated Parmesan cheese
In a large sauté pan, heat olive oil over medium heat. Add chopped onions, celery, carrots, and garlic. Once garlic is fragrant, season with salt and pepper. Cook until onions are softened.
Transfer contents to a slow cooker on high. Add remaining ingredients from the recipe list above EXCEPT for the kale, sourdough bread cubes and grated Parmesan. Cook for 1 hour. Add kale and bread. Remove Parmesan cheese rind. Cook for an additional 20 minutes. Season with additional salt and pepper if needed.
Serve and garnish with grated Parmesan cheese.
Fruit Sandwich

Milk bread is sometimes known as milk toast. I prefer calling it this even though I only really toast it for a dish called Coffin Bread. And because I don’t really enjoy making bread, the bakery that I buy my milk bread from calls it milk toast too.
One of my milk toast guilty pleasures is the fruit sandwich. You can sometimes find it in East Asian convenience stories like 7-Eleven. It’s subtlety sweet and so easy to make yourself.
All you need is:
- 2 slices milk toast (I like to call it Asian Wonderbread)
- Lightly sweetened whipped cream (decrease the amount you’d regularly use for whipped cream by 25-50%)
- Your favorite sliced fruit
- Plastic wrap
All you need to do is spread a layer of whipped cream on both pieces of toast; add sliced fruit on one piece of toast. (The trick here is to make sure your fruit has the same thickness.) Repeat if you’d like. Top with the other piece of toast, whipped cream facing down. Tightly wrap the sandwich in plastic wrap. Let it sit in the fridge for about 30 minutes before unwrapping and eating – you want the bread to soften slightly.
Some fruit pairing ideas:
- Mango and strawberry
- Strawberry and orange
- Strawberry and kiwi
- Cantaloupe and orange
- Green grape and orange
- Peach and kiwi
- Cantaloupe and grape
No bananas though…the texture blends in too much with the whipped cream.

Water spinach is often used in Southeast Asian cooking and not an actual “spinach” because it belongs to a different family. Unlike conventional spinach, the hollow stems hold up well in a hot pan and it becomes mouthwateringly tender. It tastes like spinach but there’s something particularly refreshing about it. But don’t grown this vegetable in your garden if you don’t live where it’s natively grown: it is extremely invasive that the USDA has classified it as a noxious weed and a threat to native plants in North America.

For 3-4 servings:
- 1 bunch (about 1.2 pounds) “a-choy”/”ong choy”/water spinach, roughly chopped
- 2 tbsp. vegetable or canola oil
- 3 cloves garlic, smashed
- ½ c. chicken or vegetable stock
- 2 tsp. kosher salt
In a saute pan over medium heat, heat oil. Add smashed garlic until fragrant, about 10 seconds. Add the stock, salt AND stems of the vegetable.
Cook for about a minute before adding the rest of the vegetables. Saute occasionally. Once vegetables are bright green and tender, serve as a side dish.


