#cosplay props

 by ARIZATUS1See more : https://webmangaplus. com/cosplay/")


 Xmas Nico RobinSee more : https://webmangaplus. com/cosplay/")


Hey friends! I’m just finishing up Boba’s Blastech ee-3 blaster carbine, so it’s time for another summary post. For more regular updates, find me on Instagram (https://www.instagram.com/ultraboltzinsta/) or twitter (https://twitter.com/nate_bolton). Anyway, step one (above). Come up with a plan! Decided I was going to lengthen the barrel by 2″ and create a new stock. The grip is slightly too small, but I decided to leave it as-is for structural reasons.

(above) Hey and here we go! Blocks are starting to come together. PVC pipe to lengthen the barrel and MDF for the stock. The connection between the stock and the grip will be made of three layers of sintra glued together.

(above) With the stock and barrel extension in place, it’s ready for primer (I use Krylon Fusion primer/paint as a base as I find it has the best plastic adhesion) and a base coat of matte black. Next, weathering and age!

(above) I thought I had some more intermediate pics of the weathering, but I’m afraid they’re just vids on my Instagram. Nevertheless, here we have the blaster ready for clear coat. The weathering is multiple layers of colour washes + dry brushing, as well as a healthy amount of silver dry brushing to simulate places the paint has been worn smooth off. After clearcoat you may want to reapply some of the silver weathering as a matte top coat will kill some of the shine of the silver. That’s it!
Post link


Jack Frost staff WIP [1]
Its been an on/off cosplay project, I actually wanted to cosplay Jack Frost 2 years ago, but had to postponed it when I finally get to continued back my studies and had to take time to get used to it again.
So hopefully, I can debut my Jack Frost cosplay in a local upcoming con soon this year. If I can’t, well I can just go for a photoshoot session, and cosplay it for other future cons, hospital visits and other charity activities.
Now that I had more time before the con I decided to do Rey’s staff!
It is made out of a pole vault pole, craft foam, worbla and hard plastic.

My dad gave the pole to me months ago “Maybe you can do something with this”, like parents tend to do. And it is 1 inch in diameter, just like hers is suppose to be. So that was perfect.
I sawed of a bit to make it 15 cm longer than me, what I’ve heard it the best dimension. Buut messed up and it was only 5 cm longer. but I fixed that by extending it it both ends with a bit of wood pole. It was to be covered anyway.
I started with drawing out where and how long each of the parts were gonna be. Which I completely missed at one place, but I had changed it around a lot so guess I got confused over the markings.

This is one of the sides. I used EVA foam for the widest parts and used stripes of craft foam to keep the shape when I covered it to. If I had been more meticulous I could have painted this and called it a day.
But I wanted it a bit neater so covered it in worbla. At the top bit with the blue stripes, the stripes were not as noticeable as I wanted but ¯\_(ツ)_/¯.

For the fins I pondered a bit of what they would be, I had no room for worbla, I could only have foam but it could easily be deformed. I could have just worbla, either made and molded my scrapes or to flat put together. Then I thought of cardboard, but just as foam it could be miss formed to easy.
So what I went with ended up with hard plastic, I used the plastic “glass” from a pictures frame and cut out 12 fins. I glued them together two and two and hot glue is reeealy effective.
And about hot glue. I used it for the entire staff, but Bubblefish warned me about using worbla over it. cause ya know, hot glue get loose if it get’s heated up. I did not have any problem though. But she had with some project and it is worth having in mind.

This is a awful picture but this is how I made the hand grips. I took craft foam and cut lines in it with a knife, but not trough it, just a incision. They look a bit different so for the top ones and the vertical I also made the grooves more noticeable by heating it up with a heat gun (the ends separate and make it look cooler).
Then I spray painted it, first with black and then I went over it with gunmetal(same as my Hawke armour) and then mixed it with a bit of both to make it not to black but not silver and I think it is pretty good colour.
A last tip would be, use craft foam in the same or close to the colour the prop is gonna be. as You can see I used purple and orange for the grips and the paint did not want to get into the grooves to easily. If I had used black it would not have mattered so much, but orange slipping trough? not so nice. The reason why I used these colours was becasue the cheapest site I have found only do mixed packs and this the scraps left.
-Marlin
Hi!
So for me and my team’s (without Bubblefish) Psycho Pass cosplay, which I haven’t talk about yet, they wanted the dominators to light up. I laughed. But they visited me and we just went for it.

And it worked. But I will talk about them more thoroughly another post.
This post is about all the work before the soldering, which was a pain and damn hard to find a good tutorial. So here I am, trying to make one.

This is what you will need, Lamps, battery of preference(and space), wires, resistors, a switch and a battery holder. Not pictured is tools for soldering.
The switch can be soldered to the wires easily, with one connected to each leg of the switch. Th use of the battery holder is pretty self explanatory.
In this case we choose button batteries because our prop is not so big sp there is not much room for it and we needed to easily be able to switch batteries.
And these button batteries are 3 volts,(the voltages is written on the package) and the led lights takes 3 volts to light up, so it is a perfect match and no resistors are needed.
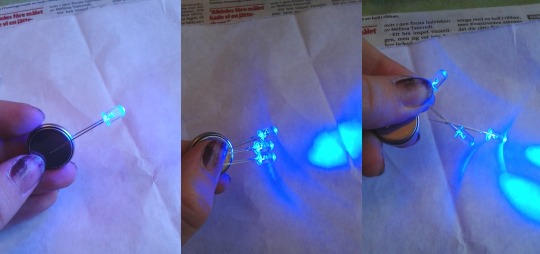
So just putting the led on the battery (+leg(longer leg) to the plus side of the battery and -leg(shorter leg) to the -side.) You can even put several leds on the battery, or even series connect them like this. But for some reason,
My understanding is that you need resistors, for everything more than one lamp. when we connected the leds with wire and no resistor they did not light up. Explanation for that: The first led ate all the 3 volts and left none to the other one. So that is why a resistor is needed to split out the voltage over all the lights. I did try connect three 3v leds light to a 9v battery but nothing happened.
We also tried serie conectng two 3v button batteries, but that did not light up 2 leds, we did parallel connect the batteries that time, out teori is that if they had been in a serie it would have light up 2 leds but not more.
But resistors are not scary, we used this website to help us calculate.
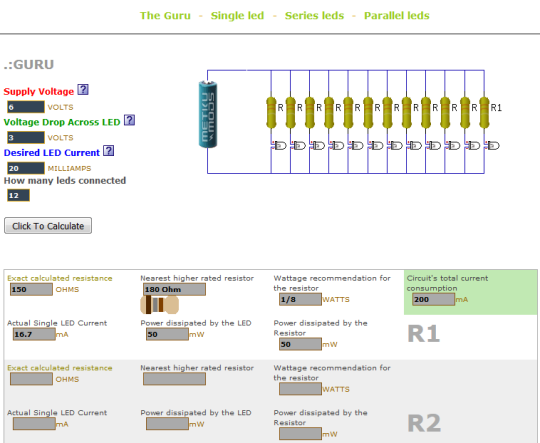
We put in our voltage supply. 6 since we used two 3v batteries,
The volage drop is 3, the usual for leds, is also says on the package.
The led current depends on colour(I think) and you can find it on the package.
Lastly we put in 12 since that was the amount of leds we wanted to use.
The results was that we needed a 150ohms resistor on each led, with 180 working but not best.
The resistor should be wrapped around the + leg of the led, soldered and them taped with electrical tape.(For stability and if the + and - legs touch it will short circuit.
It had to be parallel contected, which means that each led had to have one + wire and and - wire connected to it.
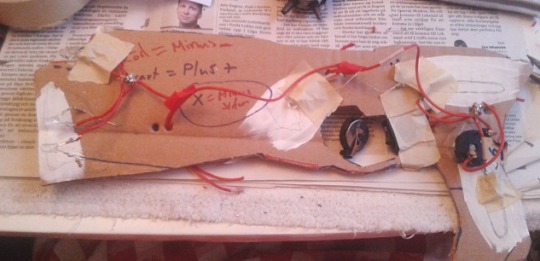
Here I am halfway. You can say that the switch is the middlepoint, the wire used on this side the battery on this side comes from the - pol on the battery and the other side is the + side. To minimise the amount of wire we made “clusters” where wires from nearby lamps are connected. The holes are for putting the - wire to the leds on the other side and get the + wires to the leds here.

Had no good picture of it done, because I took a video, for some reason. (edit: can’t get it to work in this post for some reason so here is a link here it does.)
I think that explains is, if you have any questions about this process send me a message I will try to answer or let my buddies who seems to understand this better then me try to answer it. :)
–Marlin