#led lights


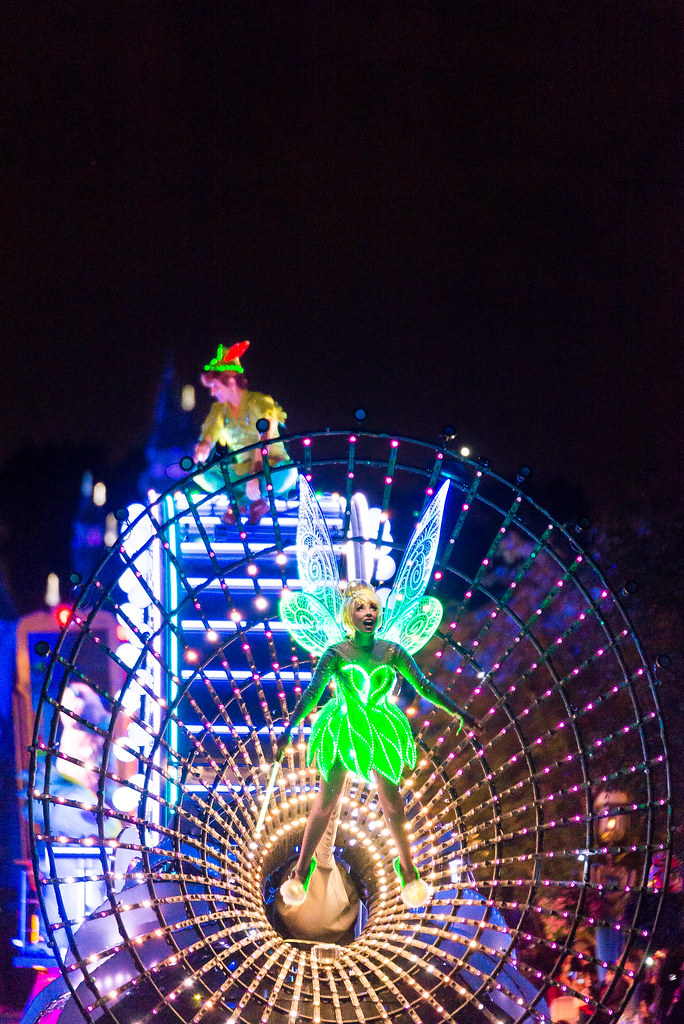
TheLuminarie De Cagna is an imposing cathedral-like structure that was recently on display at the 2012 Light Festival in Ghent, Belgium
Post link


*Suck it*

You’re dead to me

My edit

All i need is you

Not mine

*bang bang*

*trippy eyes*

*techno is on god *

*It was all a DrEaM*

*we are made of stardust*


Colourful lights to brighten up my life a little


Craving intimacy


3D Optical Illusion of 2D Lamps
Studio Cheha based in Tel Aviv has created these LED lamps “Bulbing” with an illusion of 3D effect since the lamps are in fact completely flat. Financed thanks to Kickstarter, the designers have made several lamps’ shapes : ballons, mountain, tornado…
Post link
LUCID STEAD by Phillip K Smith III
Growing plants indoors can be the ideal way for those people with a green thumb but not enough free space to have a full-fledged garden. In fact, indoor gardening can be quite a productive endeavor for most people, especially in these days of rising awareness regarding the need of growing one’s own vegetables. This can help people in avoiding vegetables available in the market that come laden with harmful chemical fertilizers and pesticides. However, starting and maintaining an indoor garden is no mean feat, and a large percentage of people starting out commit a number of common mistakes. Even though these mistakes are quite common, it is essential to get to know each of them for the damage they can cause to the plants in both the short and long-term prospects.
The first mistake that any gardener can possibly make is not doing enough research regarding the plants they intend to grow and their specific requirements. Each of the plant types have some specific needs, as well as, growth conditions that the gardeners must be able to provide to them for their optimal growth. Growers must also perform adequate research regarding the growth techniques that yield the maximum result, and any other improvisations that can improve the profitability of their practice. Finally, growers need to provide the nutrients in the right quantity to grow the plants optimally.
One of the major constraints faced by the people practicing indoor gardening is the lack of adequate amount of natural light. Thus, it becomes essential to opt for grow lights that take the place of sun in proving adequate amount of light energy to the plants growing indoors. However, many growers fail to calculate accurately the number and power of such grow lights that they would require for their plants. This results in inadequate amount of light available to plants that leads to low yields. Growers must plan this with due care and use more light for plants with bushy growths.
Another common mistake that people make while growing plants indoors under LED grow lights is the addition the same amount of nutrients that they would while growing out in the open. Plants growing indoors under these grow lights typically require 30% less nutrients than in natural settings, and adding too much nutrients turns out to be counterproductive. Growers ought to find out about the exact nutrient requirements of the plants they intend to grow, and then calculate the amount that they need to add under the given growth conditions.
Indoor gardening also requires regular inspections of the health conditions of the plants to prevent outbreak of any diseases, and maintain growth rate. Growers often make the mistake of not giving enough focus to the need of daily checks of the plants. Since plants growing under LED lights experience lesser degree of evaporation, growers ought to check the water content in the soil regularly to avoid water accumulation and consequent damage to the roots. They should also check other parameters such as soil pH to keep the growth conditions optimum.
Finally, planning properly to ensure adequate provisions for the plants is essential to maintain the optimum growth conditions regardless of their growth.
Hi!
So for me and my team’s (without Bubblefish) Psycho Pass cosplay, which I haven’t talk about yet, they wanted the dominators to light up. I laughed. But they visited me and we just went for it.

And it worked. But I will talk about them more thoroughly another post.
This post is about all the work before the soldering, which was a pain and damn hard to find a good tutorial. So here I am, trying to make one.

This is what you will need, Lamps, battery of preference(and space), wires, resistors, a switch and a battery holder. Not pictured is tools for soldering.
The switch can be soldered to the wires easily, with one connected to each leg of the switch. Th use of the battery holder is pretty self explanatory.
In this case we choose button batteries because our prop is not so big sp there is not much room for it and we needed to easily be able to switch batteries.
And these button batteries are 3 volts,(the voltages is written on the package) and the led lights takes 3 volts to light up, so it is a perfect match and no resistors are needed.
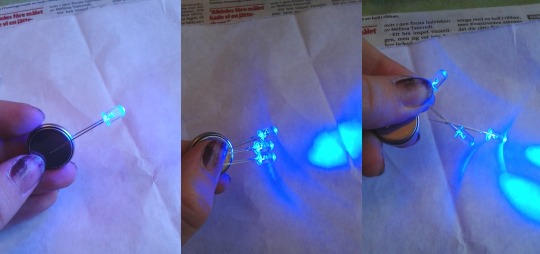
So just putting the led on the battery (+leg(longer leg) to the plus side of the battery and -leg(shorter leg) to the -side.) You can even put several leds on the battery, or even series connect them like this. But for some reason,
My understanding is that you need resistors, for everything more than one lamp. when we connected the leds with wire and no resistor they did not light up. Explanation for that: The first led ate all the 3 volts and left none to the other one. So that is why a resistor is needed to split out the voltage over all the lights. I did try connect three 3v leds light to a 9v battery but nothing happened.
We also tried serie conectng two 3v button batteries, but that did not light up 2 leds, we did parallel connect the batteries that time, out teori is that if they had been in a serie it would have light up 2 leds but not more.
But resistors are not scary, we used this website to help us calculate.
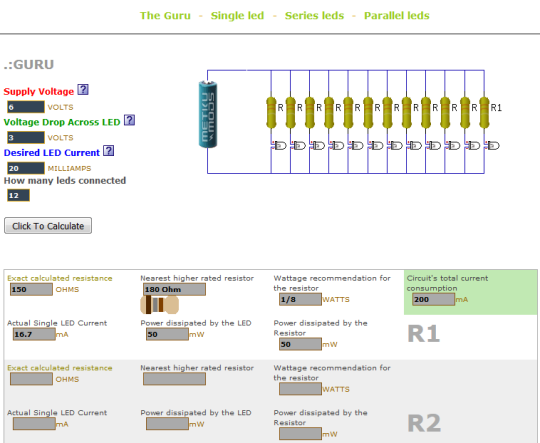
We put in our voltage supply. 6 since we used two 3v batteries,
The volage drop is 3, the usual for leds, is also says on the package.
The led current depends on colour(I think) and you can find it on the package.
Lastly we put in 12 since that was the amount of leds we wanted to use.
The results was that we needed a 150ohms resistor on each led, with 180 working but not best.
The resistor should be wrapped around the + leg of the led, soldered and them taped with electrical tape.(For stability and if the + and - legs touch it will short circuit.
It had to be parallel contected, which means that each led had to have one + wire and and - wire connected to it.
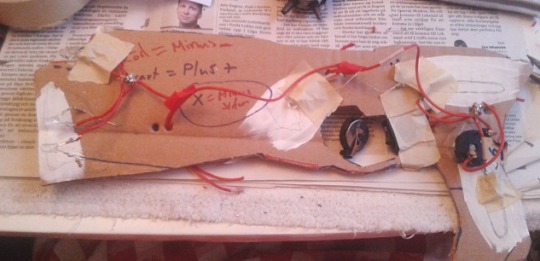
Here I am halfway. You can say that the switch is the middlepoint, the wire used on this side the battery on this side comes from the - pol on the battery and the other side is the + side. To minimise the amount of wire we made “clusters” where wires from nearby lamps are connected. The holes are for putting the - wire to the leds on the other side and get the + wires to the leds here.

Had no good picture of it done, because I took a video, for some reason. (edit: can’t get it to work in this post for some reason so here is a link here it does.)
I think that explains is, if you have any questions about this process send me a message I will try to answer or let my buddies who seems to understand this better then me try to answer it. :)
–Marlin