#step by step


You can get PSD + original files for free Until 2021/1/3. Please check my PixivBooth!
I wish you all have a wonderful holiday season. I know I’m a bit late, but here is an Christmas stuff. Please enjoy!
Post link


test
(some weird thing happened while posting with PC, so try posting with phone
—-
okay seems like it works this time :/
===============================
quick little piece for Harry Potter 20th Anniversary !
with a few rough step-by-step wip thing…. (WHAT THE H— is with THE LAST ONE(initial color plan, i think ?(UH
Post link
| THE VALIANT #1 PAGE 12. 2014. Photoshop, 2750 × 4175 px. |
This page involved looking into the mirror a lot, but I took at least one webcam pic for the last panel. The cigar club is based on a real one in NYC that I found pics of online. (Those beautiful, blonde waves are based on my own hair.) All but 4 pages of issue #1 were done digitally, using Kyle T. Webster’s Photoshop brushes. You can see the traditional pages at Splashpage Art.
I thought the trade paperback was coming out today (and last week) but it looks like you’ll have to wait until the end of the month. In the meantime, our book was ranked as one of the top Valiant stories of all time by CBR. Awesome!
| What’s the deal? |
| digital inks |
| digital pencils |
| digital layout |
| digital ink detail |
via Blogger http://ift.tt/1c59Uds
| THE VALIANT #1 p18. 2014. Photoshop, 2750 × 4175 px. |
Did I say this week? What I meant was that The Valiant trade paperback will be out May 27. But in keeping with the spirit, here’s another page with its accompanying reference. This page was made completely in Photoshop, with a major assist from Kyle T. Webster’s brushes, specifically Rough Inker, Ink Wash 1, Bone Dry, and Deliciously Dry. This allowed me to keep working on the book, even when I was traveling.
| RAAaaauaaauAAuUUUgh! Google! |
| digital inks with wash tone |
When the project first began, I was going to “save time” by keeping the colors flat, albeit modulated with an “ink wash” layer. By the second issue, I was already back to my old habit of two-tone coloring, but this technique was nice while it lasted. Because I was inking digitally, I couldn’t help myself from adding the tone as I went along. I just love that look for black and white comics, something akin to Blazing Combat.
| digital pencils |
| digital layouts |
via Blogger http://ift.tt/1Iy6Uol
| THE VALIANT #2 PAGE 15. 2015. Ink(ed by Joe Rivera) on bristol board with digital color, 11 × 17″. |
The Valiant trade paperback comes out next week, so I thought it might be a good time to look back at a page from issue 2. In this scene, Ninjak really cuts loose — only to have his bum thoroughly handed to him. As you can see from the pencils, I changed where he was looking in the first panel… he wasn’t angry enough!
I also wanted to mention that this page(andmany others fromThe Valiant) are now available through my art dealer, Splashpage Art. Covers are listed separately. And even if you’re not interested in purchasing, we’ve got nice big scans of the originals, pencils by me and inks by my dad, Joe Rivera. Hope you enjoy the closer look.
| True assassins use paper tubes. |
| inks by my Pops |
| blue-line print of pencils |
| pencils over digital sketch |
| digital sketch |
via Blogger http://ift.tt/1Ki9HyZ


via Blogger https://ift.tt/Fp5gsBV

Fluffy Vegan Cinnamon Rolls
1. Warm up the water until it is between 100°-115° F and add 1 teaspoon of sugar, and all the yeast. Stir and let sit for a few minutes. Yeast should activate.
2. Add the coconut oil, salt, 2 cups of flour, remaining coconut sugar, and stir until the mixture comes together. Add additional flour in ½ cup increments until mixture pulls away from the sides of the bowl. Turn dough out onto floured surface and knead a few times until you form a smooth ball.
3. Combine the cinnamon + coconut sugar mixture. Dust the counter with more flour, and turn the dough ball out onto the floured surface.
4. Make dough rectangle about 12x16 inches. Spread melted coconut oil over the rolled out dough.
5. Sprinkle oil with cinnamon and coconut sugar mixture.
6. Starting at the long end closes to you, begin to (gently but tightly) roll the dough up into a log. You should get around 12 rolls.
7. Set somewhere warm for about 40 minutes. After 40 min, put in preheat oven to 350°F. Rolls should puff up and double in size. Bake them for about 15 minutes.
Post link
Heyy lovely people! So I’ve been receiving a lot of ask on how I made all these Lyric Wallpapers that I’ve posted here. So this post will answer briefly how I make my edits! [ might be a little long]
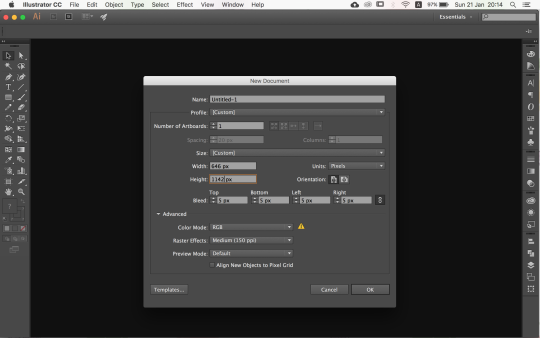
I am using Adobe illustrator on my laptop. It is somehow similar to Adobe Photoshop with some major differences. You can actually use photoshop to do these edit too. Point is, I prefer using illustrator. In the pic above, is the document settings that I use.
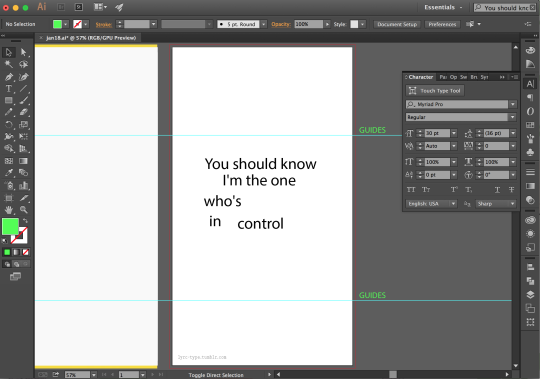
once I have my artboard, I place the lyrics that I’ll be working on. I used to put in ruled guides so the words won’t intercept with the digital clock on the phone’s lockscreen.
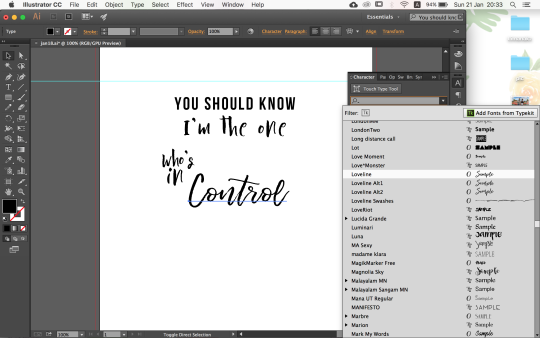
Next, the step that consumed 90% of my editing time; choosing the FONTS!I spent most of the time trying to find the right fonts so it’ll fits my desired layout. Most of the fonts I have were from dafont.com& other free downloads sites. Other times, I make brush lettering, scan it and vector it out to be used as the lyric type.

Once I finally choose the fonts, I’ll make several changes to the type characters so it’ll fits and make it look Awesome!I wasn’t too used to this step when I first started out but after a period of time experimentingI got used to the software’s tools. Well, at least the ones I need for the edits! hehehe

Here’s the fun part; Making the background! It’s simple actually. Most of the time I find relevant photos & textures on the net. Other times I used the photos I took. I am BIG & CrazyaboutTEXTURES.I LOVE putting in textures for my backgrounds. Not sure why but I just do!

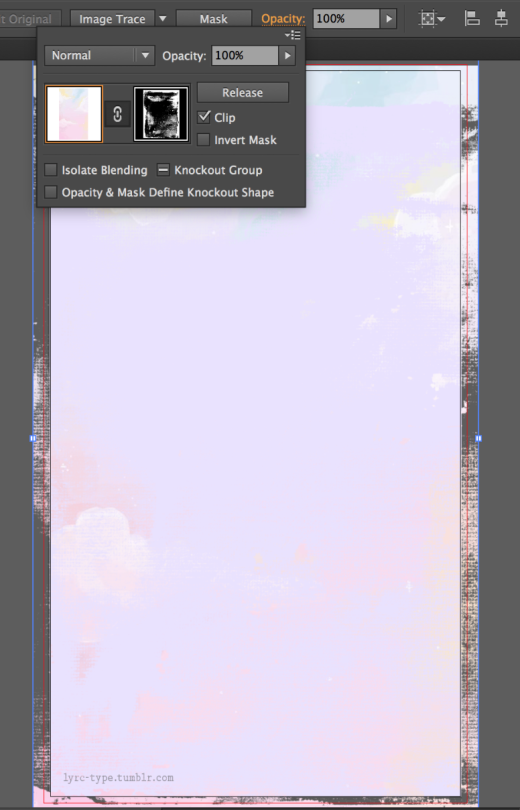
So, for a simple edit, you can find one photo you like and put it as a background. However, what I like to do, is to combine and layer a few images because I’m just that extra… Anyway, when I first discover how to make mask on illustrator I was super amazed. I didn’t knew I could do something like that on illustrator & not just photoshop. Made my editing easier cos I didn’t have to edit the images on photoshop and import it back to illustrator. [ I might not makes sense to you now am I?]

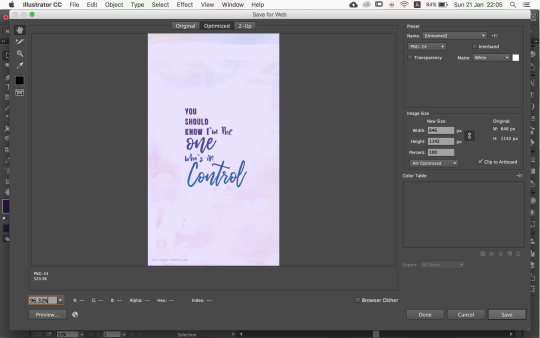
Finally! Once I’m satisfied with the design, I’ll export out my work through ‘save for Web…’ in.png With that, we’ve completed one lyric type wallpaper!
I hope I’ve answered to most of you curious users. This is how I make MY edits.There are many other ways on how you can make yours. If you are looking for a very simple way to make your own wallpaper, you can try out Canva on desktop or Mobile [ requires Sign Up but the basic stuff are still free ] or you can download mobile photo editing apps such as April - Layouts Photo Collage,Snapseed , Pixlr - Free Photo Editor [available for iOS & androids] There are many more but those are few of my favs.
That’s it then! If you need any help in making your own wallpaper or have any editing questions just slide into my ask, message & replies. Just no more request please. Hahaha. Have a good day my good people xX


I’m trying to hone my visual storytelling skills after getting some feedback at IAMAG conference last week. Still at a loss as to how to come up with these kinds of things, and how to do this in a bigger project, but right now just taking it day by day!
Post link

Here is the process of my latest illustration for the Character Design Challenge, Carnival Girl!
Post link


Ariel dans sa grotte / Ariel in her grotto
Progress images can be found on my Artstation for the Desireable Future painting.
https://www.artstation.com/artwork/oOKodk
★ HOW TO FRENCH TWIST YOUR OWN HAIR TUTORIAL FOR SHORT MEDIUM LONG HAIR - ROMANTIC UPDO - WEDDING
Learn how to do a Romantic French Twist hairstyle with voluminous curls on your own hair for short, medium or long hair in this hair tutorial video.

Hey guys, just wanted to let you know that I’ve finally launched my Patreon page!
It’ll be be like a behind the scenes of my work - a place where I can share with you my process- sketches, step by steps, high res jpgs, thoughts and more. I will also offer to give overpaints and feedback on your characters.
Here’s the link - patreon.com/magdalina /
Support me for $5 to see the full step-by-step process of this character with pictures and notes where I guide you through my whole process! It’ll be posted tonight!
I’m also making this a Draw This in Your Style challenge on Instagram!You can see teh rules in my post there!
I will share my favourite entries on my stories and I will pick the best 5-9 entries in the end and post them on my feed too!
Have fun <3
Instagram
Post link


“Saturn”
WIP…
I’m working on this embroidery since 15h00 now and I’m still doing the inside of my planet.
See you tomorrow for the next steps
https://www.etsy.com/fr/shop/OphelieTrichereau
I take custom orders.
Post link


“Saturn”
Work in progress…
The material :
- a hoop ; linen ; felt ; scissors (for fabric, threads and paper) ; water soluble fabric ; paper ; embroidery threads ; pins ; needles (for threads and beads) ; beads; pen ; a compass.
First steps :
- I do the drawing of my planet and it’s 9 rings with a pen and the compass on a paper, then I transfer it on water-soluble fabric with a pen. After that I cut the circle of my planet in the paper and from my water-soluble fabric.
- I cut a circle of felt the size of my hoop for later. I stretch the fabric in the hoop, keeping it overhang of minimum 1cm.
- I place my paper and my water-soluble fabric on my fabric with pins.
- I select the embroidery threads that I will need for my embroidery.
- I start to embroider the outlines of my embroidery on my water-soluble fabric.
https://www.etsy.com/fr/shop/OphelieTrichereau
I take custom orders.
Post link


Realistic foot tutorial


Realistic hand tutorial


Nose in profile tutorial