You can grow your own gherkin pickles and more with this pest-proof mini cuke/squash from Africa. Try growing burr gherkins to make delicious pickles and a spicy Brazillian stir-fry.
The Midwest Organic and Sustainable Education Service (MOSES) is seeking nominations for the “2015 MOSES Organic Farmer of the Year” award, which will be presented at the 26th annual MOSES Organic Farming Conference in La Crosse, Wis., Feb. 26 to 28, 2015.
The award recognizes an organic farmer or farm family with a history of outstanding land management, resource conservation, and farming innovation. These exemplary farmers also are committed to spreading the organic message in their communities. This is the 13th year for the award program, which comes with a prize package that includes full admission to the 2015 MOSES Conference.
North Dakota seed and grain farmers, David, Ginger, Dan and Theresa Podoll of Prairie Road Organic Farm and Seed in Fullerton, ND, received the 2014 MOSES Organic Farmers of the Year award. Their farm story and other recipients’ stories are online at the MOSES website under the “Projects” tab.
Anyone can nominate a farmer for this award. Nomination forms are available on the MOSES website, or by calling the MOSES office at 715-778-5775. Nominations are due by Sept. 15, 2014.
This prestigious award comes with a number of prizes including a cash award, lodging, a bookstore gift certificate and full admission to the Organic Farming Conference, the nation’s largest gathering of organic farmers.
The recipe is modified from Ball Complete Book of Home Preserving by Kingry and Devine.
We love pickles and that does not just mean cucumbers. Pickled okra, green beans, baby onions, beets- and our new true love; pickled asparagus. We pick the asparagus every day and keep it in 2’“ water until we have a few quarts. Longer spears can be snapped in half and with ends placed in water and stored in the refrigerator. [Get the recipe!]
There are reasons growing carrots organically is challenging. Carrots germinate slowly. Weeds germinate fast. What if you could plant the carrots into the weed-free soil after they are already germinated with green tops? They would be weeks ahead of the weeds yet to germinate. It’d be like a five mile head start in a marathon.
Carrots are delicate. Their foliage is delicate, and early on it is barely discernible from the weeds. By the time the tiny lacy greenery is substantial enough to see, the weeds are taller and bigger. Weeding them is painstaking. [Keep reading….]
I have friends who have numerous fig trees, and they brought me a huge colander full of ripe black figs the other day. It’s impossible to eat all of them fresh, so I like to make this easy fig jam. The nice thing about this jam is that it’s not too sweet because you don’t need to add any sugar. Figs are naturally sweet. The only things I add are the juice of one or two fresh lemons, a touch of kosher salt, and water as needed to break down the skins, and get the jam to cook to a smooth consistency.
The hardest part about this is washing and sterilizing the jars and lids, and then processing the jars once they’re filled. It’s fun though, and feels very scientific.
I used very small jars so I could have treats to give to neighbors and friends, and so I didn’t have to break out the huge canning pot. I just used a basic spaghetti pot to process these jars, with a metal trivet at the bottom so the jars wouldn’t touch the pot and possibly break.
Canning is a bit dangerous with all that boiling water and hot temps, so please be careful when you do this.
For the jam: Wash and chop fresh black figs. Add to a large pan, along with the juice of 1 large lemon, ½ cup water, and a pinch of kosher salt. Cook on low, stirring as often as you can so that it doesn’t burn to the bottom of the pan. I used my large, low Le Cruset dutch oven thing (we found ours on sale, this amazon price is way high) This type of enamel lined pan works great for this because all the moisture evaporates quickly and you can get a nice jam consistency, a stainless skillet would work well too. After cooking and stirring for a few minutes you can start to smash the skins down with a potato masher, but you don’t have to.
Cook for about 30 minutes, adding a splash of water here and there as needed so it doesn’t get too thick and caramelized.
Wash jars and lids. Start a pot of water to boil. Once it’s boiling, use tongs to gently place the jars in the boiling water for a few minutes to sterilize. Lift them out, and place on a clean kitchen towel on the counter. Fill the jars with the jam, carefully wipe the rims with a clean paper towel or cloth. Sterilize the lids using the lid holder thingy, use the magnet thing to place the lid on the jar without touching the inside of it, (this is to keep everything free of any bacteria on your fingertips), place the rings in the boiling water for a couple minutes, use the tongs to remove them and place on the jars. At this point you just want to loosely secure the rings, don’t screw them down super tight, that way, the air can escape from the jar in the water bath process. The air escaping helps to secure the lid nice and tight when you take them out to cool. I love Science.
Reduce the heat on the stove for a minute so you don’t get too hot doing this part, use the jar lifter to gently lower the jars into the pot and onto whatever metal trivet or rack is in the bottom of the pot. Add as many jars as you can without them touching each other, or the sides of the pot. Increase heat back to boil, let the jars boil in the water bath for ten minutes to seal them. Once ten minutes (or longer for larger jars) is up, reduce heat, carefully lift out the jars with the jar lifter and place them on the kitchen towel to cool. You should hear each lid make a ‘pop’ as it goes all convex. This is one of the best parts about making jam, the pop is pretty cool.
Sorry, This is so long. But I wanted to be detailed in case you have never made and jarred jam before. Enjoy!
Challenge 144: 10 Years, Looking Forward: The Perfect Homestead Studio
I relocated to SCAD in 2010 at the beginning of the new year and graduated November of 2011. Having transferred blindly as a Junior totally relying on that “good feeling” alone SCAD and all its resources, as well as the town of Savannah, had exceeded all my expectations so much so I now call it my second home. I’ve met some beautifully talented people at my time there. Feeling the creative energy that flowed in the city and around my fellow classmates and professors every day I finally felt I was where I was suppose to be. The only two things I regret is not taking licensing classes, since this is what I have done since graduating and absolutely love, and not being able to afford to come back to Savannah to attend my graduation that Spring. Despite my financial struggles after graduating, what has happened since each step of the way has only prepared me for success, gave me confidence as an artist, a professional, and as a person to become stronger and better at what I do, and helped me learn not take anything or anyone for granted.
Square Carousel has been my push, my drive, my focus, and in some cases my savior for my mental and professional sanity. This amazing group of individuals, who I consider family, has helped my art and style grow from the uncontrolled random mess it used to be and continued to challenge my abilities with super cool projects and challenges. This is something I’ll truly miss, but not as much as I will my fellow SCAD Illustrators. There’s always something special about a group of people who “get it”. Who come together to help solve design issues, who support one another as much as we do, who have “been there done that”, and who are an understanding reliable shoulder to lean on during the more difficult times as a working illustrator. Being a part of Square Carousel has been such a pleasure and is something I’ll always be grateful for having experienced working with such talented beautiful people. I wanted to give a special big thank you to my girl Sayada for bringing me into the Collective, and for everyone else being so amazing over our years together. For all our Christmas card swaps, all of your friendship and support, and having watched many of you grow as creatives over the years, I will continue to follow and support you all in your creative and your life journeys. I am forever grateful for all of you, and I cannot wait to see what life has in store for all of us in the next 10 years! You guys…we’re so going to crush it!!!
For our last and final challenge I wanted to illustrate something truly special to my heart. Ever since I saw the 1990s TV show The World of Peter Rabbit and Friends, I wanted my own home/cottage to mirror the spirit of that of Beatrix Potter. In this homestead I dream of looking out my studio window as I create for a living to support my future family, and seeing my animal friends happily playing outside in the garden. Over the years this vision has stayed the same, but having since adapted a vegan eco-friendly lifestyle, volunteering for rescues and creating content for those types of animals, and the way I see my garden have changed a bit to accommodate how I now want to live and use my art to give back. Now I see this whimsical space not only giving me creative inspiration and a meditation space of my own, but also a land that has a productive purpose to give back to our animals and our environment who need it the most. My new cottage, now with a greenhouse studio, consists of self-sustainable practices such as solar windows, surrounding myself with plants that keep the air clean, converting part of my studio to a foster space, organic gardening that attracts healthy pollinators, and animals that I hope to rescue/foster to help give them new homes and a better quality of life. Though I look forward to this studio and space coming to a reality, I’m still not quite sure where I want this magical space to be located or how it’ll turn out….which makes this vision all the more exciting.
Here’s to the next 10 years and the start of our many new adventures. Salute!
Happy Halloween @GreenSoil! (Ode to William Wordsworth by Nancy Wallace) #Wordsworthrevisited
Playing with Poo (My Brew of Choice)
I wandered lonely as a cloud
That floats on high o'er vales and hills,
When all at once I saw a crowd,
A host, of golden regal cows;
Beside the lake, beneath the trees,
I chanced upon some moo poo tea.
Such bovine beauties did grace the meadow,
And bellow such a sweet libretto.
They roamed in never-ending line
Along the golden country side:
Ten thousand cattle I saw at glance
Tossing their heads in sprightly dance,
Whilst pooping as they pranced.
Then through the tumble-down, farm-shed door,
Cometh Annie to complete the chore,
Trowels a'blazing! a perpetual collection of poo ensues,
(Nothing but organic will do.)
She gathers bags of moo poo tea
Enough for you, enough for me.
Oh! such garden goodness we create through brew.
Get your poo on, with organic compost tea from Authentic Haven Brand, HERE.Created from livestock raised on permanent native grass pastures at the Haven Family Ranch, California. Naturally organic.
Hügelkultur (German, meaning “hill culture” or “mound culture”) is the garden concept of building raised beds over decaying wood piles. Decayed timbers become porous and retain moisture while releasing nutrients into the soil that, in turn, promote root growth in plant materials. As the logs decay, they expand and contract, creating air pockets that assist in aerating the soil, allowing roots to easily penetrate the soil. This decaying environment creates a beneficial home to earthworms. As the worms burrow into the soil, they loosen the soil and deposit nutrient-rich worm castings, beneficial to plants. An earthworm can produce its weight in castings on a daily basis.
The best decayed wood for a Hügelkultur, according to A Growing Culture, comes from alders, applewood, cottonwood, poplar, maple and birch. Use wood products that have been in the process of decay for about a year (using green, or fresh, wood products will rob the soil of necessary nitrogen). Some wood products, like cedar and black walnut, should be avoided because they produce organisms that negatively effect plant growth.
Keyhole Gardening: a Drought-Tolerant, Compost-Style, Sustainable Concept
The key hole garden concept is quite simple. A circular planting bed (with a “keyhole” to allow access to the center) is constructed with bricks, stone, gabion-style walls, or even aluminum siding. In the center of the keyhole is a circular compost bin in which kitchen scraps and household “gray water” are poured.
Layers of soil inside the circular walls slope slightly outward to encourage positive drainage away from the central compost bin. As kitchen and garden waste breaks down and gray water is added, a natural “compost tea” soaks into the surrounding soil providing nutrients to plants growing within the circular wall. More information and instructions at the link.
An ice storm is on its way. This, after two polar vortexes in January and a two-inch snowfall that paralyzed Atlanta’s roadways for 24 hours. Thank goodness for primroses (Primula vulgarism) - just in time for an icy, snow-bitten Valentine’s Day.
It’s still too early for spring bulbs to appear from beneath the frozen tundra, so I brought home a few primroses from the local garden center to brighten an otherwise grim growing season. I dressed up an old vintage plant stand with terra cotta pots and filled them with primroses. Then I tucked a couple of plants into milk glass vessels that I keep on hand for various flower projects. The snow-white milk glass is such a pretty contrast to plant materials, and the primroses are no exception. For a tabletop centerpiece, I placed a pretty red primrose under a garden cloche for Valentine’s Day. What better way to spend the next two weeks, than under the influence of primroses?
Because primroses like cool temperatures and moist soil conditions, they are an easy flower to grow this time of year. The garden doesn’t offer a lot of color in February, so the first burst of spring usually comes in the form of primroses. As the garden starts to break out of winter, group primroses in planters with violets and pansies, all of which are edible flowers if you grow them organically (I use an organic cow manure tea from Authentic Haven Brand to keep my primroses blooming over a long period of time). Add organically-grown flower petals to salads, pasta dishes, or desserts for subtle, colorful flavors from the garden. Freeze the petals in ice cube trays for fruity beverages, or dry them to use in tea, but introduce them sparingly to guard against possible allergic reaction.
“Primrose” comes from Medieval Latin: prīma rosa, or “first rose.” They are my first flowers every spring.
How about a garden giveaway? What a lovely way to start the new year! The dead of winter is a perfect time to plan a garden, so here’s a little gift to get you started.
Susan is one of the most gracious and generous gardeners I know, and is always willing to share her secrets to growing roses with the rest of us. “Roses are easy, people can be difficult,” and Susan proves that point with her tips in the new 2014 guide, filled with colorful photographs of roses she took in her rose garden. You can read about her journey to write the guide on her blog.
The American Rose Society awarded Susan with its Presidential Citation “for Promoting the Rose and Rose Education Via Social Media,” and her photo of the Julia Child Rose is included in the 2014 ARS Calendar for the month of July.
You can find Susan on twitter, @gagasgarden, or on her blog, Gaga’s Garden when she isn’t taking care of her roses.
Never spray weed killer around your plants. Those toxic chemicals seep into our water supply and damage the soil. They can also affect the taste of many plants such as mint, tomatoes, cucumbers etc.
Instead, after you’ve watered your plants pull the weeds out from the root. (pulling them out after the soil has soaked up water makes it much easier to pull the full root out).
Weeding your garden is a great way to understand whats going on with your plants and gives you some quiet alone time to enjoy the progress your plants have made :)
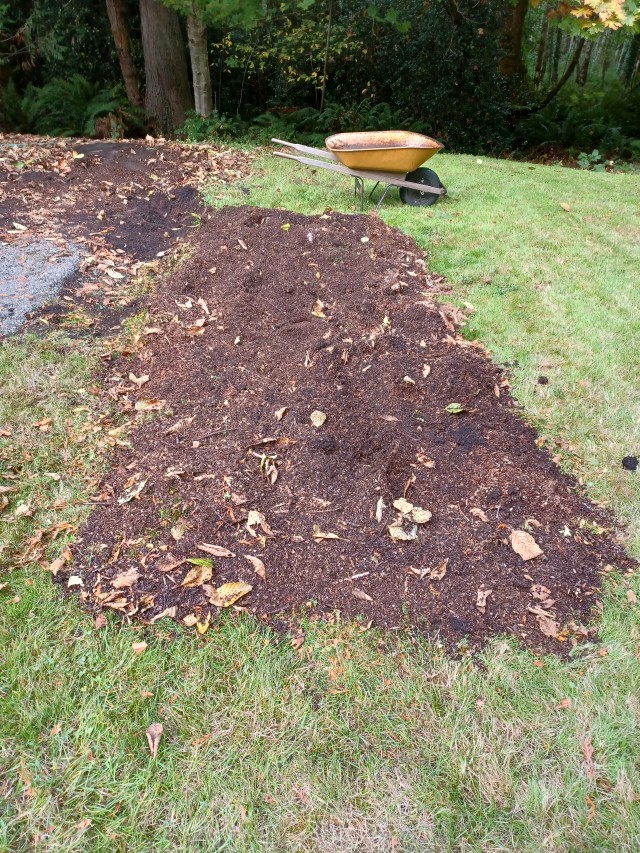
Now is the easiest time of year to start a new garden bed (assuming “now” = early fall, day time temperatures around 45f). All you have to do is lay down cardboard:
Top it with still some nitrogen rich compostable matter, in this case grass clippings:
Some carbon-rich matter, in this case old wood chips:
And keep layering until it’s pretty thick:
And then walk away and ignore it until spring. All winter long, it’ll be decomposing, while killing the grass and weeds underneath. By spring time, the soil underneath will be nice & loose and fertile, and you’ll be able to plant straight into it.
(If you want to meet organic standards, then make sure any cardboard or paper is non-glossy and black & white.)
Update to this bed, and replies to comments I remember.
First off, to the person who was very concerned that I was “destroying” the lawn, I think it’ll be fine, there’s a lot of it:
This person, who is not me, has a lot of lawn. I’m allergic to grass (it gives me hives and makes me incredibly itchy) so if it were mine you can be assured I would definitely destroy it the first chance I got. But that’s not the case here, and adding one additional bed isn’t hurting anything.
It’s not got a barrier or border for edging because that matches the rest of the person’s garden beds, and honestly, I’ve found that you still have to edge around barrier, so I skip that and edge twice a year. Here’s what the edge currently looks like:
Would some sort of edging be nice, aesthetically? Perhaps, but this person wanted to make a bed as cheaply as possible, so this works.
Someone else was concerned about wind blown weed seeds, and you can see the resulting weeds in the above picture as well as in this close up:
No weeding had happened at this point, so you can see there’s remarkably few. At least for this climate and time of year.
There are a couple ways you could deal with this. First off, you can hand weed, which is super easy because they’ve had a very easy life in the mulch, so it’s quite easy to get all the roots up. Secondly, you could just mulch more. It just depends on the situation and how developed the weeds are. You could, hypothetically, also just take a stirrup hoe to it, but we just hand pulled the weeds and it hardly took any time.
In other news, my fava beans have started to bloom:
These are the large seeded kind, for eating rather than use as a cover crop. I really like their flowers, though I feel like the cover crop version has more flowers. These are still gorgeous though.
And yeah, there are weeds in there. That’s life. Especially when you garden for other people for a living, and thus don’t have so much time for your own garden :/
If you want to support bees and have really hardy plants that don’t require a lot of fussing, native plants are the way to go. I’ve got several in my yard, but I’m particularly excited about three berry species: thimbleberries, black cap raspberries, and native blackberries:
There are so many flowers on these guys, and I’ve been seeing multiple native bees on them, including bumble bees. Because they’re native, they’re well adapted and I don’t have to water them- and they don’t care at all about how wet and cold it has been this year. Really looking forward to the berry crop.
Highly recommend looking up what is native to your area and connecting with a native plant salvage group.


 #Wordsworthrevisited Playin")
 #Wordsworthrevisited Playin")
 is the garde")
 is the garde")


")
")