#witch diy
Self Protection Jar
This is a throwback to an old spell that uses a lot of sharp items to create a protection jar. Using sharp objects like thumbtacks, pins or broken pieces of glass is a way to create a ‘psychic fence’ so to speak. That way anything negativity coming towards you will be pushed back or deflected by all the sharp objects surrounding your energy field.
What you’ll need
- 1 clean and cleansed jar (see note on this post on how to cleanse your jar)
- Sharp items (Thumbtacks, pins, opened safety pins, needles. If you’re going to use broke glass PLEASE BE CAREFUL)
- Add in any protection herbs or crystals if you choose to but I usually skip this step.
- Something that binds you to the jar such as fingernail filings or a lock of hair. The original spell asked for drops of blood but that’s a whole different thing if you want to do that. I recommend just using hair because of the risk of infection by cutting yourself.
Cleansing your jar
It’s important to cleanse your jar first and foremost. You can use any jar (Hello salsa and sauce jars!) Clean them out super well. If you are stuck with a smelly jar that has retained a strong odor even after washing out thoroughly you can rinse the jar with vinegar or let it sit overnight. That will usually get rid of any smell.
Once you have cleaned your jar, I simply cleanse it by using incense. Light your incense and let the smoke thoroughly fill up your jar before releasing it into the air.
What to do
Set up your spell with any provisions you would normally use. Light candles, incense, and have any crystals out that you feel connect you to your magic. Protect your space by imagining a white light in a circle around you encasing the jar and sharp objects inside.
Place each object inside until your jar is at least ¼ to ½ of the way full. Last, add a lock of hair or item that you chose to bind this jar to you.
Once everything is inside, close the jar. If you want to seal the jar with wax you can take a candle and drip wax on top of the jar or on the sides letting the wax drop down into the seal.
Close your spell and release your circle.
Take your jar and hide it in a dark place where no one will find it.
SPECIAL SHOT OUT to Obsidian Odyssey for collabing with me and creating the art for this post. Check out her witchy blog! Also she’s an AMAZING artist and has a free coven you can join!
Post link
One of my favorite ways to spell cast is with a deck of tarot cards. It’s so simple and effective, and you can literally use this basic spell for anything you want to draw in or release from your life. You can use any tarot deck for this spell technique, but I keep an older deck that I don’t use for readings anymore and use that.
What you need:
You can improvise in any way, but I usually have incense burning, a few white candles out (tea lights are my fave) and whatever crystals I feel are appropriate for the issue at hand. You can always use a general white quartz if you’re unsure.
I always include a physical portion of whatever I’m spell casting for. If it’s a job I want, I might print out my resume and have it laying on the bottom, or collect a some dirt from around the building. If the spell is about me, I might cut a lock of my hair. Just so there is something to anchor the spell to.
I will usually add whatever other elements I might need for visualization or to set the tone. Some things I have used was ribbons for school colors, pictures, herbs that have relevant properties and things like that.
What you’ll do:
Start out by predetermining which three tarot cards you want to use. If I am looking for a job for instance I might choose the 10 of pentacles to represent money, judgement to represent the decision of me working and a third card that closely represents the work I will be doing.
Begin your spell by casting a circle or simply visualizing a bright white light around you, protecting you and your space. Light your candles and incense. Set out your physical items leaving space for your cards.
Set out the first one and visualize in your minds eye the intention of your spell. Then lay out the second one and visualize you getting what you want or the decision being made in your favor. Set out your third card and visualize you in the position of where you want to be.
Meditate on this for a few minutes, making sure you are releasing your intention out into the world and knowing that if there is any mundane work to be done that you are committed to your part. (Mundane work would be working on your resume, brushing up on any skills, and submitting for the job…basically doing your best effort to get where you want to be.)
When you feel like you have released your intention, blow out the candles (or let them burn up to you) and ignite your incense. Thank the energies and release your circle however you want to.
Collect all the items and place them in a small bag and carry them with you. Leave your tarot cards out (if you can) and revisit that energy as many times as you want until your spell is successful. Happy casting!
Post link
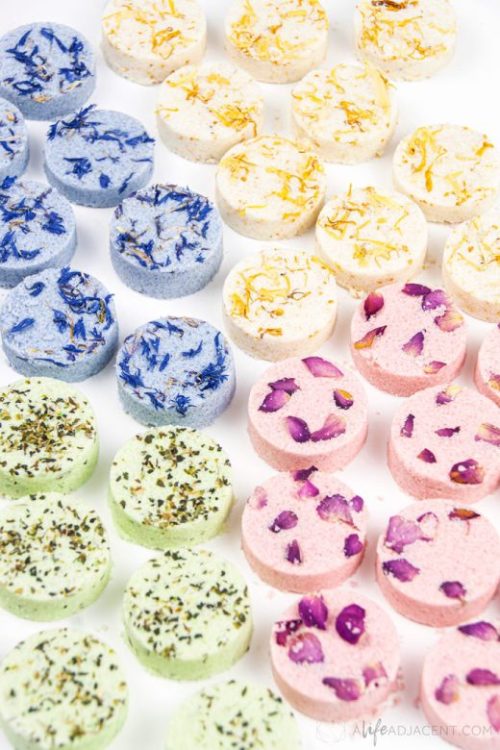
⋆☆⋆ Shower Steamers ⋆☆⋆
Don’t have a bath and still want to relax? Want the spa-like experience without the high costs? Want a lovely way to pamper yourself? Then go ahead and try out this DIY bath steamer recipe.
Ingredients & Necessary Items:
❅ Silicone Mold
❅ Glass Bowl
❅ Whisk
❅ Measuring Utensils
❅ Face Mask
❅ Baking Soda (8oz or 1cup)
❅ Citric Acid (8oz or 1 cup)
❅ Polysorbate 80 (Can also use Sorbitan Oleate)(2.5oz or 1/3 cup)
❅ Essential Oils of Your Choosing (Minimum of 10 drops per scent, adjusted to your smell preference.)
❅ A Colorant of Choice (Plant Power, Flower Dye, etc)
❅ Dried Herbs and/or Flowers (Optional)
❅ Nitrile Gloves
Prep Work:
❅ Grab your gloves and mask. It’s not the best to inhale the dry ingredients so a well ventilated space (at least a window open) is needed. Gloves are necessary because direct contact with the dry ingredients can cause dryness in skin or irritate it.
Initial Instructions:
❅ Mix your dry ingredients together (Baking Soda & Citric Acid) into a class bowl. I recommend sifting the Baking Soda into the Citric Acid as it will combine better. Stir with a whisk to further combine. Add in half of the herbs and/or flowers you think you’ll want.
❅ If you choose to have colored steamers, stir in the Flower or Plant Powder. If you don’t add in a colorant, they’ll be white and can still be really pretty.
❅ Mix the wet ingredients together (Polysorbate 80/Sorbitant Oleate and Essential Oils) until the Essential Oils blend evenly with Polysorbate 80/Sorbitant Oleate. There should be little to no streaking of the Oils in the mixture.
❅Add the wet ingredients into the dry material little by little while mixing with a whisk. Once initially combined, begin to mix with your gloved hands, kneading until the liquids are nicely distributed. This mixture should have the consistency of wet sand– just moist enough to hold its shape when pressed together.
❅ Adjust mixture as needed
Silicone Mold Usage:
❅ Add in herbs and/or flowers to mold before you add in mixture. Go lightly and be sure to avoid the edges of the mold.
❅ Fill the mold(s) with the mixture and press the mixture into the mold with your fingertips, paying attention to any edges in the mold. Fill and compress bit by bit until mold is completely full. Then take the bottom of something flat and hard (like a measuring cup) to further flatten and compress.
❅ Let dry overnight for a 24 hour period. Room temperature is OK and the mold can remain uncovered. Do not leave in a moist/humid area.
❅ Gently demold, tapping the mold to check if it sounds and feels solid. If so, continue with the demolding process. Very gently loosen the steamer from the mold by carefully pulling away the silicone while using your thumbs to gently push out the steamer.
Notes:
❅ Feel free to check out this post of mine for essential oil combinations to use. There’s more essential oils for those associations than I have in that post so if you have questions or want more options, feel free to ask.
❅ All ingredients can be found locally in grocery stores, in specialty shops or even online.
Post link


Tarot cards, oracle cards, and rune stones travel case.
While thrift shopping yesterday I came across a small wicker picnic basket. The closures were broken, but it had good bones.
I took it home, gave it a good cleanse and decorated it. I added the ribbon for tie closures, I was able to use part of the original clasps to run the ribbon through as a guide.
I added some flowers from my crafty collection. I may add a fabric liner, but not sure at the moment.
I think my cards are going to be happy in their new home.
(Project was under $5. Basket was $2. I had everything else in my stash. It was nice to get a little crafty again. )


