#miniature

 8 X 10\", Tissue, wire, paper, thread, gouache 2014 Process Shots: http://pop")
 8 X 10\", Tissue, wire, paper, thread, gouache 2014 Process Shots: http://pop")
NOT AGAIN (Mobile)
8 X 10", Tissue, wire, paper, thread, gouache
2014
Process Shots: http://poppyplay.tumblr.com
“The Season of Spring” curated by Daniel Rolnik, Flower Pepper Gallery, Pasadena, Mar 2014. Sold.
Post link


I made a bunch of brass mini masks, some with patterns, some with gold leaf, some with weathering.
Polyurethane resin, brass powder, gold leaf, gold ink, glass bead, acrylic paint


Two simple designs. Mini kitsune masks, polyurethane resin masks, acrylic paint


Some other mini masks !
This one was inspired by the pattern of a fire salamander (but when I painted the white under layer of the yellow parts, I found it to pretty to pretty to go with the yellow)
Polyurethane resin mask, acrylic paint, gold leaf.


Mini kitsune mask, because that’s fun to do ! Polyurethan resin, acrylic paint, selective glossy varnish


Hello everyone! This is my latest work, a miniature factory created inside a watch case. Most of it has been built by using tiny watch parts. It is a factory which turns stone into gold. The stones are fed into the machinery on the top right, to go through a process of complex transformation inside the factory and come out as gold in the bottom right. The bits of gold I used are actual 9K gold. Enjoy!
Post link


Hello everyone! This is my latest creation, a tiny flying ship with three figures working on it. There is a steersman at the helm, a lookout on the top looking through a telescope and a stoker shoveling coal into the steam engine. The flying machine has been made out of tiny watch parts and the entire scene has been bulit inside a vintage pocket watch case. The front has been closed with a piece of glass from an incandescent bulb that I have cut to size. Enjoy!
Post link


Hello everyone! This is a private commission I made, a miniature robot inventor’s workshop. It is made primarily from watch parts and contains a good deal of tiny objects, tools and details. I built it on a pocket watch case and closed it on top with a glass dome. Enjoy!
Also check my Etsy shop to see some of my other creations:
www.etsy.com/shop/MicroJewellery
Post link


A magical city sits on a floating cloud while traveling through the night sky. The scene has been created inside an antique silver pocket watch and the miniature city is made out of watch parts which have been turned into tiny buildings and houses. Enjoy!
You can find this together with my other creations at:
www.etsy.com/shop/MicroJewellery
Post link


Here’s my latest miniature world! I find the library to be a powerful image, a symbol of our accomplishments as a civilization and an archive of the scientific, literary and spiritual knowledge of man. Enjoy!
Available, along with my other creations, at my Etsy shop:
www.etsy.com/shop/MicroJewellery
Post link


One of my latest works: ‘The Dig’, part of a new body of work I am developing, to be exhibited later this year.
Don’t forget to visit my website and online shop:
www.gregorygrozos.com
www.etsy.com/shop/MicroJewellery
Post link


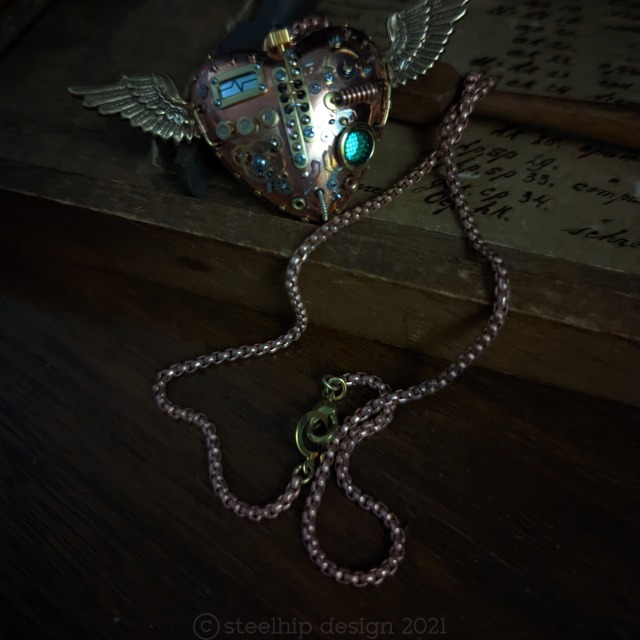
My latest heart.
I know - another heart. I still love making them and, at this time of year, I get a lot of requests. Each is unique - sometimes on purpose, sometimes to cover up an accident - drill scratch, hole in the wrong place etc. The heart itself is vintage - new old stock from the 1970s - a lucite core with a thick copper plate. They are still available but, eventually, I’ll have to find an alternative. I’d love to find similar wood hearts - that could be hinged with a secret internal compartment. If anyone knows where something like that can be sourced - let me know. Dimensions would be 1 ½ inches wide/high and about ¾ of an inch deep so they could be cut and hollowed out.
The next one I’ll be making will be a bit different - a central “window” with a flashing red LED - with batteries that can be replaced. It will have to be a symmetrical design with a feature taking up that much real estate on the heart. I’m starting it tonight and I’ll post a video of it to show the “flash”.


SS Cicada
I don’t know where I got the idea for a dirigible cicada miniature model but here we are. Falling asleep with my YouTube queue probably with videos on the recent 17 year cicada cycle followed by the use of airships during WW1 must have blended together in my subconscious. I enjoyed creating the last insect - the custom bee - I had to do another but this was too large for a piece of jewellery.
So I worked on each separate section, hoping it would all fit together in the end. That’s always the scary part - will the wings fit on the body? Will the scale of everything maintain the illusion of an actual, albeit fantastical, airship once joined? Unlike very clever model scene makers I don’t work with a scale ruler. As I don’t fabricate or cast metal there is no real point - I’ll still have to adjust a part in my collection to fit.
I started with the wings - they bring everything together and set the scale. Like the last piece - the body is a brass screw electrical terminal. The abdomen has two main parts - the high copper piece with a grill and a lower section made from a cut out earing drop I filled in with resin. The wings are also filled with resin and a very light dusting of green and gold mica.
I’ve been making miniature nebulas lately so that is where the glass “hot air balloon” came from. It is fitted with a vintage brass bead cap, chains, tiny brass drops and internal details. While I was searching for pieces I came across the hand blown green glass bead with a swirl pattern. I had to incorporate it but it was difficult to do so. Adding a piece to one side of a symmetrical design alters the way it hangs. The swirl on the bead is matched with the black swirled disk hanging under the balloon.
She has wrapped wire legs with metal crimps, two brass and steel “propellers” affixed to the front, one large rear flag and bunting on the secondary “balloon” tether. Everything attached is done so using screws and very rarely, glue. I have no idea how many separate components I used but it would be well over 100. I’ve been working on and off for a week - probably about 40 hours not including the time sourcing parts, taking photos and writing this. The rigging was a nightmare. The chain at the back, connected to a “U” shape piece is the ship’s anchor.
A friend who is a genius wood worker turned some gorgeous wood bases for me. I think it’s Jarrah. It has four brass legs on the bottom. The hanging mechanism consists of a filigree disk, a vintage brass corrugated bead and assortment of brass rods, copper and brass tubing and beads. The top section pulls out so it can be packed for shipping.
One final surprise. I left a hole in the body for a tiny green LED light. It is difficult to use - turning on by pushing the light into a battery. But it could be used on special occasions to show her off. The battery type is a bit exotic but available online.
I’m thinking about entering her in a local art competition before putting her up for sale. I hope you like her.

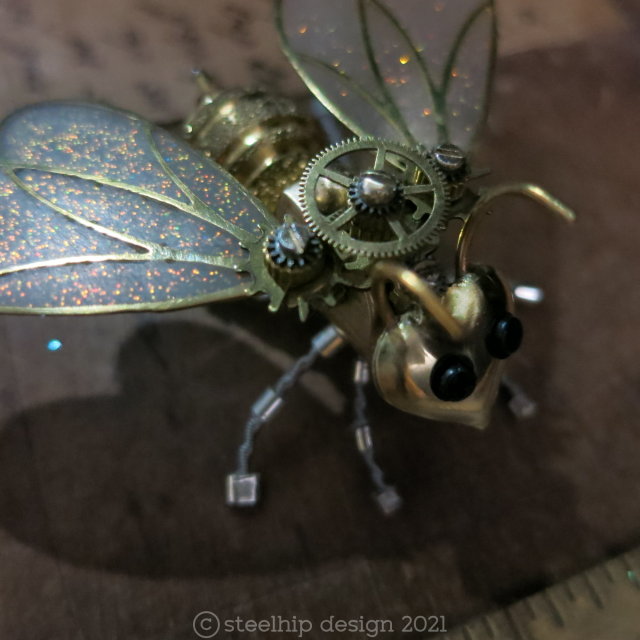


I had a client recently ask me to make a steampunk mechanical bee for her and gave me a photo of a tattoo for reference. This is the result. The wings were a problem as I wanted them light. I ended up cutting down two brass pendant bases and filling them with UV resin. They then had to be sanded back to the brass and finally polished. I was aiming on transparent but the frosting works. Her body is an old brass electrical terminal cut to fit. Her wire legs are threaded through the body for security. The crimps are for effect and to stop the feet scratching if worn as a pendant.
She also contains an assortment of gears, pinions, screws, bolts, rivets, an electrical probe is her “stinger” and her wire antenna do rotate. I hope the client likes her but if not I’ll try again. I’ve already had interest so she will sell either way.


So I’ve been seduced by resin and watching far too many space videos and Hubble images of nebula. I already love using light in my work so I wanted to produce something that looked like a cloud of gas creating new stars within. A star nursery. It’s taken me months of trial and error.
At first glance it may seem like I’ve just dumped a ton of glitter and pigment powder into resin and given it a stir. I wish it was that easy. These have to be made in layers but hard level lines look artificial. So I swish and swirl the resin around until it cures chaotically adding tiny amounts of powder and glitter teasing out tendrils of colour and flashes of iridescence. I use a flattened toothpicks for the job.
The next step was creating the look of stars forming within the cloud. Enter fibre optics. I cut and bundle the strands sealing them together with resin. I then bend them out into all directions. Finally I cut them down to fit into the mold. At some point I insert them into the resin being careful to set the main bunch into the central point of the mold. In some designs the threads are obvious - in others I’ve hidden the bunch using dark pigments.
At this point I have a sphere of resin with a fiber optic “stalk” sticking out. I paint the last layer black and wait for it to dry. I then cut down the stalk and drill it down flush to the resin. The light is produced by a tiny LED widget. Some pieces have static white light that I’ve dyed. In others I’ve used a rotating RGB colour LEDs. I seal the end and set it in another layer of resin. Fortunately they have a handy ring that also makes it easy to turn on and off with a simple twist. It takes three LR621 batteries equivalent to 364, AG1, SR621SW.
I’ve had trouble uploading the videos so I’ll re-shoot tonight for an acceptable file size and format for Tumblr. Unfortunately trying to photograph these spheres is very difficult. They are glass and very shiny. You can’t see the depth and complexity in a photo. Maybe I need a new camera with a good macro setting.
It’s terrifying releasing a new product so different from my normal work. Are these steampunk? Not really but I hope my work transcends a genre. I want to take light from tacky novelty jewellery into an art product for adults to wear that will amaze and wonder. That is my goal with these. I’ve made several of them so they will dominate my feed in the next weeks. I hope you don’t get sick of seeing them. It’s fantastic using colour again but it’s been a serious financial investment in resin, pigments, equipment, exotic glitters/sequins/foils, molds and LED lights. Some I had to buy in serious bulk. It’s impossible to calculate the hours I’ve spent creating and perfecting these.
I’ve used three different width sizes: 20mm (0.86in), 25mm (1in) and 30mm (1.2in). I haven’t put a chain on some of them. I will give options in type of chain or cord and drop length to buyers. Some may prefer no chain. I’m also thinking about creating a stand turning it into a unique ornament when not being worn. I’m also hoping, as my technique improves, to replicate specific nebula like the famous “Pillars of Creation” image captured by Hubble.
Some may not see any “space” reference. Friends have called certain pieces “an ice cave”, “underwater scene” and “storm clouds with lightening”.
They will be available soon in my Etsy shop. Depending on the covid situation I’m hoping the big music festivals in spring and summer will be happening. It would be the perfect accessory for those day/night events.
Post link
Star Box II
Well I enjoyed making the first solar system box - I had to make another. This started as a basic pine box. I stained it, swapped out the hinges and latch, created the “windows” and covered them with mesh and brass frames. You can’t see it but there is a lock washer (it looks like a reverse gear with internal teeth) in each porthole illuminated by mounted LEDs. The six sides are covered with riveted struts, brass features and vintage cut star cabs. The central orbit field has a solid metal ring and twisted wire frame with brass claws. I created tiny brass winders over two vintage gears with round cut outs. Two different kinds of alarm clock winders are located on each side. There is also vintage brass knurled nuts on the sides. Finally there are 3 brass star cutouts above the hinged side.
The planets are driven by an internal wood disk with embedded magnets. I also did a similar thing as the last piece - drilled holes in the lid and disk sitting above 4 LEDs. As it spins the “stars” twinkle. The lights and motor have separate battery packs with switches. Sorry, I’m still not clever enough to rig a single battery pack and external on/off switch. Next one….
I’m really enjoying this foray into these larger projects. It’s my inner prop builder coming out. Unlike the last one - this one will be for sale in my Etsy shop.
Well I’m sitting in hospital unexpectedly - nothing too serious. I was going to post this last night but I was in too much pain.
So this is a proof of concept. The word “magical” is used far too much but that was my ambition. Something of unknown use and unknown provenance.
Proof of concept is the build I make all the mistakes on - motor too fast, planets too large and high, LEDs wiring wrong and ugly battery packs. Internally this might not be saleable quality.
The video isn’t great, sorry. When I get home I will take some still photos of all the decorations and detail. It was inspired by those magnetic ballerina jewellery boxes from the 1960s. She would dance around a mirror when the box was opened.
I initially covered the neodymium magnets and attached the planet on a post. Wrong. They fell down, stuck to each other with such force they ended up broken. So I’ve gone for simple using the magnetic force to hold the metal spheres. I will include several spare magnets and planets.
I hope you like it!
Steampunk


What a dapper chap! I was inspired by a few posts and popularity of my LED experiments in design. Found an old skull charm, gave him goggles and cobbled together a top hat from an XL brass eyelet, some cut brass tubing and walled setting. I attached it at a slight jaunty angle. Couldn’t resist installing a tiny LED within the skull set in resin. Like my other pieces it’s powered by putting a small clutch battery pack on a small post. The whole piece is set on a stick pin so it could be worn on a cravat or dress coat. Unfortunately, the LED has made it very difficult to photograph accurately. The light seems too bright but in reality it’s just an eerie green glow. Perfect finish to a gentleman’s outfit who dabbles in the macabre and dark arts. The batteries are easy to replace.
Post link
Hi there!
After a very long time, I decided to start publishing something again.
These months was very busy for us,between work, problems, various stresses, inner conflicts and demons… anyway the whole World seems to be against our wish to make art. But I’m not a person who gives up easily and I really love what I do. So life goes on ;)
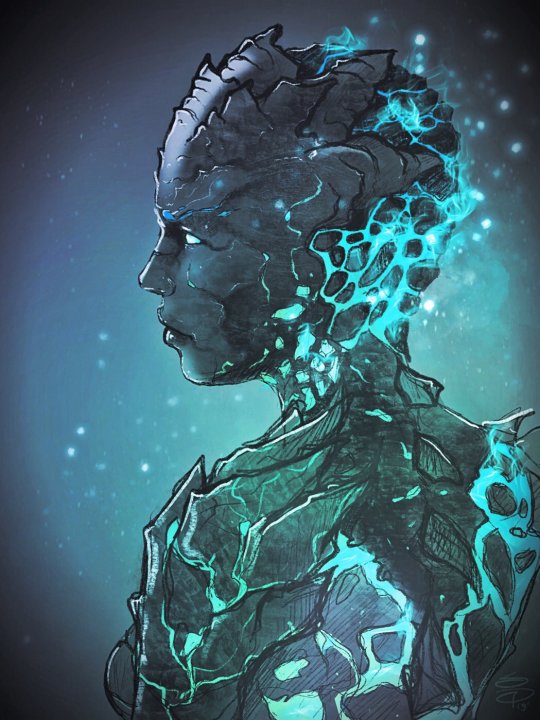
I’ve got a lot of things to show you. For now, I’m going to share just some meaningful things. Among these, I re-discovered an old passion of mine, the sculpture. I’m having a lot of fun with fantasy miniatures and small objects like pendants and keychains, can’t wait to show you someting more!


I’ve always been shy and a private person, so I find difficult to use social networks in general and that’s one of the reason I’ve take a little break from Tumblr. Also, in a sea full of water drops, it’s diffcult to be noticed and this could means that nevermind how much effords you put in your artworks, it’s kinda easy to remain in the ocean deeps. And it’s demotivating. You know, the most important thing is to continue doing what you love. Yes, but it’s not easy to stay positive in some moments, right? xD
Anyway, I’ve met some beautiful people here that gave me so much motivation to continue my journey as an artist. I will be always grateful for all that wonderful support. Also a smile means so much even in the darkest moments, and if I will be able to give to you some positive emotions throught our art, it’ll be worth believing that also a little waterdrops is enought to make the World a better place ;)

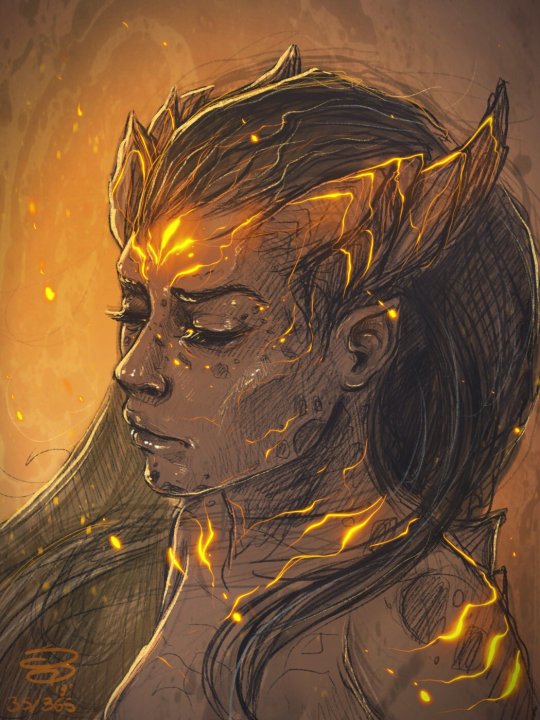
I’ll share new things soon, stay tuned! <3