#soy sauce
The Ultimate Guide to Potion Bases
We all spend so much time thinking about the correspondences of the actual ingredients that go into our potions that we often forget to think about what the potion base represents! (At least I do.) It would be nice to have a list of all the various liquids that can be used in place of water. Naturally, I can’t think of everything but I think this is a pretty good starting point! What else can be used? Eventually, at some point down the road, I will compile all these thoughts into a book on potion making and want to include this! Keep in mind that these are my own correspondences. Let me know if you disagree or if you’d change anything up! Let’s see how big we can make this list. Also, I should probably note that not all of these liquids can be ingested. (Obviously.)
The List
Vinegar: Used for cleansing and purification potions.
Lemon Juice: Used in hexing, cursing, or revenge potions.
Cranberry Juice: Used in love potions.
Apple Juice: Used in healing, knowledge, and youth potions.
Ammonia: Used in banishing, cursing, purification, and protection
Red Wine: Love potions and potions dealing with death and the afterlife.
White Wine: Used in platonic love potions as well as success brews.
Rum: Used in potions involving spirit work.
Whisky: Another good base for potion work.
Vodka: A good base for work involving rapid banishing.
Laundry detergent: Good for cleansing potions.
Oils: Used to speed up a process.
Molasses: Used in potions intended to slow a situation down.
Rubbing Alcohol: Another good base for cleansing and purification.
Hydrogen Peroxide: Used in healing potions.
Milk: Used in potions to promote sleep and peace.
Sour Milk: Used to cause nightmares or in potions designed to torment.
Orange Juice: For potions of solar importance, healing, success.
Soda Water: Used in potions designed to encourage laughter and giddiness.
Ginger Ale: Used in health or healing potions.
Olive Juice: Used in peace potions.
Honey: Used in potions to sweeten up another’s disposition.
Syrup: Used in abundance and prosperity potions.
Beer: Used in potions intended to induce slumber.
Clam Juice: Used in aphrodisiacs.
Cough Syrup: Used in healing potions and to make someone ‘cough it up.’
Soy Sauce: Used in protection potions. (Thanks Lexa Rosean for this one!)
Pineapple Juice: Used in abundance potions and fidelity potions.
Coconut Milk: Used in spiritual and magical cleansing potions.
Ice: Solid first, then melted for transformation potions.
Coffee: Really, a potion in and of itself in my book.
Vanilla Extract: In small amounts, used in passion potions.
Witch Hazel: Used in communication and cleansing potions.What else can you all think of?
Post link
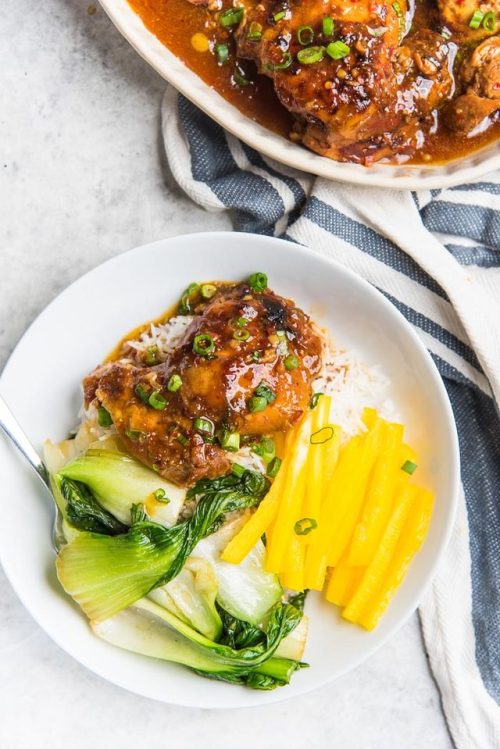
Instant Pot Honey Soy Chicken Thighs
Servings: 6
STUFF
6 pieces of boneless chicken thighs 6 - 7 oz each, 2 - 2.5 lbs total
¼ cup honey
¼ cup light soy sauce
1 tbsp chili flakes crushed red pepper (optional)
4 - 5 garlic cloves
1 tbsp good quality chicken stock paste or 1 cube
½ yellow onion sliced thin (or 4 - 5 spring onions, sliced into big pieces)
2 whole star anise
¼ cup water
1 - 2 tbsp water
1 tbsp cornstarch
Sliced green onion and sesame seeds, for serving
STEPS
Add the chicken into the Instant Pot, and scrape in any leftover marinade in the bowl as well. Add the water and star anise and mix well.
Place the chicken, honey, soy sauce, and chili flakes in a bowl, and mix to coat well. Set aside. (If you’d like the chicken to be even more flavorful, you can let it marinate for about 1 hour, or up to 24 hours).
Set the instant pot to the saute setting. When the pot is hot, add about 1 tbsp of oil. Saute the onions and garlic cloves until the onions have softened and there’s some caramelization on the garlic cloves. Add the chicken stock paste (or crushed up cube) and mix it in with the onion and garlic.
Lock on the IP lid (vent closed) and set the IP to cook the chicken on high pressure for 7 minutes, and natural release for 5 minutes. Open the vent and allow the IP to depressurize.
Remove the chicken from the pot, and transfer them to a plate or a lined baking tray (if caramelizing - see below). Mash up the softened pieces of garlic cloves with a spoon or fork inside the cooking liquid.
Set the IP to saute. Mix the water and cornstarch together in a small bowl to make a smooth slurry.
When the cooking liquid starts to simmer, add half of the cornstarch slurry and stir through to thicken. Simmer for 1 minute. If you’d like to thicken the sauce further, stir in the rest of the cornstarch slurry and simmer for at least another minute. If you’re happy with the consistency of the sauce, let it simmer for a few minutes and then keep it warm until the chicken is ready.
Taste and season with more salt if necessary.
NOTES
If you’re using smaller chicken thighs, you can reduce the cook time to about 6 minutes. If you prefer the chicken to be cooked to a point where it’s really soft, then cook the chicken for a further 1 - 2 minutes.
If you’re using bone-in (skinless or skin-on) chicken, increase the cook time to 11 - 12 minutes (for large chicken thighs), or 9 minutes for smaller chicken thighs.
If you’re doubling the recipe, double the amount of honey, soy, garlic, chicken stock, chili flakes and onion. But keep the amount of star anise the same, and you can eliminate the water altogether (because the marinate will provide enough liquid for the recipe). You may need more cornstarch slurry to thicken the sauce.
Post link
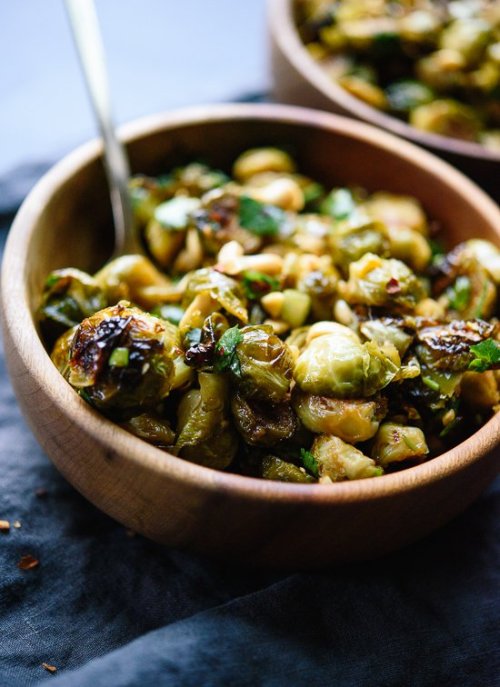
Kung Pao Brussels Sprouts
Servings: 4
Prep Time: 15 mins
Cook Time: 30 mins
Total Time: 45 minutes
STUFF
Sprouts:
2 pounds Brussels sprouts
2 tablespoons olive oil
Kung Pao sauce:
2 tablespoons reduced-sodium tamari* or soy sauce
2 tablespoons honey or maple syrup
1 tablespoon rice vinegar
2 teaspoons toasted sesame oil
½ to 2 teaspoons sriracha, to taste
2 cloves garlic, pressed or minced
Garnishes:
⅓ cup roasted peanuts (either salted or unsalted)
⅓ cup chopped green onion (both green and white parts), about 3 green onions
2 tablespoons fresh cilantro leaves, chopped (optional)
Red pepper flakes (optional)
STEPS
To prepare the Brussels sprouts: Preheat oven to 400 degrees Fahrenheit. Trim the nubby ends and any discolored leaves off the Brussels sprouts, then cut the sprouts in half lengthwise.
Transfer the sprouts to a large, rimmed baking sheet (I covered mine in parchment paper first for easy cleanup), then toss them with about 2 tablespoons olive oil, until they are coated with a light, even layer of oil. Arrange the sprouts in an even layer, flat sides down, and roast for 25 to 30 minutes, tossing halfway, until they are tender and deeply caramelized on the edges.
Meanwhile, to prepare the sauce: In your smallest saucepan, add the tamari or soy sauce, honey or maple syrup, rice vinegar, sesame oil, ½ teaspoon sriracha and garlic. Whisk until combined, then taste and add more sriracha if you’d like (mine was just right with 1 ½ teaspoons sriracha, but I love spicy food).
Bring the mixture to a boil over medium-high heat, stirring occasionally. Reduce heat to medium and cook, stirring often, until the sauce has thickened, about 5 minutes. It’s done when, if you take it off heat long enough for it to stop bubbling and carefully tilt the pan back and forth, the sauce will slide down the pan rather than slosh.
Transfer the roasted sprouts to a medium serving bowl. Pour the sauce over the sprouts and toss to coat. Add the peanuts, green onion and optional cilantro and toss again. Serve immediately, with red pepper flakes sprinkled on top if you’d like a little extra heat (and color).
NOTES
MAKE IT GLUTEN FREE: This dish is gluten free as long as you use gluten-free tamari, which is a variety of soy sauce that is usually (but not always, check the label) gluten free. I always use tamari instead of soy sauce because I prefer the flavor of it! Look for tamari next to the soy sauce in the Asian aisle of the grocery store.
MAKE IT VEGAN: Simply swap maple syrup for the honey instead when making the sesame glaze.
MAKE IT PEANUT-FREE: Just omit the peanuts. You might like a sprinkle of sesame seeds instead.
CHANGE IT UP: Broccoli would be a fantastic substitute for the sprouts, and probably cheaper, too!
NUTRITION
Calories 233
Total Fat 11.1g
Saturated Fat1.6g
Trans Fat0g
Polyunsaturated Fat2.3g
Monounsaturated Fat6.6g
Cholesterol 0mg
Sodium 430.8mg
Total Carbohydrate 30.4g
Dietary Fiber8.8g
Sugars14g
Protein 9.2g
Post link
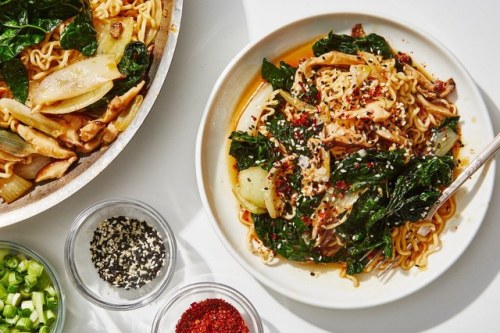
Garage Ramen Noodles
Servings: 4
STUFF
1 bunch Tuscan kale, de-stemmed and torn into
2 medium-sized yellow onions, each cut into 8 wedges without roots or tips
5-6 oz shiitake mushrooms (or cremini), de-stemmed and sliced
4 packs dried ramen noodles without seasoning packets
⅓ cup mirin
⅓ cup soy sauce
2 Tbsp. oil
1 Tbsp. toasted sesame seeds
¼ cup rice vinegar
Neutral oil
Pinch of kosher salt
STEPS
Fill a pot with salted water and bring it to a boil. While waiting for the water to boil, heat some neutral oil over medium heat in a large skillet, and throw your chopped onions in there. Stir them occasionally as they start to get tender. Once your water is boiling, throw 4 packs of dried ramen noodles in there.
Cook dried ramen noodles for about 3 minutes so they’re slightly underdone. While the noodles are cooking, add your sliced mushrooms and kale to the skillet, with a bit of kosher salt and a splash more oil. Transfer them to the skillet (and saving a scoop of the cooking liquid, as you would pasta water).
The kale and mushrooms will cook almost all the way as you stir them around in the skillet. When you add your undercooked ramen noodles, the vegetables will finish with that residual heat. Make sure to leave the heat on under your skillet.
We’re adding our real flavor enhancers now, which also create our sauce. Add a splash of reserved ramen noodle water, ⅓ cup mirin, ⅓ cup soy sauce, 2 Tbsp. oil, 1 Tbsp. toasted sesame seeds, and ¼ cup rice vinegar to the pan, pouring over the noodles and vegetables. Toss everything in the skillet for a couple minutes, so the sauce gets all up in the noodle’s business. You don’t want any sauceless noodles.
And now, you plate. Make a nice little mountain of stir-fried noodles on your plate or in your bowl. Make sure you get plenty of kale and mushrooms. Top it with more toasted sesame seeds, some hot sauce, flaky sea salt, or chile flakes.
Post link
mmm whole-meal noodles with chickpeas and veggies

Asian style noodles under 20 minutes - my type of meals
* click on photos for a better quality

1. What is required:
- 300 g. noodles
- shiitake mushrooms (I bought the package of 30 g. dried mushrooms. I soaked them in hot water for several hours until soft)
- 250 g. frozen edamame or green beans
- ~ 100 ml. rice vinegar
- 2 tbsp soybean paste (I am using the Korean one. You can use miso paste. In this case take 3 tbsp because it’s less saltier)
- 2-3 garlic cloves
- 2 tsp maple syrup
- 2 tbsp soy sauce
- 80 ml. tahini
- raw radishes and sesame seeds to garnish (optional)
* I am also using lemon grass powder and the mix of Asian spice.

2. Cook the noodles according to the package instructions. Rinse under cold water.
3. Chop mushrooms into quarters.

4. Heat a large pan. Cook mushrooms and green beans/edamame in water or oil over medium heat.

5. While vegetables are cooked, mince the garlic cloves.

6. Mix tahini, soybean paste, soy sauce, rice vinegar, and maple syrup in a bowl. Add the minced garlic.

7. When vegetables are soft, add noodles and the tahini sauce. Mix well and cook for 5-7 minutes.

8. Garnish with sesame seeds and sliced radishes.

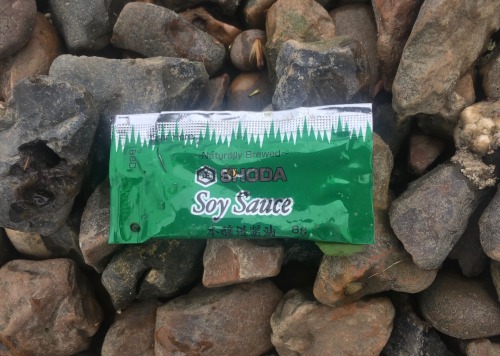
Soy sauce sachet. Soy sauce was created about 2,200 years ago in China. Shoda Sauces was established in south Wales in the late 1990s.
Post link
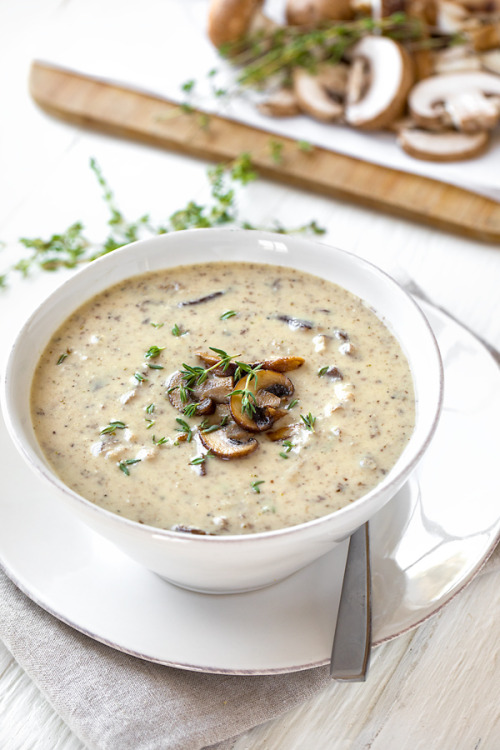
CREAM OF MUSHROOM SOUP
(From StH)
https://thecozyapron.com/cream-of-mushroom-soup/
Ingredients:
• Olive oil
• 1 pound crimini mushrooms, sliced
• 1 pound shiitake mushrooms, sliced
• Salt
• Black pepper
• 4 tablespoon unsalted butter
• 1 small onion, finely diced
• 4 cloves garlic, pressed through garlic press
• 1 tablespoon fresh thyme leaves, divided use
• 1 teaspoon Italian seasoning
• ¼ teaspoon white pepper
• ½ cup dry sherry
• 3 ounces all-purpose flour (about 10 tablespoons)
• 6 cups warm chicken broth/stock
• 1 cup heavy cream
• ½ teaspoon soy sauce
Directions:
- Place a large soup pot or Dutch oven over high heat; drizzle in about 3 tablespoons of the olive oil, and once hot, add in about 2/3 of the sliced mushrooms, reserving 1/3 of them for a moment.
- Add in a small sprinkle of salt and black pepper, and saute the mushrooms for about 8-10 minutes, until their liquid evaporates and they are browned; remove these mushrooms from the pot, and reserve them until the end.
- To this same pot add another 2 tablespoons of olive plus the butter, and once melted, add in the diced onion and the remaining 1/3 of raw sliced mushrooms, and saute for about 6-8 minutes until softened and browned, and the liquid has mostly evaporated.
- Add in the garlic, 1 teaspoon of the fresh thyme leaves, the Italian seasoning and the white pepper, and stir to combine; add in the sherry, and allow it to simmer and reduce for about 2 minutes until almost completely gone.
- Stir in the flour and cook together for about 30 seconds to cook out the raw flour taste, then pour in the chicken stock/broth, whisking all the while to avoid lumps from forming.
- Allow the soup to come a simmer, then simmer for 10 minutes until thickened.
- Off the heat, puree the soup (I use a hand-held immersion blender, but you can also use a regular blender and work in batches) until smooth; stir in the heavy cream, add back into the pot the reserved sauteed mushrooms from earlier, plus another 1 teaspoon of the fresh thyme leaves, and the soy sauce.
- Ladle into bowls, sprinkle over some of the remaining thyme leaves, and serve with some parmesan crisps or bread. (If I have some leftover mushrooms, I like to slice those up and quickly saute them, then spoon them on top of the soup as a garnish—totally optional.)
Post link
FRIED BUCKWHEAT NOODLES (Fried Soba Noodles)
(From M/FoMT)
https://www.pccmarkets.com/recipe/soba-noodle-stir-fry/
Ingredients:
- 1 (9 ½-ounce) package soba noodles
- ¼ cup soy sauce
- 2 tablespoons sesame oil
- 1 tablespoon molasses
- 2 tablespoons mirin
- 1 tablespoon rice vinegar
- 1 teaspoon salt
- 1 tablespoon grated ginger
- 1 tablespoon minced garlic
- ½ teaspoon white pepper (optional)
- 1 teaspoon red pepper flakes (optional)
- 2 tablespoons high-heat oil
- 1 (10-ounce) package firm tofu, cubed
- 2 (10-ounce) packages frozen stir-fry vegetable mix OR 4 cups fresh vegetables of choice (onions, bok choy, carrots, broccoli, peppers)
Directions:
- Boil 2 quarts water in large pot. Cook noodles until al dente, about 4 minutes. Strain and set aside.
- In a small bowl, combine soy sauce, sesame oil, molasses, mirin, rice vinegar, salt, ginger, garlic, white pepper and red pepper flakes.
- Heat wok over high heat; add oil. Add tofu cubes and stir-fry until browned. Add vegetables and cover for 3 minutes. Add cooked noodles and sauce mixture to vegetables and tofu. Stir until coated evenly by sauce. Serve hot or cold.
Post link
TEMPURA RICE
(From M/FoMT)
https://www.japancentre.com/en/recipes/354-tendon-tempura-rice-bowl
Ingredients:
- 300g cooked rice
- 75g tempura flour
- 4 shiitake mushrooms
- ½ peeled renkon lotus root
- 80g shelled king or tiger prawns - tails on
- ¼ aubergine
- sunflower or vegetable oil
sauce
- 6 tbsp mirin
- 2 tbsp soy sauce
- 1 tsp prepared liquid dashi
- 2 tbsp sugar
Directions:
- When making a donburi it is better to start with the rice preparation as this takes the most time.
- While the rice is cooking, let’s get our tempura ingredients ready to be fried. Begin by cutting the renkon and aubergine into slices of no more than a centimetre thick to ensure fast frying and removing the shell of the prawns leaving the tail attached.
- The next step is to pat the ingredients dry with a piece of kitchen paper and to place on a plate in the fridge prior to cooking. Chilling ingredients is the secret to a nice and crispy tempura batter.
- Now grab a heavy bottom pan and fill it approximately 2/3 with oil before heating it to 160-170°C (you could use a deep fat fryer to regulate the temperature). A thick pan is good for retaining heat but an iron wok is even better for this job. Check the oil is at the right temperature by dropping a splash of batter into the oil, if it sizzles then the oil is ready.
- Whilst the oil is heating up make sure to keep an eye on it whilst mixing 75g of tempura flour with 110ml of ice cold water to make the batter. The colder the batter and ingredients before frying, the lighter and crispier your tempura will be. You can use ice cubes to keep your batter extra cold.
- Now you’re almost ready to deep-fry. Dust the ingredients with a little flour, then dip into the batter, covering completely before placing the battered ingredients with your chopsticks into the oil and cooking for a minute or so on each side until the batter turns golden. Try not to cook too many pieces at one time as this will lower the oil’s temperature. Once cooked, remove from the pan and place on a wire rack before placing on kitchen paper to soak up the remaining excess oil.
- Finally let’s prepare the sauce. Put the mirin to boil on high heat and let all the alcohol dissolve. When you can no longer smell the alcohol just add the soy sauce, dashi and sugar and let the mix simmer for a few minutes. Then grab a donburi bowl and add the rice and tempura before covering with the tasty sauce. Enjoy.
Post link
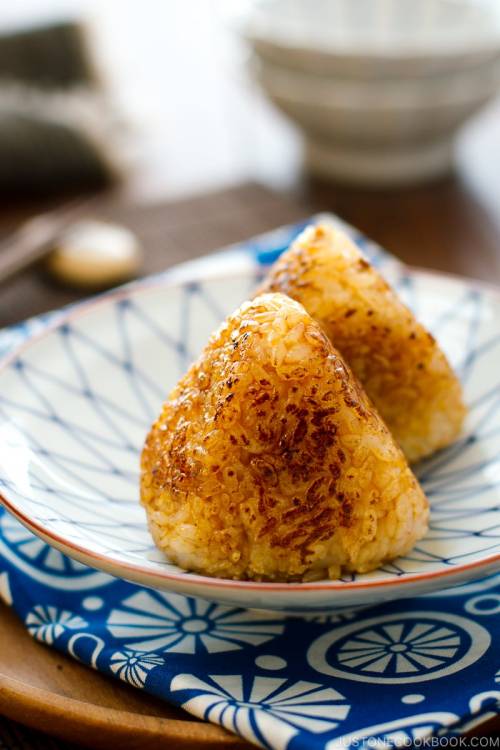
TOASTED RICE BALL
(From M/FoMT)
https://www.justonecookbook.com/yaki-onigiri-grilled-rice-ball/
Ingredients:
- 2 rice cooker cups uncooked Japanese short-grain rice (360ml; 1 rice cooker cup (180ml) of uncooked rice will make 3 rice balls.)
- Water
- kosher/sea salt
- neutral-flavored oil (vegetable, canola, etc)
- soy sauce
Directions:
- Gather all the ingredients. Cook the rice in the rice cooker, pot over the stove top or pressure cooker.
- Let the cooked rice cool a little bit until you can hold rice without burning your hands. Do not let the rice completely cool down.
- Make Onigiri into triangle shapes. First wet both of your hands with water so rice won’t stick.
- Then put some salt in your hands and rub to spread all around.
- Scoop about a half cup of rice onto your palm.
- Cover the rice with the other hand and gently form the rice into a triangle.
- Make sure covering hand (my right hand) should be forming a triangle shape. When forming the onigiri shape, your hands should be just firm enough so the onigiri doesn’t fall apart. You don’t want to squeeze the rice too tight.
- I use three fingers (thumb, index finger, middle finger) to cover the area to make a nice triangle shape. Then rotate onigiri to make a perfect triangle.
- While you squeeze onigiri firmly with both hands, one of your hand (my left hand) has to press onigiri to keep a nice form.
- Gently squeeze the center of triangle on both sides so there is a slight indentation (for grilling onigiri). Now onigiri is ready!
- Lightly oil a cast iron skillet and put it on medium heat.
- Grill onigiri until all sides are crispy and lightly browned. Don’t turn it around. Just work on one side at a time and avoid turning over frequently.
- Lower heat to medium low and brush all sides with soy sauce. Rotate to make sure all sides become crispy. Be careful not to burn onigiri after you brush it with the sauce.
Post link
TEMPURASOBA(Soba Noodle Soup, Tempura Buckwheat Noodles)
(From M/FoMT)
https://www.justonecookbook.com/soba-noodle-soup/
Ingredients:
- 4 cups water
- 1 piece kombu (dried kelp) (4" x 3” = 10 cm x 8 cm)
- 1 cup katsuobushi (dried bonito flakes) (1 cup = 10 g)
- 2 Tbsp mirin
- 1 Tbsp sake
- 2 Tbsp soy sauce
- 1 tsp kosher/sea salt
- 7 oz dried soba noodles (buckwheat noodles) (7 oz = 200 g)
Toppings:
- 1 Kamaboko (fish cake)
- 2 frozen shrimp tempura
- 1 bunch komatsuna (or spinach)
- 1 green onion/scallion (or Tokyo negi) (1 scallion = 3" Tokyo negi)
- Shichimi Togarashi (Japanese seven spice) (or Ichimi Togarashi) (See Notes)
Directions:
- [Optional] Soak kombu in water overnight (if you have time).
- Transfer kombu and water into a saucepan. Bring the water to a boil. When it’s almost boiling, remove kombu from water and discard.
- Add katsuobushi and simmer for 30 seconds. Then turn off the heat and let katsuobushi sink to the bottom of pan. Let Katsuobushi steep for about 10 minutes.
- Strain the dashi over a large strainer lined with a paper towel set over another saucepan. Gently twist and squeeze the paper towel to release any remaining dashi into the saucepan.
- Add mirin, sake, soy sauce, and salt in the dashi and bring the soup to a boil. Set aside until warming up later.
- Insert a knife at the bottom of kamaboko to separate it from the wooden board. Then cut the kamaboko into ¼ inch slices.
- Slice green onion thinly and cut komatsuna into 2 inch pieces.
- Boil the komatsuna in salted water. I first boil the hard bottom parts of komatsuna since they take longer to cook. Then add the leafy part later. Once they are tender, take them out and soak in ice water to stop cooking. Drain well.
- Bake shrimp tempura at 400F (200C) for 15 minutes, or according to the package instructions.
- Meanwhile boil two large pots of water (See Note). One for cooking soba noodles and the other pot for warming up the noodles after washing them. Cook soba according to the package instructions less 30 seconds*. Mine says cook for 4 minutes, so I cook 3 minutes and 30 seconds. Unlike pasta, you do not need to add salt to the water.
- Drain the soba noodles and wash the noodles with hand under cold water to get rid of slimy texture.
- Then transfer the soba noodles into the other pot of boiling water to warm up the noodles again. Once they are warm, drain and place them into a serving bowl.
- Pour hot soup over the noodles and place toppings. Sprinkle shichimi togarashi or ichimi togarashi if you like it spicy. Serve immediately.
Notes:
You can use Ichimi Togarashi or Shichimi Togarashi (Japanese seven spice)
If you want to save time, just boil one pot of water, cook according to the package instructions (4 minutes), rinse under cold water, and then put the noodles directly into a bowl.
If you have Mentsuyu, you can dilute it with hot water to make a soup broth.
Adjust the seasoning as you like - to make it saltier or sweeter. I intended to bring out good dashi flavor so my seasonings may be too light for some of you.
Post link
EGG OVER RICE
(From M/FoMT)
https://www.seriouseats.com/recipes/2016/04/tamago-kake-gohan-egg-rice-tkg-recipe-breakfast.html
Ingredients:
- 1 cup cooked hot white rice (about 12 ounces cooked rice; 340g)
- 1 egg (plus 1 optional egg yolk)
- Soy sauce
- Kosher salt
- MSG powder, such as Aji-no-moto or Accent (optional)
- Mirin (optional)
- Hondashi (optional)
- Furikake (optional)
- Thinly sliced or torn nori (optional)
Directions:
- Place rice in a bowl and make a shallow indentation in the center. Break the whole egg into the center.
- Season with ½ teaspoon soy sauce, a pinch of salt, a pinch of MSG, ½ teaspoon mirin (if using), and a pinch of Hondashi (if using). Stir vigorously with chopsticks to incorporate egg; it should become pale yellow, frothy, and fluffy in texture.
- Taste and adjust seasonings as necessary. Sprinkle with furikake and nori (if using), make a small indentation in the top, and add the other egg yolk (if using). Serve immediately.
Post link
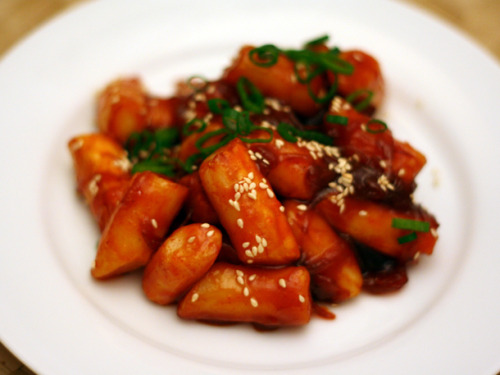
ROASTED RICE CAKES
(From M/FoMT)
https://www.seriouseats.com/recipes/2010/12/roasted-rice-cake-recipe.html
Ingredients:
For the roasted onions:
- 1 teaspoon canola oil
- 1 medium white onion, thinly sliced
- Kosher salt
For the roasted rice cakes:
- ¼ cup mirin
- ¼ cup chicken broth
- 2 tablespoons canola oil
- 1 pound rice cake sticks
- 1 tablespoon sesame seeds
- 2 scallions, ends trimmed, green parts thinly sliced
For the Korean Red Dragon Sauce:
- ¼ cup water
- ¼ cup sugar
- ⅓ cup ssamjang (fermented bean and chile sauce)
- 1 tablespoon light soy sauce
- ½ teaspoon sherry vinegar
- ½ teaspoon sesame oil
Directions:
- Heat oil in 12-inch cast-ion skillet over medium-high heat until lightly smoking. Add onions and cook, stirring occasionally until onions begin to brown, about 10 minutes. Season with salt and reduce heat to medium-low. Continue cooking, stirring occasionally until richly caramelized, about 30 minutes longer. Adjust heat as needed to prevent burning. Transfer cooked onions to bowl.
- Meanwhile, make the dragon sauce. Combine water and sugar in medium saucepan and bring to a boil over high heat. Stir constantly until sugar is dissolved then remove from heat. Let cool for one minute, then stir in ssamjang until dissolved. Add soy, sherry vinegar, and sesame oil.
- For the rice cakes, pour mirin and broth into a large heavy-bottomed saucepan and bring to a boil over high heat. Reduce to medium-high and cook until lightly thickened, about two minutes. Add red dragon sauce, reduce heat to medium, and cook until glossy and thick, about six minutes. Add roasted onions and stir well.
- Meanwhile, clean out iron skillet, and return to stove. Add two tablespoons canola oil and heat over medium-high heat until just starting to smoke. Add rice cakes and reduce heat to medium. Cook until light brown on all sides, about 3 minutes per side.
- Toss rice cakes with sauce. Garnish with sesame seeds and scallions.
Post link
SOBA NOODLES (Buckwheat noodles)
(From M/FoMT)
https://sweetandsavorymeals.com/soba-noodles-recipe/
Ingredients:
- 10 ounces soba noodles dry
- 3 tablespoons rice wine vinegar
- 1/3 cup soy sauce
- 2 tablespoons sesame oil
- 1 tablespoon brown sugar
- 2 cloves garlic minced
- 1 tablespoon ginger grated
- ¼ teaspoon red pepper flakes
- 2 tablespoons canola oil or peanut oil
- ¼ cup green onions thinly sliced
Garnish:
- Green onions
- 1 teaspoon sesame seeds
- Chopped peanuts
Directions:
- In a large pot of boiling water, cook noodles according to package instructions. Rinse under cold water, drain and set aside.
- In a small bowl, whisk together rice wine vinegar, soy sauce, sesame oil, brown sugar, garlic, red pepper flakes, and ginger.
- Place a large skillet over medium-high heat. Add the canola oil and heat until shimmering, once hot, add the chopped green onions. Cook, stirring, for about 30 seconds or until just softened.
- Add the soy sauce mixture and cook for 30 seconds.
- Add the noodles and toss until heated through.
- Garnish with the sesame seeds, green onions and chopped peanuts.
Post link
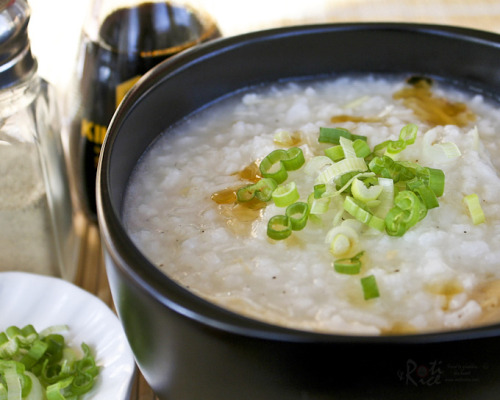
RICE PORRIDGE (Rice Gruel)
(From M/FoMT)
https://www.rotinrice.com/top-commenter-chinese-comfort-food-and-award/
Ingredients:
- 2 cups rice (400g)
- 10 cups water (2.4 liters), and a little more to dilute
- 2 bone-in chicken breasts (skin removed)
- Salt and pepper to taste
- 1 inch ginger (finely julienned) (30g)
- 3 green onions (finely sliced)
- Sesame oil
- Soy sauce
Directions:
- In a large pot, rinse rice till water runs clear, about 3 to 4 times, drain.
- Add 10 cups (2.4 liters) water to the rice and set it on the stove to boil. When water comes to boil, remove lid, add chicken breasts. As soon as water comes back to a boil, add salt and pepper and reduce heat to simmer for about 30 minutes. If porridge gets too thick at any point, stir in ½ cup (120ml) water to dilute.
- Remove chicken breasts from pot with tongs. Shred the chicken breasts and return shredded meat to the pot.
- Add ginger and one to two teaspoons of sesame oil to the porridge. Turn off heat.
- Serve immediately with a sprinkling of green onions, pepper, and soy sauce. Add a few drops of sesame oil if desired.
Post link
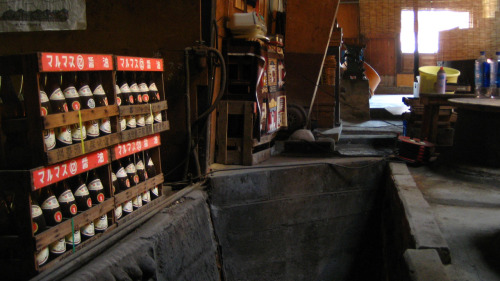
Soy sauce factory in Shioya, near Murakami
An old and splendid wood building in a small village near the sea. That place would be a wonderful setting for a comic, wouldn’t it?
“The soy sauce mystery”!
Post link
Spice Up Your Stir-Fry With Homemade Soy Sauce
Homemade soy sauce is easy to make and you can reap other edible delicacies, such as tofu or sprouts, during the process.
By R. Lewis Canupp-Penrod
Post link

