#vegetarian recipe
For the Base: You can use mini pita pockets, split english muffins, bought pizza bases, sliced baguette rounds, or make your own bases (which is less lazy than I’m usually feeling)
- Toppings:You can put whatever you like on these but this is the combination I like best
- Tomato paste (the cheap canned stuff is fine)
- Kalamata olives
- Sundried tomatoes
- Cherry tomatoes
- Onions
- Kale and/or spinach
- Fresh basil
- Garlic
- Oregano
- Dairy free cheese (plain hummus will also work nicely)
Method
- Spread tomato paste as thick or thin as you like on the bases.
- Slice/chop up everything except the cheese/hummus and sprinkle it over the bases. I like to really pile my pizzas up but do what works for you.
- Slice/grate the cheese and put it on top, or add a couple of good dollops of hummus.
- Cook in the oven at 180C (350F) until the cheese is melted and just starting to brown (or the hummus is just starting to brown)
- Eat
- Two cups pasta (I had wholemeal so that’s what I used but any pasta will do, gluten free, noodle, penne, spirals, whatever)
- A cup of almond milk (any non dairy milk is fine)
- Three tablespoons of flour (I used wholemeal wheat, but you could use rice, oat, or cornflour to make it gluten free)
- Half a cup of brewers yeast (nutritional or savoury yeast would work too)
- A pinch of salt
- A block of firm tofu (seitan would work too if you prefer it)
- A big handful of fresh chives (you could use dried as well, but you’ll need to simmer the sauce for longer and possibly adjust the amount)
- White or Apple Cider vinegar (could be swapped for lemon juice)
- A cube of veggie stock (optional)
- A splash of soy sauce (optional)
- A pinch of cumin seeds (optional)
- A few tablespoons of oil (I like to use the oil from sundried tomatoes but any vegetable oil is fine)
- A handful of pumpkin seeds (optional, you could swap for other nuts/seeds if you wanted)
- A handful of sunflower seeds (optional, you could swap for other nuts/seeds if you wanted)
- Olives (optional)
- Sun dried tomatoes (optional)
- Spinach, Kale, whatever vegetables you have spare would do fine, broccoli and cauliflower go surprisingly well in pasta dishes.
- Put the pasta on to boil. Traditionally you’d add a pinch of salt and a splash of oil, but I don’t usually bother. If you’re using wholemeal pasta like I did it’ll take a little longer to cook.
- Usually with tofu you’re supposed to press it to get the moisture out, but I’m lazy. Years ago I discovered if you freeze tofu and then thaw it (if you’re in a hurry you can defrost it in hot water), it becomes a lot more like a sponge and you can just squeeze the moisture out without any trouble. Cut or crumble the tofu into chunks however you like it, and throw them a frying pan with the cumin seeds and a splash of oil. I use a non stick frying pan but you can do without (it’ll just take more stirring).
- Fry the tofu much the same way you would fry onions for a few minutes, then crumble the veggie stock over the top, then add around a third of the brewers yeast, and a splash of soy sauce. Keep stirring.
- After a few minutes, or as soon as the stock and yeast start to stick or form clumps, add a splash of vinegar, this helps to deglaze the pan and adds a sharpness to the flavour. Keep stirring.
- Now add any vegetables, seeds, olives, etc to the mix, except the chives and keep stirring till the vegetables are cooked. Chunkier vegetables will take longer.
- Now, you can mix up the sauce in the pan with everything else or you can mix it up separately. I find it’s easier separate but it means one more container or pot to clean.
- Mix a couple of tablespoons of oil with the flour, add a splash of soy sauce, and a splash of vinegar, and a pinch of salt. Stir into a thick paste. Slowly add the almond milk, stirring as you go. If the sauce is still thick, add some more milk.
- Now add the chives and if you haven’t already, add the sauce to the pan, then drain the pasta (which should be done by now) and add that too. Lower the heat and let it simmer, stirring occasionally, for about ten minutes. If the sauce gets too thick in that time, add a bit more milk or even water. You’re looking for the flavour of the chives to spread out and mix with everything else. Add a bit more salt or vinegar if you think it needs it.
This mix should make enough to feed 2-4 people depending on how hungry they are. If you add a salad or bread or something it’ll stretch to six.
This week, I’m going to be making a quick and easy rice pudding dessert, recorded in a 14th century Neapolitan cookbook - the Cuoco Napoletano! Rice began being used in medieval Europe intensively around the 9th or 10th centuries AD - though evidence for it’s cultivation in the Eastern Mediterranean date back to Alexander the Great’s conquests into Asia.
In any case, let’s now take a quick look at The World That Was! Follow along with my YouTube video, above!
Ingredients (makes 4 portions)
2 cups rice
4 cups almond milk
1 cup sugar
saffron
Method
1 - Wash and Cook Rice
To begin with, we need to cook some rice. I used basmati rice, but Arborio or other, fatter-grained rice would have been used in antiquity as well! Begin by washing a couple of cups of rice in some cold water. Move the grains around with your hands, to get rid of excess starch. When the water runs clear, place your rice in a pot, and fill up with cold water until the rice is just about submerged.
Place your pot over a high heat until the water boils. Let everything cook until the rice is almost done - but not quite ready. Take it off the heat and let it cool down.
2 - Prepare Saffron
Next, rehydrate your saffron a little. Do this by letting it sit in some boiling water for a few minutes. Saffron is VERY expensive, so you can of course skip this step - it’s really only to add colour, and a slight woody taste - to the finished dish!
3 - Prepare the Milk
While your rice is cooling, go pour about 4 cups of almond milk into a saucepan, along with a cup’s worth of sugar. Bring this to a boil over a medium heat. The original recipe tells you how to make almond milk as well, by combining ground almonds with water. Keep your sugar and milk mixture stirring occasionally, while you wait for it to boil.
4 - Combine Ingredients
When the almond milk is at a rolling boil, turn the heat down to low and let it simmer away. Add in your cooled rice back into the pot, along with your rehydrated saffron! Mix everything together, and let it cook for another ten to twenty minutes. Or until your rice is lovely and soft, and stays in a soft mound when you pile it up with a spoon.
Serve up either warm or at room temperature, and dig in!
The finished dish is quite simple, yet very sweet! The three main ingredients - rice, almonds, and sugar - would have been readily available in many medieval Mediterranean markets - particularly in those markets at the conflux of trade routes, such as along the Italian coast.
The original recipe also mentions that other kinds of milk can be used when making this - such as goat milk. However, it neglects to mention that if you use those kinds of milk, stirring it when it’s coming to a boil could cause curds to form - making it more like a kind of cheese, rather than pudding.
Today, I’m making a quick and easy accompaniment to any medieval Irish meals you have planned - a bowl of praiseach (pronounced: prashock)! The basis of this is a simple savour porridge, that’s then flavoured with some sautéed mustard greens! Although wild mustard (charlock) greens are usually used, any suitably pungent edible greens can be used!
In any case, let’s now take a look at The World That Was! Follow along with my YouTube video, above!
Ingredients (for 4 portions)
Mustard Greens / Turnip Greens
2 cups oatmeal (or oat groats)
2 cups milk (or water)
butter
Method
1 - Prepare the Greens
To begin with, we need to chop some greens. Though praiseach is normally made using wild mustard (charlock), you can also use normal mustard greens, or even turnip greens (like I’m using here). They all have similar taste profiles - being pungent, slightly spicy greens - that react similarly when being cooked.
In any case, chop your greens finely, removing any untoward-looking leaves that escaped your prep-work.
2 - Sautee the Greens
When your greens of choice have been chopped to your liking, toss a knob of Irish butter into a pan, and let it melt. You can of course use local butter, I’m just totally not biased. When the butter has melted, toss in your chopped greens, and let everything sauté away over a medium heat for only a couple of minutes. Your greens may shrivel up, but this is normal! Take them off the heat when they’ve been coated in butter, and are lovely and fragrant.
3 - Prepare Praiseach
When your greens are cooling off, go start making your porridge base. Toss equal parts of oats and water (or milk, if you want to be fancy) into a pot, and place this over a medium-high heat. Keep stirring this so it doesn’t stick to the bottom of your pot.
While I used rolled oats here, which may have had a similar analogue in antiquity, whole oat groats would have been more commonly used (i.e. the whole, unhusked grains themselves, as opposed to the modern rolled, husked, and crushed grains used here). This would have had a higher fibre content than this dish.
When your oats have been cooked, but are still about 10 minutes from being served, toss in your cooked greens. Stir all of this together, and let it infuse for ten more minutes.
Serve up warm, in a bowl of your choice, and dig in!
The finished dish is quite thin and easy-going. It’s not overly flavourful, but has a nice background heat thanks to the mustard greens. By sautéing them, you cut the edge off the taste, and let it mellow out among the oats.
Oats are a wild grain, and can be grown in relatively poor-quality soils - such as those in parts of the midlands and west of Ireland - and as a result were seen as a “peasant grain” for much of the medieval period. Porridge is one of these peasant dishes that persist into the modern day, as it’s still a simple yet filling dish that can be altered with the addition of different ingredients!
As the autumn comes to a close, and the cold of winter sets in, I figured it’d be a great time to make a simple savoury treat from medieval Georgian cuisine - stuffed apples! Though savoury stuffed apples are commonly found in the Caucasus region, this isn’t exclusive to Georgia! Armenia, and parts of north-western Iran, western Turkey, and Azerbaijan also have regional variants of this dish!
In any case, let’s now take a look at the world that was! Follow along with my YouTube video, above! If you like what I make, consider supporting me on Patreon!
Ingredients (for 4 servings)
4 large tart cooking apples
honey
ground cinnamon
ground nutmeg
water
1 cup rice
butter
Method
1 - Prepare Apples
To begin with, we need to prepare our apples. Do this by slicing the top off of about 4 large apples, before carving out the middle - leave about a finger’s width of a wall.
Drizzle some honey in here, and sprinkle a little ground cinnamon inside. Honey was used in the civilisations of the Caucasus for millennia, and was an important part of many people’s diets in the medieval period.
2 - Prepare Filling
Next, pour a cup of rice into a bowl, and pour some water over this. Rinse the grains until the water runs clear. When it’s cleaned, keep the grains just about submerged, and bring the pot to a boil. Cook your rice for a few minutes until they fluff up. When they’re done, let them cool down a bit, before mixing in a handful of raisins or sultanas, along with some freshly-grated cinnamon, and some freshly grated nutmeg, or mace.
Both of these spices were commonly found in the kitchens of the region in the medieval period, thanks to Georgia’s proximity to the silk road and spice trade.
3 - Assemble Stuffed Apples
Take your hollowed apples, and fill them to the brink with your rice stuffing. Place a dollop of butter over this, before placing the lids of your apples back on top.
Place your apples onto a deep tray, and pour about a cup of water into this. If you want, you could add some more aromatics or spices in here - such as mint, rosemary, or cloves! Then put the tray into an oven preheated to 350F or 175C for about a half an hour, or until the apples puff up and turn golden.
Take your apples out, and serve up alongside some roast meat and vegetables! Spoon over some of the baking liquid, to rehydrate the rice a little too!
The apples are quite tart, but with a deliciously sweet undertone. The flesh is melt-in-your-mouth, and pairs very well with the texture of the fluffy rice. This pairs really well with roast lamb and pork, and is a fantastic (and easy) side-dish for any feast you’re preparing for!
Today, I’m going to be making a simple pulse and leaf salad present in ancient Cretan - and possibly wider Hellenic - culture! It’ still eaten today, in a modern dish called “palikaria” which is eaten in the Eastern Mediterranean around feast days. Although the modern version of this dish is associated with Christian religious festivals, its likely that it arose from pre-Christian practices!
In any case, let’s now take a look at the world that was! Follow along with my YouTube video, above! If you like my recipes, consider checking out my Patreon!
Ingredients
½ cup small broad beans
½ cup chickpeas
½ cup green lentils
1 tbsp salt
½ cup olive oil
½ cup red wine vinegar
parsley
arugula
sesame seeds
Method
1 - Soak Pulses
To begin with, we need to prepare our pulses. If you’re using dried pulses, soak these overnight in some water. If you’re using them canned, simply drain them.
Next, we need to wash these in salted water. Do this by placing into a pot, a half a cup of chickpeas, a half a cup of green lentils, and half a cup of broad beans (or butter beans, if you can’t get your hands on them) Pour in some water until the pulses are just submerged. Heat this slightly over a medium heat for a few minutes.
2 - Make Dressing
While your pulses are soaking together, go make your salad dressing. Although probably a more modern development, it’s not unlikely that a simple olive oil and wine vinegar dressing was made and used in antiquity.
In any case, quickly whisk together equal amounts of olive oil and red wine vinegar until it emulsifies into a smooth seasoning. Make sure to taste this and adjust to your preference.
3 - Toss Salad
Now, we need to drain our pulses, again. The ritual washing of things in salted water (such as sea water) was a common motif in contemporary Hellenic religious practices - and it’s likely that some food types were prepared in a similar manner (particularly dishes being prepared for a ritual)
Place a bed of your rocket (or arugula) leaves onto a plate, and spoon on a generous portion of your pulses. Drizzle with a bit of your dressing, and sprinkle a handful of sesame seeds onto the plate.
Serve up and dig in!
The finished dish is a simple yet filling meal, packed full of protein! The pulses used would have been available in antiquity, and archaeological records show that lentils, chickpeas, and broad beans were all cultivated in the Eastern Mediterranean since the Neolithic period - albeit in differing amounts, depending on the size of the settlement, and the quality of the soils.
This week, I’m going to be recreating a simple carrot and coriander soup that was popular in medieval French cuisine - the simple Potage de Crécy. Although I’m using orange carrots, which were rare in antiquity, carrots, parsnips, or any combination of these would work well here!
In any case, let’s now take a look at The World That Was! Follow along with my YouTube video, above! Check out my Patreon for some more recipes!
Ingredients (for 2-3 portions)
1 onion (or an equal volume to the amount of carrots) chopped
3 carrots (or an equal volume to the amount of onions) diced
2 cloves garlic
olive oil
ground coriander
500ml stock (e.g. chicken, vegetable, etc.)
Method
1 - Prepare and Cook Onion
To begin with, we need to peel and chop one whole onion. Onions of all kinds were a staple of most cuisines from the neolothic period to modernity, as they’re hardy, filling vegetables that have a multitude of uses. In any case, chop this into fine chunks, so they cook evenly. When this is done, toss some olive oil into a pot, and heat it up over a medium high heat.
When the oil is shimmering, toss a couple of crushed cloves of garlic into the oil, along with your onions. On top of this, sprinkle some salt, some freshly ground black pepper, and some freshly ground coriander. Put all of this back onto a medium high heat for a few minutes while you deal with your carrots.
2 - Prepare and Cook Carrots
Go peel a few carrots - aim for about an equal amount of carrots to onions. When they’re peeled, slice them into discs - making sure they’re all the same size, so they cook evenly. Although orange carrots were fairly rare in antiquity, they’re the dominant strain today. But remember that throwing in some parsnips or heriloom carrots wouldn’t hurt either!
When your carrots are prepared, add them to your onions when the pot smells lovely and fragrant, and the onions have turned translucent. On top of your carrots and onions, pour about 500ml of a soup stock of your choice. I went with chicken stock here, to add a more meaty background taste, but any stock would work well enough here!
3 - Cook
Place your pot over a high heat, and let it come to a boil. When it hits a rolling boil, turn the heat down to low and let it simmer away for about 30 minutes, or until a knife, when stabbed into a piece of carrot, comes out easily.
Serve up in a bowl of your choice, garnish with a little sprig of parsley or cilantro, and dig in!
The finished soup is rather sweet, thanks to the carrots and onions, and has a lovely zesty taste thanks to the coriander. The broth thickened up nicely, and the carrot chunks softened into a toothsome mouthful.
Today, I’ll be making a quick side-dish from Rome, as recorded by Apicius! He has a few ways of preparing mushrooms, but this is one of the more flavourful methods he shows us!
In any case, let’s now take a look at The World That Was! Follow along with my YouTube video, above! Consider checking out my Patreon page!
Ingredients
500g mushrooms (I used chestnut mushrooms)
2 tbsp red wine vinegar (or malt vinegar)
1 tbsp salt
1 tbsp pepper
fresh coriander or parsley
Method
1 - Chop the Mushrooms
This is a rather simple recipe, but to begin with, we need to prepare our mushrooms. I used chestnut mushrooms, sliced into thin segments, but button or Portobello mushrooms may also be similar to what was available in antiquity, along with edible morels. If you have smaller mushrooms, you can skip slicing these, and proceed with cooking them as is!
2 - Sauté Mushrooms
Into a hot pot, pour a generous amount of olive oil - enough to coat the base. On top of this, toss your mushrooms. Sprinkle this with a bit of salt to help draw the moisture out of the mushrooms, before placing the pot over a medium heat. Stir everything around gently, so the mushrooms sweat out their moisture. Depending on what mushrooms you use, this may result in them being crushed slightly. Sauté these for about 3 -5 minutes.
3 - Sauté other ingredients
When your fungal friends have taken on a bit of colour, toss in some fresh coriander, and some freshly-ground black pepper, and a couple of tablespoons of red wine vinegar, before stirring everything together and returning to the heat for another 3-5 minutes. Be careful not to burn your mushrooms!
4 - Serve!
When your mushrooms are cooked, take these out of the cooking liquid, and place them in a bowl. Put the liquid over a high heat and let it boil down and reduce into a sauce.
Pour the sauce over your mushrooms, and dig in with some bread!
The finished mushrooms are super tender and flavourful - the vinegar really amplifies their meaty texture. The chestnut mushrooms I used retained a little bite to them, which was a welcome sensation!
Although the original recipe states that you should remove the coriander when serving the mushrooms, I chose to leave a few of them in so the dish retains a little bit of colour. The vinegar doesn’t have a very sharp taste once the sauce has thickened and reduced, and gives the mushrooms a lovely dark glaze.
Bruschetta with Three Toppings
2 cups (12 oz./375 g) chopped tomatoes and/or quartered cherry tomatoes
4 cloves garlic, finely minced
1 Tbs. chopped fresh basil
Kosher salt and freshly ground pepper
Extra-virgin olive oil
3 Tbs. unsalted butter
1 lb. (500 g) cremini mushrooms, sliced
1 shallot, finely chopped
1⁄4 cup (2 fl. oz./60 ml) red wine vinegar
1 cup (8 fl. oz./250 ml) low-sodium beef broth
4 fresh thyme sprigs
Grilled Balsamic Onions (see below), chopped
1 tsp. chopped fresh sage
12 slices country-style bread, such as sourdough batard
¼ cup (1 oz./30 g) grated Parmesan cheese
1 lb. (500 g) fresh mozzarella cheese, cut into thin slices
http://blog.williams-sonoma.com/bruschetta-with-three-toppings-3/
Post link
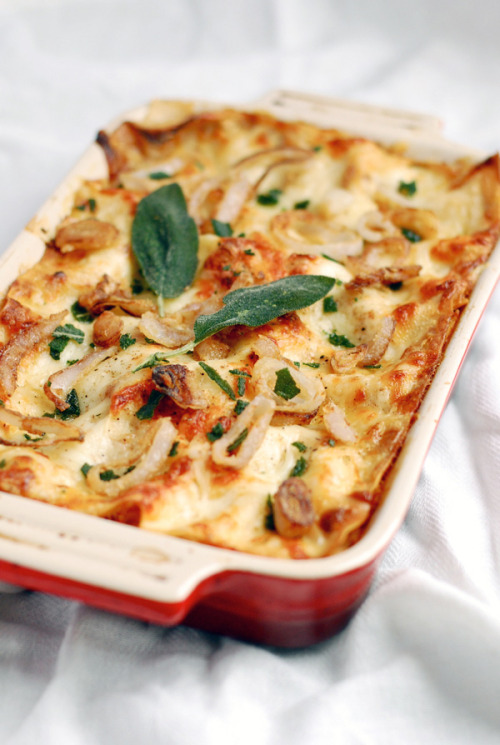
Roasted Squash Lasagne w. Sage & Shallots
for the roasted squash
1 kabocha squash, peeled, seeded, and cut into ¼ inch slices
3 tablespoons olive oil
pinch sea salt
fresh ground black pepper
Preheat the oven to 425 degrees. Lay the squash slices on a rimmed baking sheet, drizzle with olive oil, turn to coat, and sprinkle on the salt and pepper. Roast squash for 15 – 20 minutes, flipping halfway through, until the edges have browned and the squash is tender.
for the béchamel
6 tablespoons butter
1/3 cup unbleached all-purpose flour
2 cups whole milk, room temperature
2 cups heavy cream, room temperature
¼ teaspoon freshly grated nutmeg
½ teaspoon sea salt
http://www.brooklynsupper.net/2012/12/roasted-squash-lasagna-with-fried-sage-shallots/#.U5S8DssU_IU
Post link
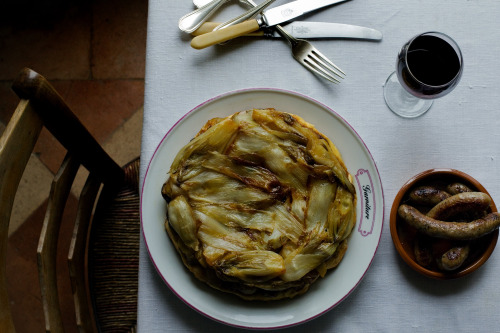
Endives Tarte Tatin
Ingredients:
6 endives (chicory)
2 small shallots (finely sliced)
1 clove garlic (ground)
6-8 small potatoes (cooked and sliced)
250 g/ ½ pound chestnuts (peeled, cooked & sliced in half)
5 topinambours/ Jerusalem artichokes (peeled and sliced in ‘rondelles’)
125 g/ 2/3 cup Sainte Maure de Touraine goat’s cheese (or any of your favourite cheese – one that will melt beautifully!)
2 tbsp brown sugar
40 g butter
Salt & pepper (for seasoning)
Pastry:
For the shortcrust pastry:
200 g/ 1 & ½ cup plain flour
125 g/ ½ cup unsalted butter, chilled and sliced in cubes
½ teaspoon salt
1 large egg
3 tbsp cold water
Post link
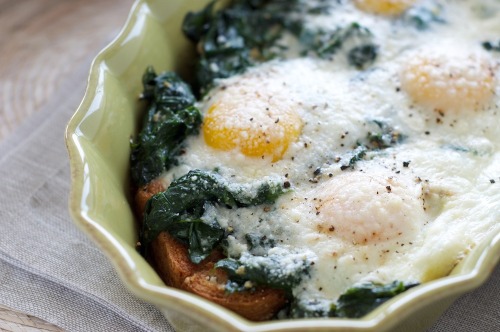
Baked Eggs w. Spinach & Brioche
2 tablespoons olive oil
- 1 clove garlic, minced
- 2 bunches spinach (about 1 ½ pound) washed
- Sea Salt and fresh ground pepper
- 2 tablespoons unsalted butter, + more for baking dish
- 8 slices brioche, cut ½ inch thick
- 12 large eggs
- ¼ cup creme fraiche (recipe below)
- 1 cup grated Parmigiono-Reggiano
http://pixelsandcrumbs.com/blog/2013/3/15/baked-eggs-with-spinach-brioche
Post link
Potato and Squash Terrine
Yum, this is so good and so easy. This is like a potato lasagna. I’ve made this and posted the recipe before, but was not happy with the pictures. So I remade it this week and took this photo. I might photograph it one more time with a different lighting situation.
This is an easy vegetarian main dish or a yummy side dish to go with fish or chicken or whatever protein you are into. It would be so good with ham. Potatoes and ham always go great together. I like this casserole because it’s mostly healthy, and uses end of summer veggies and herbs. And cheese! It has cheese! Yum, but it doesn’t have to. This could easily be a vegan dish if you don’t eat cheese, or you could use almond or cashew chz. I love cheese.
Here’s how to make this easy and delicious dish.
Heat oven to 400
Slice 2 -3 large portabella mushrooms, 1 golden squash, 1 eggplant, 3 or 4 tomatoes, 1 sweet onion, 2 shallots, and 4 or 5 red potatoes. Grill the eggplant and portabella mushrooms in a grill pan or just sear in a hot skillet. These are the only vegetables I pre-cook for this. I do it to sweeten the eggplant, and I sear the mushrooms because it takes a bit of the moisture from them, so the casserole doesn’t come out watery. It also gives them a nice texture. Wash basil. We have a ton of basil growing in our garden right now. It’s so good on so many things. I scrambled some into eggs the other day with a little parmesan and they were the best scrambled eggs ever.
Here’s how to make this potato veggie lasagna thingy:
Crush 4 garlic cloves. Whisk crushed garlic in a dish with a few tablespoons olive oil, salt and pepper, and ½ cup white wine.
Grate your favorite cheeses. I used parmesan, cheddar and a little mozzarella.
Layer the veggies one vegetable at a time, adding cheese, basil leaves and a tablespoon of the white wine dressing between layers. Season with an extra pinch of salt and pepper between potato layers. I use about 2 to 3 layers of potatoes in between the other veggies. It’s good to have an extra tomato layer in the middle too.
I try to make the top layer tomato with little onion on top and then a bit of cheese, that way you get a really flavorful crust. Make sure to save a little of the dressing for the very top layer.
Cover with parchment for the first 25 minutes or so of cooking so the cheese on top doesn’t cook faster than all those veggies. Bake for about 45 minutes total, uncovered at the end. Dress with a drizzle of good quality balsamic dressing. Yum!
Post link
Crispy Garlic Tofu Butter Lettuce Wraps
This was my lunch today. I shot this in the front window of our living room. I like the way the light works in this spot of our house. I’m definitely going to use this spot for more of my food photography portfolio, which I’m trying to build. I’m also trying to build my cooking skills. This was soo Yummy. This is a variation on my lunch yesterday, partly because yesterday’s crispy garlic tofu dish was so dang good that I wanted it again. But also party because I still had a bunch of the same ingredients leftover. And I needed to break into the hoisin sauce I didn’t use yesterday, to see what that would bring to the dish. It brought a lot of deliciousness, but hoisin is so salty. I’m glad I had the dipping sauce and fresh lime juice to cut through all that hoisiny saltiness. The addition of peanuts added a whole other level of flavor and crunch as well. The was quick to make, about ½ hour for everything.
For the garnishes: Wash and spin butter lettuce leaves, slice sugar snap peas, slice green scallions, peel, seed and slice cucumber, crush peanuts, slice limes.
Cook the crispy garlic tofu the same way I describe in the previous recipe.
Assemble the lettuce cups on the plate, add a tiny bit of hoisin to the bottom of each cup, (optional) fill with the crispy garlic tofu, garnish with all the veggies, peanuts, organic black sesame seeds, and fresh mint. Now you just fold them up and dip in the spicy dipping sauce. Yum!
For dipping sauce, combine 2 tbsp lemon or lime juice with 2 tbsp brown sugar, 1 fresh chopped chilies ( used a seeded jalapeño), add 1 tbsp fish sauce. Adjust for your own salt / sweet preference. I can’t wait to make this again.
Post link
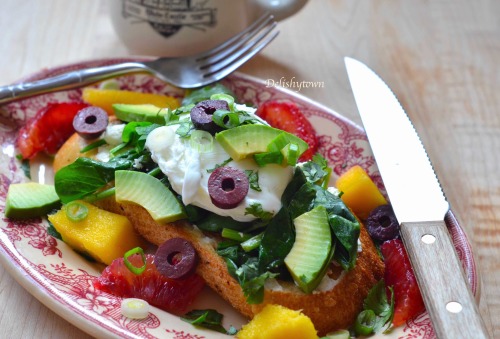
Poached Eggs on Spinach Avocado Cheese Toast with fresh fruit, olives and spring onions…
This was our delicious breakfast yesterday. It looks complicated, but it was easy and fresh. The most complicated part was taking a picture while hungry.
I’ve been going to the Farmer’s Market every week, and I’m trying to cook with more fresh, healthy ingredients/ less carbs / less fat. That being said, the vegetable cream cheese toast on the base of this dish is so good. You could just have that with eggs. But adding all sorts of fresh fruits & veggies gives this dish a crunchy flavor explosion, and way more nutrition. I love a delicious bite with the briny Kalamata olives, crispy toast and creamy salty spinach w/ feta and poached egg. Yum. I might have to make this for breakfast again today. Here’s how to make this delicious dish:
Start a pot of water boiling for poached eggs. You could make sunny side up, or any other style of egg if you don’t like poached. I cook the eggs at the end when I’m done with all the other prep.
Wash and saute a big handful of spinach in olive oil with a minced garlic clove, med low heat until fragrant and wilted. Salt and pepper, set aside to stop cooking. Sprinkle with feta cheese.
Slice olives, green onions, avocado, and whatever fruit you have. I used mangoes and blood oranges. Wash and chop cilantro.
By now your water is boiling, so add a splash of vinegar to the pot, use whatever vinegar you have, white, red wine, or whatever. Probably not balsamic, never tried it though. Stir the water in the pot to create a whirlpool, crack the first egg in, add any additional eggs. I do up to three at a time. Once the egg(s) is cooked but yolks are still soft, remove to a paper towel- lined plate with a slotted spoon.
Toast bread, I used sourdough. Spread the toast with vegetable cream cheese or goat cheese, any kind of spreadable cheese or none.
Compose the dish with toast on the bottom, cheese, avocados, wilted spinach, poached egg, sliced olives, cilantro and onion on top and fresh fruit all around. This would be awesome with hollandaise too. Yum!
Post link
Teriyaki Tofu and Mushrooms
Ingredients
- 2 packages (14 ounces each) firm tofu, sliced crosswise into 6 rectangles
- 3 tablespoons finely grated peeled fresh ginger
- ¼ cup soy sauce
- 1 tablespoon rice vinegar
- 1 tablespoon sugar
- 2 teaspoons cornstarch
- 2 tablespoons vegetable oil
- 8 ounces fresh shiitake mushrooms, stemmed and caps sliced ¼ inch thick (about 4 cups)
- 1 to 2 bunches watercress, stemmed (about 6 cups)
Instructions
- Arrange tofu in a single layer on a baking sheet lined with paper towels. Cover with more towels and another baking sheet; weight with a heavy skillet. Let drain until towels are soaked, about 15 minutes.
- Meanwhile, make teriyaki sauce: Place ginger in a fine strainer; press to release juices into a bowl. Whisk in soy sauce, vinegar, sugar, cornstarch, and 1 cup water.
- In a large nonstick skillet, heat 1 tablespoon oil over medium heat. Cook half the tofu until golden brown, 4 to 6 minutes per side. Transfer to a plate. Repeat with remaining tofu.
- Heat remaining tablespoon oil in same skillet over medium heat. Cook mushrooms, stirring often, until browned, about 5 minutes. Add teriyaki sauce; bring to a boil. Cook until thickened, about 1 minute. Return tofu to pan; toss gently to coat. Serve with watercress.
Post link
Manicotti
Prep Time: 45 mins
Cook Time: 60 mins
Ingredients
- 1 (10 ounce) package frozen spinach, thawed completely & squeezed dry
- 8 ounces shredded mozzarella cheese
- 15 ounces ricotta cheese
- 4 ounces cream cheese
- ½ cup shredded Romano or Parmesan cheese
- 2 large eggs
- ½ teaspoon salt
- ½ teaspoon freshly ground black pepper
- 1 box (12 to 14 shells) manicotti noodles
- 3 to 4 cups marinara sauce (1 jar + a little more)
- ½ cup shredded Romano or Parmesan cheese, for topping
Instructions
- Preheat oven to 350 degrees F.
- In a large bowl, mix spinach, cheeses, eggs, salt and pepper. Stir together until well blended.
- Place about 1 ½ cups of marinara sauce in a 9x13-inch pan. Spread it around to cover the bottom.
- Place the mixed filling into a plastic bag. You can use either a frosting piping bag or a gallon zip bag. Snip the corner, gather the top and squeeze the filling into the corner. Hold an uncooked manicotti shell in your hand and squeeze the filling inside the shell. Let it overflow on both sides. Place the filled shell into the sauce-lined pan. Repeat with remaining manicotti and fill the pan with the stuffed shells, until you run out of shells and filling. You should be able to fill 12 to 14 shells- if you run out of room in your pan, use a separate smaller pan to accommodate the extra.
- Cover the pasta with marinara sauce, using about 2 ½ cups of sauce. Sprinkle ½ cup Romano/Parmesan on top. At this point, you can cover with foil and refrigerate until you’re ready to bake, or you can cover with foil and place it in the oven immediately.
- Bake, covered with foil, 50 minutes. Remove foil and bake an additional 10 minutes.
Notes
- It’s perfectly okay to use low fat ricotta and low fat cream cheese.
- If you don’t wish to use the spinach, it’s ok to leave it out and just turn this into a cheese-stuffed manicotti.
- If you don’t wish to use the plastic bag method of squeezing the filling into the shells, you can use a very small spoon or fork to stuff the filling– it will just take a bit longer and might be a little messy.
Post link
Credit to the anon who told me abt this recipe!
Ingredients:
- Potatoes
- 1 small potato- 129 cals
- 1 medium potato- 161 cals
- 1 large potato- 279 cals
What you’ll need:
- An oven
- A silicon baking tray
- A knife
How to:
“All you have to do is cut potatoes into fries and bake them on the silicone mat in the oven for 30-40 minutes at 425 degrees. The silicone mat is essential because that’s what makes them crispy and not soggy without oil. As someone who wouldn’t eat fries because of the oil, this has made potatoes go from fear to safe food and has helped me eat a bit more.” -anon

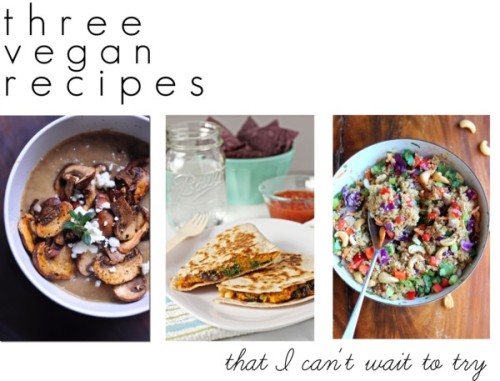
I would love to eat a cleaner, more plant-based diet but end up putting cheese and eggs on everything. These recipes look like I wouldn’t miss either of those ingredients one little bit. (Or maybe just a little bit, that would also work for me)
I say this, and then I get to the store and completely forget any plans I had thought about and just get by basics: sweet potatoes, kale, eggs, almond milk, yogurt, and apples. Like every time.
If anyone would like to share their favorite vegan/vegetarian/healthy recipes with me I am all ears!
Post link


